background image


29 


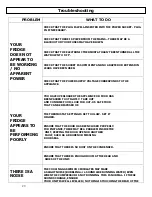
PROBLEM WHAT 

TO 

DO 


CHECK THAT THE PLUG IS WELL-INSERTED INTO THE POWER SOCKET.  PLUG 

IN IF NECESSARY. 


CHECK THAT THERE IS POWER FROM THE MAINS – THERE MAY BE A 

BLACKOUT OR YOUR FUSES MAY HAVE BLOWN. 


CHECK THAT THE ELECTRONIC THERMOSTAT HASN’T BEEN TURNED ALL THE 

WAY DOWN TO ‘OFF’. 


CHECK THAT THE SOCKET IS SUFFICIENT AND NO ADAPTER OR EXTENSION 

LEADS HAVE BEEN USED. 


YOUR 

FRIDGE 

DOES NOT 

APPEAR TO 

BE WORKING 
/ NO 
APPARENT 

POWER 


CHECK THAT THE POWER SUPPLY VOLTAGE CORRESPONDS TO THE 
APPLIANCE.  


YOU HAVE OVERLOADED THE APPLIANCE OR FOOD HAS 

BEEN PACKED TOO TIGHTLY.  TAKE OUT 

AND CONSUME FOOD; LOOK FOR OUT-OF-DATE FOOD 

THAT CAN BE DISPOSED OF.   


THE THERMOSTAT SETTING IS SET TOO LOW.  SET IT  

HIGHER.  


ENSURE THAT THE DOOR HAS BEEN CLOSED PROPERLY.   
FOR INSTANCE, THERE MAY BE A PROBLEM INSIDE THE 

 UNIT, KEEPING THE DOOR OPEN OR ANOTHER 

 FAULT, SUCH AS A BROKEN OR MISSING 

DOOR SEAL. 


ENSURE THAT THERE IS NO DUST ON THE CONDENSER. 


YOUR 
FRIDGE 
APPEARS TO 

BE 
PERFORMING 
POORLY  


ENSURE THAT THERE IS ENOUGH ROOM AT THE REAR AND 

 SIDES OF THE UNIT. 


THERE IS A 

NOISE 


THE COOLING GAS WHICH CIRCULATES MAY MAKE 

A SLIGHT NOISE (BUBBLING or a SOUND LIKE RUNNING WATER) EVEN 

WHEN THE COMPRESSOR IS NOT RUNNING.  THIS IS NORMAL.  IF THESE 

SOUNDS CHANGE, ENSURE: 


YOUR UNIT IS WELL LEVELLED / NOTHING IS TOUCHING THE REAR OF THE 

Troubleshooting 

Содержание BR22

Страница 1: ...BR26A Built in Combi Fridge Freezer...

Страница 2: ...REEZER NOTE This User Instruction Manual contains important information including safety installation points which will enable you to get the most out of your appliance Please keep it in a safe place...

Страница 3: ...6 USING YOUR FRIDGE 7 8 STORAGE GUIDE FOR YOUR FRIDGE FREEZER 9 15 CLEANING AND MAINTENANCE 16 17 DEFROSTING 18 19 INSTALLING YOUR FRIDGE FREEZER 20 FITTING THE D COR DOOR 23 24 LEVELLING YOUR FRIDGE...

Страница 4: ...k Reversible doors 2 General racks Dimensions mm H x W x D 1775 x 540 x 545 To fully enjoy using your appliance long into the future please firstly familiarise yourself with the specifications safety...

Страница 5: ...to come into contact with the elements Do not pull out or insert the plug with wet hands Before any cleaning or maintenance work ensure that the appliance has been disconnected from the power supply...

Страница 6: ...late at the rear wall Beneath this there is a channel and an outlet for defrosted water Never let this channel become clogged Use a plastic straw to clear away any dirt 3 CRISPER TRAYS SERVING TRAY Th...

Страница 7: ...n settle SITUATING YOUR FRIDGE FREEZER CAUTION DO NOT PLACE THE APPLIANCE NEAR HEAT SOURCES AND FOLLOW THE INSTALLATION ADVICE SHOWN ON PAGE 20 FOR FULL INSTALLATION ADVICE PLEASE SEE PAGE 20 MAKE A N...

Страница 8: ...0 C you should NOT leave your fridge on the maximum setting for long periods Settings 3 5 Use these mid settings for longer storage of food in the fridge mid coldness Settings below this will give a...

Страница 9: ...NCE IS TO BE INSTALLED o You switch your fridge OFF by turning the thermostat knob to position 0 NOTE When you first switch on the appliance allow 24 hours for it to cool down to the desired temperatu...

Страница 10: ...wet items before placing them in the appliance Make sure that you arrange food in such a way that the door can close completely Be especially wary of protruding items such as bottles between shelves...

Страница 11: ...dful of the storage life of foods you are going to be freezing for a long time Although the temperature of the freezer can dip to a very low level this does not mean that food can be stored indefinite...

Страница 12: ...etables with their stalks or roots facing towards the cold source you will be able to store them for longer The leaves on carrots turnips etc should be removed before you store them Always store eggs...

Страница 13: ...ature of your Fridge bearing the following in mind o Ambient temperature o How often the doors are opened and closed o Quantity of food stored in the compartments o Moisture content of what you place...

Страница 14: ...13 STORING FOOD IN YOUR REFRIGERATOR Remember to store food properly observing advice on the packaging STORAGE GUIDE FOR YOUR FRIDGE FREEZER The charts below are approximate guidelines only...

Страница 15: ...efore recommend that the size of the package not be too large It should also be sufficiently cooled at least to room temperature before being inserted in the freezer compartment The amount of fresh fo...

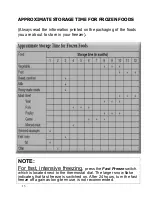
Страница 16: ...the foods you are about to store in your freezer NOTE For fast intensive freezing press the Fast Freeze switch which is located next to the thermostat dial The larger snow flake indicates that fast fr...

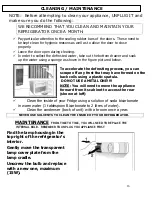
Страница 17: ...a bicarbonate in warm water 1 tablespoon Bicarbonate to 2 litres of water 9 Clean the condenser back of unit with a broom once a year NEVER USE SOLVENTS TO CLEAN THE INSIDE OF YOUR REFRIGERATOR Find t...

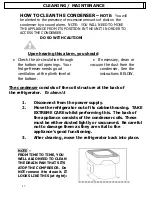
Страница 18: ...r See the instructions BELOW The condenser consists of the coil structure at the back of the refrigerator To clean it 1 Disconnect from the power supply 2 Move the refrigerator out of its cabinet hous...

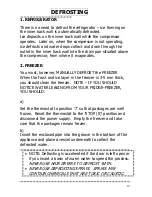
Страница 19: ...mm thick you should clean the freezer NOTE IF YOU SHOULD NOTICE WATER LEAKING FROM YOUR FRIDGE FREEZER YOU SHOULD a Set the thermostat to position 7 so that packages are well frozen Reset the thermos...

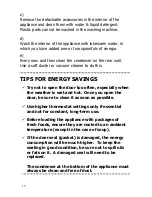
Страница 20: ...the door too often especially when the weather is wet and hot Once you open the door be sure to close it as soon as possible 9 Use higher thermostat settings only if essential and not for constant lon...

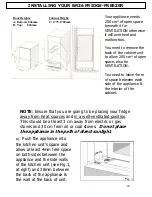
Страница 21: ...des between the appliance and the side walls of the kitchen unit see Fig 1 at right and 38mm between the back of the appliance the wall at the back of unit Your appliance needs 200 cm of open space be...

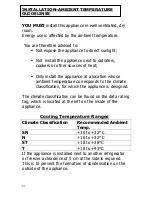
Страница 22: ...climate classification for which the appliance is designed The climate classification can be found on the data rating tag which is located at the left on the inside of the appliance Cooling Temperatur...

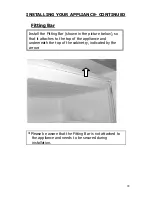
Страница 23: ...are that the Fitting Bar is not attached to the appliance and needs to be secured during installation Install the Fitting Bar shown in the picture below so that it attaches to the top of the appliance...

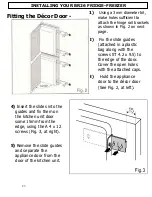
Страница 24: ...d cor door See Fig 2 at left 4 Insert the slides into the guides and fix them on the kitchen unit door some 15mm from the edge using the A 4 x 12 screws Fig 3 at right 5 Remove the slide guides and s...

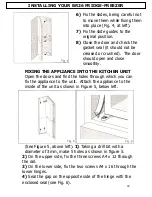
Страница 25: ...doors and find the holes through which you can fix the appliance to the unit Attach the appliance to the inside of the unit as shown in Figure 5 below left See Figure 5 above left 1 Taking a drill bit...

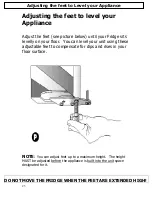
Страница 26: ...l your unit using these adjustable feet to compensate for dips and rises in your floor surface NOTE You can adjust feet up to a maximum height The height MUST be adjusted before the appliance is built...

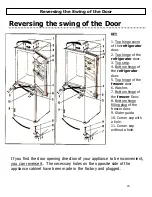
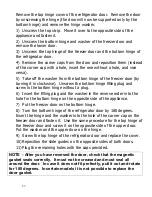
Страница 27: ...been made in the factory and plugged KEY 1 Top hinge cover of the refrigerator door 2 Top hinge of the refrigerator door 3 Top strip 4 Bottom hinge of the refrigerator door 5 Top hinge of the freezer...

Страница 28: ...sert the filling plug and the washer in the reverse order into the hole for the bottom hinge on the opposite side of the appliance 7 Put the freezer door on the bottom hinge 8 Turn the bottom hinge of...

Страница 29: ...door check that the magnetic gasket seals correctly It must NOT be creased or crushed so that there is a gap between it and the inside of the door It must also seal all around the door In case the sea...

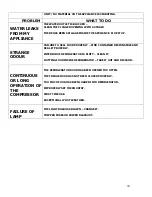
Страница 30: ...O TIGHTLY TAKE OUT AND CONSUME FOOD LOOK FOR OUT OF DATE FOOD THAT CAN BE DISPOSED OF THE THERMOSTAT SETTING IS SET TOO LOW SET IT HIGHER ENSURE THAT THE DOOR HAS BEEN CLOSED PROPERLY FOR INSTANCE THE...

Страница 31: ...INER RESPONSIBLE AND SEAL IT PROPERLY INTERIOR OF REFRIGERATOR IS DIRTY CLEAN IT ROTTING FOOD INSIDE REFRIGERATOR TAKE IT OUT AND DISCARD CONTINUOUS OR LONG OPERATION OF THE COMPRESSOR THE REFRIGERATO...

Страница 32: ...sued at the time of purchase This guarantee is transferable only with the written consent of Baumatic Ltd If the appliance fails and is considered either not repairable or uneconomical to repair betwe...

Страница 33: ...Kingdom Sales Telephone 44 118 933 6900 Sales Fax 44 118 931 0035 Service Telephone 44 118 933 6911 Service Fax 44 118 986 9124 Spares Telephone 44 118 933 6922 Technical Advice Telephone 44 118 933 6...

Страница 34: ......

Страница 35: ......

Страница 36: ...34...

Отзывы: