background image

58

59

ES

860

51

0

R 11

861

+1

0

51

1

+1 0

49

0

+1 0

840

+1

0

1.

5

R 12

74

1

3

2

4

2

1 - AUXILIAR
2 - SEMIRÁPIDO
3 - RÁPIDO
4 - TRIPLE CORONA

N.B. Para la versión Semifilotop 
la reducción en altura de 1,5 mm 
no es necesaria.

Fig. 8

1120

R 11

1121

+1

0

38

5

+1 0

36

5

+1 0

1100

+1

0

1.

5

R 12

74

38

4

1

3

4

2

1 - AUXILIAR
2 - SEMIRÁPIDO
3 - RÁPIDO
4 - TRIPLE CORONA

N.B. Para la versión Semifilotop 
la reducción en altura de 1,5 mm 
no es necesaria.

Fig. 9

Mod: 90 cm

Mod: 112 cm

Содержание BHG112SS

Страница 1: ...USER MANUAL FOR YOUR BHG112SS BHG770SS BHG630SS GAS HOB ...

Страница 2: ...e 15 26 TABLES DE CUISSON ÉLECTROGAZ FILOTOP TOUCH FR Installation Emploi Entretien 27 38 EINBAUKOCHGERÄT ELEKTRO FILOTOP TOUCH DE Installation Gebrauch Wartung 39 50 PLACA DE COCCIÓN ELECTROGAS FILOTOP TOUCH ES Instalación Uso Mantenimiento 51 62 MESAS DE ENCASTRAR ELECTROGÁS FILOTOP TOUCH PT Instalação Uso Manutenção 63 74 Contact details Page 75 ...

Страница 3: ...ENZE NECESSARIE SE NON SOTTO LA SUPERVISIONE O DIETRO ISTRUZIONI SULL USO DELL APPARECCHIO DA PARTE DI UNA PERSONA RESPONSABILE PER LA LORO SICUREZZA I BAMBINI DEVONO ESSERE CONTROLLATI PER ASSICURARSI CHE NON GIOCHINO CON L APPARECCHIO Caro Cliente sentitamente La ringraziamo e ci congratuliamo per la scelta da Lei fatta Questo nuovo prodotto accuratamente progettato e costruito con materiali di ...

Страница 4: ...spegnimento simultaneo di tutti i bruciatori è sufficiente premere brevemente il tasto ON OFF in questo modo il dispositivo si porterà in condizione di standby Programmazione del tempo di spegnimento di un bruciatore Con il dispositivo è possibile impostare in modo indipendente per ciascuno dei bruciatori un tempo oltre il quale il bruciatore si spegne automaticamente Per impostare la programmazio...

Страница 5: ...o il solo tasto KL per almeno 2 secondi Tutti i livelli dei bruciatori rimarranno al livello attuale Lo stato di tastiera bloccata si manifesta con l accensione dei punti decimali nei display del livello di portata relativi ad ogni bruciatore Durante il blocco della tastiera non è più possibile variare i livelli dei bruciatori o cambiare le impostazioni del timer ma è possibile in ogni caso spegne...

Страница 6: ...golazine Fuoco A Regolazine Fuoco B Regolazine Fuoco C Regolazine Fuoco D Regolazine Timer Accensione spegnimento Blocco Attivazione timer Regolazine Fuoco A Regolazine Fuoco B Regolazine Fuoco C Regolazine Fuoco D Regolazine Timer Accensione spegnimento Blocco Attivazione timer L accensione di un led indica l attivazione del fuoco corrispondente Un led lampeggiante indica l attivazione del timer ...

Страница 7: ... tenendo presente quanto segue le parti in vetro e acciaio devono essere pulite con prodotti idonei reperibili in commercio non abrasivi o corrosivi Evitare prodotti a base di cloro varechina ecc evitare di lasciare sul piano lavoro sostanze acide o alcaline aceto sale succo di limone ecc gli spartifiamma ed i coperchietti parti mobili del bruciatore vanno frequentemente lavati con acqua bollente ...

Страница 8: ...predisporre la guarnizione di tenuta su tutto il perimetro della foratura d incasso Le misure d incasso sono riportate nelle figure 6 7 8 9 Per i modelli Filotop è necesssario eseguire un abbassamento nella zona perimetrale del foro di incasso per una profondità di 1 5 mm Per i modelli Semifilotop tale fresatura non deve essere realizzata L installazione è realizzabile su materiali diversi quali a...

Страница 9: ...ifilotop l abbassamento di 1 5 mm non è necessario 1 AUSILIARIO 2 SEMIRAPIDO 3 RAPIDO 74 770 510 R 11 771 1 0 511 1 0 490 1 0 750 1 0 1 5 R 12 1 3 2 4 2 1 AUSILIARIO 2 SEMIRAPIDO 3 RAPIDO 4 TRIPLA CORONA N B Per versione Semifilotop l abbassamento di 1 5 mm non è necessario Fig 7 Mod 60 cm Mod 77 cm ...

Страница 10: ...4 TRIPLA CORONA N B Per versione Semifilotop l abbassamento di 1 5 mm non è necessario Fig 8 1120 R 11 1121 1 0 385 1 0 365 1 0 1100 1 0 1 5 R 12 74 384 1 3 4 2 1 AUSILIARIO 2 SEMIRAPIDO 3 RAPIDO 4 TRIPLA CORONA N B Per versione Semifilotop l abbassamento di 1 5 mm non è necessario Fig 9 Mod 90 cm Mod 112 cm ...

Страница 11: ...stallatore deve essere qualificato ed è responsabile del corretto collegamento elettrico e dell osservanza delle norme di sicurezza Prima di effettuare l allacciamento elettrico accertarsi che le caratteristiche dell impianto siano tali da soddisfare quanto indicato sulla targa matricola applicata sul fondo del piano l impianto sia munito di un efficace collegamento di terra secondo le norme e le ...

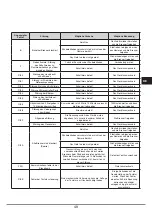
Страница 12: ...anto a questo punto sarà possibile premere il tasto PT per uscire dalla procedura oppure premere i tasti P o P per selezionare un altro bruciatore e impostarne la portata minima I livelli di portata minima vengono quindi acquisiti e memorizzati dal dispositivo e verranno utilizzati nel normale impiego del piano cottura Selezione del tipo di gas combustibile E possibile configurare il piano di cott...

Страница 13: ...5 volte in 15 minuti Attendere 15 minuti e poi effettuare l operazione di sblocco dei bruciatori Flt08 Anomalia nel circuito di alimentazione Guasto al circuito Sostituire il dispositivo Flt09 Anomalia generica E stata tolta tensione al dispositivo quando precedentemente si è verificato un altro tipo di guasto Effettuare l operazione di sblocco dei bruciatori Anomalia risonatore Guasto al circuito...

Страница 14: ...emirapido 101 1750 167 ausiliario 77 1000 95 corona 3 150 4000 381 Gas liquido G30 G31 28 30 37 rapido 87 3000 218 g h semirapido 66 1750 127 ausiliario 50 1000 73 corona 3 102 4000 291 Gas naturale G25 25 rapido 132 3000 332 l h semirapido 102 1750 194 ausiliario 80 1000 111 corona 3 160 4000 443 G20 10 rapido 155 3000 286 l h semirapido 117 1750 167 ausiliario 92 1000 95 corona 3 180 4000 381 ...

Страница 15: ... EXPERIENCE AND KNOWLEDGE UNLESS THEY HAVE BEEN GIVEN SUPERVISION OR INSTRUCTION CONCERNING USE OF THE APPLIANCE BY A PERSON RESPONSIBLE FOR THEIR SAFETY CHILDREN SHOULD BE SUPERVISED TO ENSURE THAT THEY DO NOT PLAY WITH THE APPLIANCE Dear customer We thank you and congratulate you on your choice This new carefully designed product manufactured with the highest quality materials has been carefully...

Страница 16: ... to indicate that burner A is currently selected for programming Use the P and P keys to select the timer of the burner to be programmed The selected burner is indicated by the flashing of its light The timer display shows 0 00 to indicate that the timer for the selected burner is not active To program the turn off time for the selected burner press the PT key again the timer display will show 0 0...

Страница 17: ...ock the keypad before unlocking the burners Unlocking the keypad To unlock the keypad press the KL key and the key of burner A for at least 2 seconds When the keypad is unlocked the decimal points in the level displays turn off Residual Heat When a burner goes out the relative display shows an H to indicate that the temperature of that burner is still high and the relative LED near the timer displ...

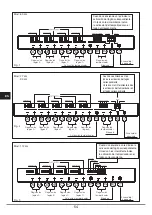
Страница 18: ... cm Setting burner A Setting burner B Setting burner C Setting burner D Timer setting Turning ON OFF Lock Time activation Setting burner A Setting burner B Setting burner C Setting burner D Timer setting Turning ON OFF Lock Time activation The lighting of an LED means that the function is active for that burner A flashing LED indicates that the timer of the relative burner has been activated The l...

Страница 19: ...on must take place periodically bearing in mind the following the glass and steel parts must be cleaned with suitable non abrasive or corrosive products found on the market Avoid chlorine base products bleach etc avoid leaving acid or alkaline substances on the working area vinegar salt lemonjuice etc the wall baffle and the small covers mobile parts of the burner must be washed frequently with bo...

Страница 20: ...fore installing the cook top install the gasket seal around the entire perimeter of the hole where it will be inserted The dimensions of the hole are shown in figures 6 7 8 9 For Filotop models the perimeter of the hole must be lowered by a depth of 1 5 mm The hole does not need to be milled for Semifilotop models The cook top can be installed on different materials such as brickwork steel marble ...

Страница 21: ...emifilotop models do not need to be lowered by 1 5 mm 1 AUXILIARY 2 SEMI RAPID 3 RAPID 74 770 510 R 11 771 1 0 511 1 0 490 1 0 750 1 0 1 5 R 12 1 3 2 4 2 1 AUXILIARY 2 SEMI RAPID 3 RAPID 4 TRIPLE CROWN Note Semifilotop models do not need to be lowered by 1 5 mm Fig 7 Mod 60 cm Mod 77 cm ...

Страница 22: ...PID 3 RAPID 4 TRIPLE CROWN Note Semifilotop models do not need to be lowered by 1 5 mm Fig 8 1120 R 11 1121 1 0 385 1 0 365 1 0 1100 1 0 1 5 R 12 74 384 1 3 4 2 1 AUXILIARY 2 SEMI RAPID 3 RAPID 4 TRIPLE CROWN Note Semifilotop models do not need to be lowered by 1 5 mm Fig 9 Mod 90 cm Mod 112 cm ...

Страница 23: ...ied and is responsible for correct electrical connections and following safety standards Prior to carrying out the electrical connection please ensure that the plant characteristics are such as to follow what is indicated on the matrix plate placed at the bottom of the working area that the plant is fitted with an efficient earth connection following the standards and law provisions in force The e...

Страница 24: ...m flow desired you must press the PT key MIN will remain displayed and no LEDs will flash so at this point you can press PT to exit the procedure or press the P or P keys to select another burner and set the minimum flow The minimum flow levels are then acquired and stored by the device and will be used during normal use of the cook top Selecting the type of fuel gas You can configure the cook top...

Страница 25: ...The burners have been unlocked 5 times in 15 minutes Wait 15 minutes before unlocking the burners Flt08 Power supply circuit anomaly Failure at the circuit Replace the device Flt09 Generic anomaly Power was cut to the device when another type of failure had occurred previously Unlock the burners Resonator anomaly Failure at the circuit Replace the device Flt0A All burners locked No gas Restore the...

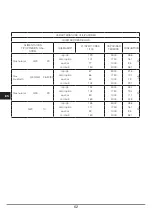
Страница 26: ...mifast 101 1750 167 auxiliary 77 1000 95 wok 3 150 4000 381 Liquefied gas G30 G31 28 30 37 fast 87 3000 218 g h semifast 66 1750 127 auxiliary 50 1000 73 wok 3 102 4000 291 Natural gas G25 25 fast 132 3000 332 l h semifast 102 1750 194 auxiliary 80 1000 111 wok 3 160 4000 443 G20 10 fast 155 3000 286 l h semifast 117 1750 167 auxiliary 92 1000 95 wok 3 180 4000 381 ...

Страница 27: ... SURVEILLANCE D UNE PERSONNE RESPONSABLE DE LEUR SÉCURITÉ OU APRÈS AVOIR REÇU DE CELLE CI LES INSTRUCTIONS RELATIVES À L UTILISATION DE L APPAREIL LES ENfANTS DOIVENT ÊTRE SURVEILLÉS AFIN DE S ASSURER QU ILS NE JOUENT PAS AVEC L APPAREIL Chère cliente merci et sincères félicitations pour le choix que vous avez fait Ce nouveau produit développé avec soin et fabriqué avec des matières de toute premi...

Страница 28: ...a touche ON OFF la table de cuisson se met ainsi en standby Programmation du temps d extinction d un brûleur Le dispositif permet de sélectionner indépendamment pour chaque brûleur un temps au delà duquel le brûleur s éteint automatiquement Pour sélectionner la programmation du temporisateur d un brûleur appuyer sur la touche PT Dans la zone du bandeau de commande où la position de chaque brûleur ...

Страница 29: ... se manifeste à travers l allumage des points décimaux sur l afficheur du niveau de portée relatif à chaque brûleur Durant le verrouillage du clavier il est impossible de modifier les niveaux des brûleurs ou les sélections du temporisateur mais on peut toutefois éteindre la table de cuisson en appuyant sur la touche ON OFF Il est impossible de débloquer un brûleur si le clavier est verrouillé Il f...

Страница 30: ...r A Réglage Foyer B Réglage Foyer C Réglage Foyer D Réglage Temporisateur Allumage extinction Verrouillage Activation temporisateur Réglage Foyer A Réglage Foyer B Réglage Foyer C Réglage Foyer D Réglage Temporisateur Allumage extinction Verrouillage Activation temporisateur L allumage d un voyant indique l activation du foyer correspondant Un voyant clignotant indique l activation du temporisateu...

Страница 31: ... et acier doivent etre nettoyées avec des produits appropriés faciles à trouver ans les magasins non abrasifs ni corrosifs Eviter les produits qui contiennent du chlore eau de Javel etc éviter de laisser sur la table de travail des substances acides ou alcalines vinaigre sel jus de citron etc les orifices du bruleûr et les chapeaux pièces mobiles du bruleur doivent etre frequemment lavés avec de l...

Страница 32: ...le joint d étanchéité sur tout le périmètre de l ouverture d encastrement Les dimensions d encastrement sont indiquées dans les figures 6 7 8 9 Pour les modèles Filotop réaliser un abaissement sur le périmètre de l ouverture d encastrement sur une profondeur de 1 5mm Ce fraisage n est pas nécessaire pour les modèles Semifilotop L installation est réalisable sur différents matériaux comme la acier ...

Страница 33: ... n est pas nécessaire pour la version Semifilotop 1 AUXILIAIRE 2 SEMI RAPIDE 3 RAPIDE 74 770 510 R 11 771 1 0 511 1 0 490 1 0 750 1 0 1 5 R 12 1 3 2 4 2 1 AUXILIAIRE 2 SEMI RAPIDE 3 RAPIDE 4 TRIPLE COURONNE N B L abaissement n est pas nécessaire pour la version Semifilotop Fig 7 Mod 60 cm Mod 77 cm ...

Страница 34: ...E 4 TRIPLE COURONNE N B L abaissement n est pas nécessaire pour la version Semifilotop Fig 8 1120 R 11 1121 1 0 385 1 0 365 1 0 1100 1 0 1 5 R 12 74 384 1 3 4 2 1 AUXILIAIRE 2 SEMI RAPIDE 3 RAPIDE 4 TRIPLE COURONNE N B L abaissement n est pas nécessaire pour la version Semifilotop Fig 9 Mod 90 cm Mod 112 cm ...

Страница 35: ...te leur longueur Branchement électrique Fig 11 L installateur doit être qualifié il est responsable du branchement électrique et du respect des normes de sécurité Avant d effectuerle branchement électrique s assurer que la tension de l installation électrique correspond au voltage indiqué sur la plaque signalétique appliquée au fond du plan l installation a une connexion de terre efficace suivant ...

Страница 36: ...ppuyer sur la touche PT pour quitter la procédure ou sur les touches P ou P pour sélectionner un autre brûleur et en régler le débit minimum Les niveaux du débit minimum sont ensuite saisis et mémorisés par le dispositif pour l utilisation normale de la table de cuisson Sélection du type de gaz combustible On peut configurer la table de cuisson pour qu elle fonctionne avec différents gaz voir tabl...

Страница 37: ...L opération de déverrouillage des brûleurs a été effectuée plus de 5 fois en l espace de 15 minutes Attendre 15 minutes puis débloquer les brûleurs Flt08 Anomalie sur le circuit d alimentation Défaut sur le circuit Remplacer le dispositif Flt09 Anomalie générique L appareil a été mis hors tension lors d un défaut précédent d un autre type Débloquer les brûleurs Anomalie résonateur Défaut sur le ci...

Страница 38: ...apide 101 1750 167 auxiliaires 77 1000 95 couronne 3 150 4000 381 Gaz liquéfié G30 G31 28 30 37 rapide 87 3000 218 g h semirapide 66 1750 127 auxiliaires 50 1000 73 couronne 3 102 4000 291 Gaz naturel G25 25 rapide 132 3000 332 l h semirapid 102 1750 194 auxiliaires 80 1000 111 couronne 3 160 4000 443 G20 10 rapide 155 3000 286 l h semirapide 117 1750 167 auxiliaires 92 1000 95 couronne 3 180 4000...

Страница 39: ...ISSE BENUTZT WERDEN ES SEI DENN DIES GESCHIEHT UNTER DER AUFSICHT ODER NACH UNTERWEISUNG IM GEBRAUCH DES GERÄTS DURCHEINER FÜR DERENSICHERHEIT VERANTWORTLICHEN PERSON KINDER SIND ZU BEAUFSICHTIGEN UM SICHERZUSTELLEN DASS SIE NICHT MIT DEM GERÄT SPIELEN Sehr geehrter Kunde wir danken Ihnen und beglückwünschen uns für Ihre Wahl Dieses neue Produkt sorgfältig entworfen und mit erstklassigen Materiali...

Страница 40: ...ese Weise geht das Gerät in Standby Programmierung der Ausschaltzeit eines Brenners Mit dem Gerät ist es möglich für jeden Brenner unabhängig eine Zeit einzustellen nach deren Ablauf der Brenner sich automatisch ausschaltet Um die Programmierung der Zeitschaltuhr eines Brenners einzustellen muss die Taste PT gedrückt werden Auf dem Teil der Steuertafel auf der die Position jedes Brenners mit einer...

Страница 41: ...ktuellen Niveau blockiert Der Zustand der Tastaursperre wird durch Aufleuchten der Kommas in den Durchsatzmengen Displays angezeigt Während der Tastatursperre kann die Brennerstufe nicht verändert und auch nicht die Einstellungen der Zeitschaltuhr verändert werden Die Kochmulde kann in jedem Fall durch Drücken der EIN AUS Taste ausgeschaltet werden Ein blockierter Brenner kann nicht freigegeben we...

Страница 42: ...g Kochstelle B Einstellung Kochstelle C Einstellung Kochstelle D Einstellen der Zeitschaltuhr Ein Ausschalten Sperre Aktivierung der Zeitschaltuhr Einstellung Kochstelle A Einstellung Kochstelle B Einstellung Kochstelle C Einstellung Kochstelle D Einstellen der Zeitschaltuhr Ein Ausschalten Sperre Aktivierung der Zeitschaltuhr Das Leuchten einer LED weist auf die Aktivierung der entsprechenden Fun...

Страница 43: ... des Geräts muß es unbedingt regelmäßig gründlich gereinigt wer den Dazu folgendes beachten Die Teile aus Glas und Stahl müssen mit milden im Handel erhältlichen Mitteln gesäubert werden Verwenden Sie auf keinen Fall chlorhaltige Mittel Bleichmittel usw Lassen Sie keine säurehaltigen oder alkalischen Speisereste Essig Zitronensaft usw auf der Arbeitsfläche Die losen Teile der Brennstellen müssen i...

Страница 44: ...er Mulde die Dichtung auf dem gesamten Umfang der Einbauöffnung anbringen Die Einbaumaße sind in den Abbildungen 6 7 8 9 zu sehen Bei den Modellen Filotop die also bündig zur Arbeitsfläche eingebaut werden muss der Außenrand der Einbauöffnung um 1 5 mm tiefer gelegt werden Bei den Modellen Semifilotop leicht überstehend muss diese Fräsung nicht ausgeführt werden Der Einbau kann in verschiedene Wer...

Страница 45: ...rlegen von 1 5 mm nicht erforderlich 1 SPARBRENNER 2 VARIO BRENNER 3 STARKBRENNER 74 770 510 R 11 771 1 0 511 1 0 490 1 0 750 1 0 1 5 R 12 1 3 2 4 2 1 SPARBRENNER 2 VARIO BRENNER 3 STARKBRENNER 4 DREIFACHKRANZ CORONA Bitte beachten Bei der Version Semifilotop ist ein Tieferlegen von 1 5 mm nicht erforderlich a Abb 7 Mod 60 cm Mod 77 cm ...

Страница 46: ...beachten Bei der Version Semifilotop ist ein Tieferlegen von 1 5 mm nicht erforderlich Abb 8 1120 R 11 1121 1 0 385 1 0 365 1 0 1100 1 0 1 5 R 12 74 384 1 3 4 2 1 SPARBRENNER 2 VARIO BRENNER 3 STARKBRENNER 4 DREIFACHKRANZ CORONA Bitte beachten Bei der Version Semifilotop ist ein Tieferlegen von 1 5 mm nicht erforderlich Abb 9 Mod 90 cm Mod 112 cm ...

Страница 47: ...trolliert werden können Elektroanschluß Fig 11 Der Installateur muss qualifiziert sein und haftet für den korrekten Stromanschluss und die Einhaltung der Sicherheitsvorschriften Bevor der Elektroanschluß hergestellt wird versichern Sie sich ob die Merkmale der Anlage den Angaben des Kenndatenschilds an der Unterseite der Kochfläche entsprechen ob die Anlage selbst nach den gesetz ichen Vorschrifte...

Страница 48: ...menge zu bestätigen die Taste PT drücken Die Schrift MIN bleibt weiterhin zu sehen und keine LED blinkt weshalb jetzt die Taste PT gedrückt werden kann um das Verfahren zu verlassen oder aber die Tasten P oder P drücken um einen anderen Brenner auszuwählen und die Mindestmengeeinzustellen DieMindestdurchsatzmengen werden dann vom Gerät erfasst und gespeichert und beim normalen Gebrauch der Kochmul...

Страница 49: ...5 Mal in 15 Minuten versucht die Brenner freizugeben 15 Minuten warten und dann die Brenner freigeben Flt08 Störung des Versorgungs stromkreises Stromkreis defekt Das Gerät auswechseln Flt09 Allgemeine Störung Die Spannungszufuhr des Geräts wurde abgetrennt als zuvor ein anderer Schaden eingetreten ist Die Brenner freigeben Störung des Resonators Schaltkreis defekt Das Gerät auswechseln Flt0A Alle...

Страница 50: ...ell 101 1750 167 hilfsbrenner 77 1000 95 wok 3 150 4000 381 Flüssiggas G30 G31 28 30 37 schnell 87 3000 218 g h halbschnell 66 1750 127 hilfsbrenner 50 1000 73 wok 3 102 4000 291 Naturgas G25 25 schnell 132 3000 332 l h halbschnell 102 1750 194 hilfsbrenner 80 1000 111 wok 3 160 4000 443 G20 10 schnell 155 3000 286 l h halbschnell 117 1750 167 hilfsbrenner 92 1000 95 wok 3 180 4000 381 ...

Страница 51: ...S NECESARIOS A MENOS QUE ESTÉN BAJO LA SUPERVISIÓN DE UNA PERSONA RESPONSABLE DE SU SEGURIDAD O HAYAN RECIBIDO LAS INSTRUCCIONES NECESARIAS SOBRE LA UTILIZACIÓN DEL APARATO LOS NIÑOS TIENEN QUE ESTAR CONTROLADOS PARA ASEGURARSE DE QUE NO JUEGAN CON EL APARATO Estimado Cliente le agradecemos mucho y le felicitamos por su elección Este nuevo producto cuidadosamente estudiado y construido con materia...

Страница 52: ...pagar todos los quemadores Para obtener el apagado simultáneo de todos los quemadores es suficiente pulsar brevemente la tecla ON OFF de esta forma el dispositivo se situará en condición de standby Programar el tiempo de apagado de un quemador Con el dispositivo es posible configurar de forma independiente para cada uno de los quemadores un tiempo más allá del cual el quemador se apaga de forma au...

Страница 53: ...5 minutos Bloquear el teclado Se activa pulsando la tecla KL durante por lo menos 2 segundos Todos los niveles de los quemadores permanecerán en el nivel actual El estado del teclado bloqueado se manifiesta con el encendido de los puntos decimales en los display del nivel de caudal de cada quemador Durante el bloqueo del teclado ya no es posible variar los niveles de los quemadores o cambiar las c...

Страница 54: ...A Regulación fogón B Regulación fogón C Regulación fogón D Regulación temporizador Encendido apagado Bloqueo Activación temporizador Regulación fogón A Regulación fogón B Regulación fogón C Regulación fogón D Regulación temporizador Encendido apagado Bloqueo Activación temporizador Cuando se enciende un led indica la activación del fogón correspondiente Un led con luz intermitente indica la activa...

Страница 55: ...adas tienen que ser limpiadas con productos idóneos que se pueden encontrar a la venta no abrasivos ni corrosivos Eviten productos a base de cloro lejía de algas ecc eviten dejar sobre el tablero de trabajo substancias ácidas o alcalinas vinagre sal zumo de limón ecc los rompellamas y las tapaderas partes movibles del quemador tienen que ser lavados a menudo con agua muy caliente y detergente teni...

Страница 56: ... guarnición de estanqueidad en todo el perímetro de la perforación del empotrado Las medidas de empotrado aparecen en las figuras 6 7 8 9 Para los modelos Filotop es necesario efectuar una reducción en altura en la zona perimetral del orificio de empotrado de 1 5 mm de profundidad Para los modelos Semifilotop este fresado no de tiene que efectuar La instalación se puede realizar sobre materiales d...

Страница 57: ...otop la reducción en altura de 1 5 mm no es necesaria 1 AUXILIAR 2 SEMIRÁPIDO 3 RÁPIDO 74 770 510 R 11 771 1 0 511 1 0 490 1 0 750 1 0 1 5 R 12 1 3 2 4 2 1 AUXILIAR 2 SEMIRÁPIDO 3 RÁPIDO 4 TRIPLE CORONA N B Para la versión Semifilotop la reducción en altura de 1 5 mm no es necesaria Fig 7 Mod 60 cm Mod 77 cm ...

Страница 58: ...ORONA N B Para la versión Semifilotop la reducción en altura de 1 5 mm no es necesaria Fig 8 1120 R 11 1121 1 0 385 1 0 365 1 0 1100 1 0 1 5 R 12 74 384 1 3 4 2 1 AUXILIAR 2 SEMIRÁPIDO 3 RÁPIDO 4 TRIPLE CORONA N B Para la versión Semifilotop la reducción en altura de 1 5 mm no es necesaria Fig 9 Mod 90 cm Mod 112 cm ...

Страница 59: ...que ser cualificado y es responsable tanto de la correcta conexión eléctrica como del cumplimiento de las normas de seguridad Antes de efectuar la conexión eléctrica comprobar que las características de la instalación satisfagan cunato indicado en la placa matrícula colocada sobre el fondo de la superficie de cocción que la instalación tenga una eficaz conexión de tierra según las normas y las pre...

Страница 60: ...padeará por lo tanto ahora será posible pulsar la tecla PT para salir del procedimiento o pulsar las teclas P o P para seleccionar otro quemador y configurar el caudal mínimo Por lo tanto el dispositivo adquiere los niveles di caudal mínimo y los memoriza se utilizarán en el uso normal de la placa de cocción Selección del tipo de gas combustible Es posible configurar la placa de cocción para el fu...

Страница 61: ...n 15 minutos Esperar 15 minutos y luego efectuar la operación de desbloqueo de los quemadores Flt08 Anomalía en el circuito de alimentación Avería en el circuito Sustituir el dispositivo Flt09 Anomalía genérica Se ha sacado tensión al dispositivo cuando previamente se ha comprobado otro tipo de avería Efectuar la operación de desbloqueo de los quemadores Anomalía resonador Avería en el circuito Su...

Страница 62: ...semiràpido 101 1750 167 auxiliar 77 1000 95 corona 3 150 4000 381 Gas licuefacto G30 G31 28 30 37 ràpido 87 3000 218 g h semiràpido 66 1750 127 auxiliar 50 1000 73 corona 3 102 4000 291 Gas natural G25 25 ràpido 132 3000 332 l h semiràpido 102 1750 194 auxiliar 80 1000 111 corona 3 160 4000 443 G20 10 ràpido 155 3000 286 l h semiràpido 117 1750 167 auxiliar 92 1000 95 corona 3 180 4000 381 ...

Страница 63: ... SEJAM SUPERVISIONADAS E INSTRUÍDAS SOBRE O USO DO APARELHO POR UMA PESSOA RESPONSÁVEL PELA SEGURANÇA DAS MESMAS AS CRIANÇAS DEVEM SER CONTROLADAS PARA CONTROLADAS PARA SE TER CERTEZA DE QUE NÃO BRINQUEM COM O APARELhO Ex mo Sr Cliente Agradecemos muito sinceramente a sua escolha e aproveitamos da ocasião para o felicitar Este novo produto que foi projectado com grande atenção e construído com os ...

Страница 64: ...os queimadores Para apagar simultaneamente todos os queimadores basta premir brevemente a tecla ON OFF desta maneira o dispositivo ficará em condição de stand by Programação do tempo de apagamento de um queimador Com o dispositivo é possível programar de modo independente para cada um dos queimadores um tempo além do qual o queimador apaga se automaticamente Para programar o temporizador de um que...

Страница 65: ...e os seguintes 15 minutos Bloqueio do teclado Activa se premindo só a tecla KL pelo menos por 2 segundos Todos os níveis dos queimadores permanecerão no nível actual O estado de teclado bloqueado é assinalado com o acendimento de pontos decimais nos displays do nível de caudal relativos a cada queimador Durante o bloqueio do teclado não é mais possível modificar os níveis dos queimadores ou mudar ...

Страница 66: ... do fogo A Regulação do fogo B Regulação do fogo C Regulação do fogo D Regulação do temporizador Acendimento apagamento Bloqueio Activação do temporizador Regulação do fogo A Regulação do fogo B Regulação do fogo C Regulação do fogo D Regulação do temporizador Acendimento apagamento Bloqueio Activação do temporizador O acendimento de um led indica a activação do fogo correspondente Um led intermit...

Страница 67: ...m vidro aço e ou esmaltadas terão de ser limpas com produtos apropriados que se encontram no comércio e que não sejam nem abrasivos nem corrosivos Evite de usar produtos om base de cloro substâncias para branquear etc evite de deixar substâncias ácidas ou alcalinas vinagre sal sumo de limão etc sobre a chapa de trabalho os bicos de gás e as pequenas tampas partes móveis do queimador têm de ser lav...

Страница 68: ...o prepare a guarnição de vedação ao redor de todo o perímetro da abertura do encaixe As medidas de encaixe estão indicadas nas figuras 6 7 8 9 Para os modelos Filotop é necessário realizar um abaixamento na zona perimetral da abertura de encaixe por uma profundidade de 1 5 mm Para os modelos Semifilotop esse abaixamento não deve ser realizado A instalação pode ser realizada em vários materiais tai...

Страница 69: ...op não é necessário realizar o abaixamento de 1 5 mm 1 AUXILIAR 2 SEMI RÁPIDO 3 RÁPIDO 74 770 510 R 11 771 1 0 511 1 0 490 1 0 750 1 0 1 5 R 12 1 3 2 4 2 1 AUXILIAR 2 SEMI RÁPIDO 3 RÁPIDO 4 TRIPLA COROA NOTA para a versão Semifilotop não é necessário realizar o abaixamento de 1 5 mm Fig 7 Mod 60 cm Mod 77 cm ...

Страница 70: ...COROA NOTA para a versão Semifilotop não é necessário realizar o abaixamento de 1 5 mm Fig 8 1120 R 11 1121 1 0 385 1 0 365 1 0 1100 1 0 1 5 R 12 74 384 1 3 4 2 1 AUXILIAR 2 SEMI RÁPIDO 3 RÁPIDO 4 TRIPLA COROA NOTA para a versão Semifilotop não é necessário realizar o abaixamento de 1 5 mm Fig 9 Mod 90 cm Mod 112 cm ...

Страница 71: ...dor deve ser qualificado e é responsável pela correcta ligação eléctrica e respeito das normas de segurança Antes de efectuar a conexão eléctrica será preciso assegurar que as características da instalação sigam o que está indicado sobre a chapa da matriz aplicada no fundo da chapa de cozimento a instalação esteja munida de uma conexão à ter ra eficaz segundo as normas e disposições das leis em vi...

Страница 72: ...presente e nenhum led piscará portanto a este ponto será possível premir a tecla PT para sair do procedimento ou premir as teclas P ou P para seleccionar outro queimador e programar o caudal mínimo Portanto os níveis de caudal mínimo são obtidos e memorizados pelo dispositivo e serão utilizados durante o emprego normal do plano de cozedura Selecção do tipo de gás combustível É possível configurar ...

Страница 73: ... Foi realizada a operação de desbloqueio dos queimadores mais de 5 vezes em 15 minutos Aguardar 15 minutos e depois realizar a operação de desbloqueio dos queimadores Flt08 Anomalia no circuito de alimentação Avaria no circuito Substituir o dispositivo Flt09 Anomalia genérica Foi cortada a tensão no dispositivo quando precedentemente verificou se outro tipo de avaria Realizar a operação de desbloq...

Страница 74: ...semi ràpido 101 1750 167 auxiliar 77 1000 95 coroa 3 150 4000 381 Gás licuefeito G30 G31 28 30 37 ràpido 87 3000 218 g h semi ràpido 66 1750 127 auxiliar 50 1000 73 coroa 3 102 4000 291 Gás natural G25 25 ràpido 132 3000 332 l h semi ràpido 102 1750 194 auxiliar 80 1000 111 coroa 3 160 4000 443 G20 10 ràpido 155 3000 286 l h semi ràpido 117 1750 167 auxiliar 92 1000 95 coroa 3 180 4000 381 ...

Страница 75: ...w facebook com baumatic uk Republic of Ireland Service Telephone 1 890 812 724 Spares Telephone 091 756 771 Czech Republic Baumatic CR spol s r o Lípovà 665 460 01 Liberec 4 Czech Republic 420 483 577 200 www baumatic cz Slovakia Baumatic Slovakia s r o Panenská 34 811 03 Bratislava Staré Mesto Slovakia 421 255 640 618 www baumatic sk Germany Baumatic Gmbh Bachstr 10 12 D 32 257 Bünde Deutschland ...

Страница 76: ...40 ...

Отзывы: