Baumalight Splinter RSX380 Скачать руководство пользователя страница 18

7 WARRANTY

This product is warranted to be free of defects in materials and workmanship under normal use and 

service, for a period of one year from the date of purchase, when operated and maintained in accordance 

with the Operating and Maintenance Instructions supplied with this unit. This warranty does not cover 

misuse or negligence.

Under no circumstances will the manufacturer be liable for any consequential damage or expense of any 

kind, including loss of profits. The manufacturer is under no circumstances liable for excavator damage 

of any kind. The manufacturer is not liable for the maintenance of the product.

This warranty is extended only to the original purchaser. Warranty is void if repairs are attempted by 

anyone other than an Authorized Service Center.

If a difficulty develops with the product, you should contact your nearest Authorized Repair Center, or 

distributor. Only these locations are authorized to make repairs to the product or affect the replacement of 

defective parts, which will be done at no charge within a reasonable time after the receipt of the product.  

Units or parts should be returned at the customer’s expense to the nearest repair location or Authorized 

Service Center. Pack unit in a strong carton and pad tightly to avoid damage. Damage in-transit is not 

covered by warranty. Include original purchase receipt with any claim (keeping a copy for your files).

The Manufacturer’s Liability  is limited to repair of the product and/or replacement of parts and is given to 

the purchaser in lieu of all other remedies including incidental and consequential charges. There are no 

warranties, expressed or implied other than those specified herein. For the nearest Authorized Service 

Center call the manufacturer.

Please note the following details and file this information in an appropriate place.

Model Number: ___________     S/N:_______________

Date of Purchase: _____________     Owner’s Name__________________________________ 

16

Содержание Splinter RSX380

Страница 1: ...SPLINTER WOOD SPLITTER PLANER RSX380 RSX580 RSX780 OPERATOR S MANUAL Issue Date October 2018...

Страница 2: ...tach Splinter Safely 4 Hazards From Modifying Equipment 4 2 3 Maintenance Hazards 5 3 SAFETY SIGNS 6 4 OPERATION 8 4 1 Preparation For Use 8 4 2 Hydraulic Connections 8 4 3 Machine Components 9 4 4 At...

Страница 3: ...or or the factory if you need assistance information or additional copies of the manuals OPERATOR ORIENTATION The directions left right front and rear as mentioned throughout this manual are as seen f...

Страница 4: ...avoided could result in minor or moderate injury NOTICE NOTICE Indicates a situation that could result in damage to the equipment or other property 2 1 Safety Alert Symbol And Safety Words 2 2 Operati...

Страница 5: ...eep your equipment in proper working condition Know the regulations and laws that apply to you and your industry This manual is not to replace any regulations or laws Additional information may be fou...

Страница 6: ...wer lines Electrocution can occur without direct contact Check clearance before raising equipment Have local utilities locate and mark under ground wires cables pipelines and other hazards before oper...

Страница 7: ...teria fungi or molds 2 3 Maintenance Hazards Before servicing park machine on a firm and level surface set parking brake and place a Do Not Operate tag on control panel Read and understand this manual...

Страница 8: ...3 SAFETY SIGNS The RSX580 is shown below The RSX380 and RSX780 are similar A B C C 6...

Страница 9: ...A MTB 175 Safety Sign C MTB 183 Safety Sign B MTB 182 Safety Sign unsafe 7...

Страница 10: ...Review all excavator pre start instructions and verify that all recommended steps and procedures have been followed 4 OPERATION 4 1 Preparation For Use 4 2 Hydraulic Connections WARNING Pressurized f...

Страница 11: ...nd Splinter 1 Read and follow all safety instructions 2 Attach excavator to Splinter See excavator operator s manual 3 Connect hydraulic hoses Verify hydraulic hoses are clear of pinch areas and movin...

Страница 12: ...nd 3 Engage parking brake 4 Shut off engine and remove key 1 Attach splitter screw or planer to gearbox Splitter Screw Planer 4 5 Transporting 1 Verify all reflectors and Slow Moving Vehicle SMV sign...

Страница 13: ...machine thoroughly before service or maintenance procedures The health effects from exposure to wood dust are due to chemicals or chemical substances in the wood created by bacteria fungi or molds In...

Страница 14: ...When positioning the planer on a stump that is larger than the large blade diameter It is important to begin cutting from one side rather than center Begin at one side shearing down to the desired le...

Страница 15: ...raulic hoses 5 Detach excavator from Splinter See excavator Operator s Manual 6 Move around the perimeter ensuring that there are no outer ridges being left behind 7 Once the center area is smaller th...

Страница 16: ...the motor shaft seal is designed to fail if case pressure exceeds 100 psi 689 kPa If motor shaft seal A has failed verify case drain line is free flow to sump or reservoir Also check drain line for bl...

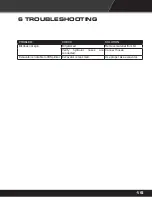
Страница 17: ...PROBLEM CHECK SOLUTION Bit does not spin Bit jammed Remove material from bit Verify hydraulic hoses are connected Connect hoses Excavator is not able to lift Splinter Excavator is too small Use proper...

Страница 18: ...tributor Only these locations are authorized to make repairs to the product or affect the replacement of defective parts which will be done at no charge within a reasonable time after the receipt of t...

Страница 19: ...17...
Страница 20: ...4575 Powell Rd Wallenstein Ontario Canada N0B 2S0 Phone 519 698 9864 Toll Free 866 820 7603 Fax 519 698 1087 www baumalight com For parts specifications and the latest machine information please visit...

Отзывы: