background image

14

1300 886 649

Model: AAVCW-0419 Product Code: 64588 04/2019

www.tempo.org

AUS

Instructions (Cont.)

Photo Mode 

•   

Press the MODE button repeatedly to enter Photo mode.

•   

Press the OK button to take a still picture.

•   

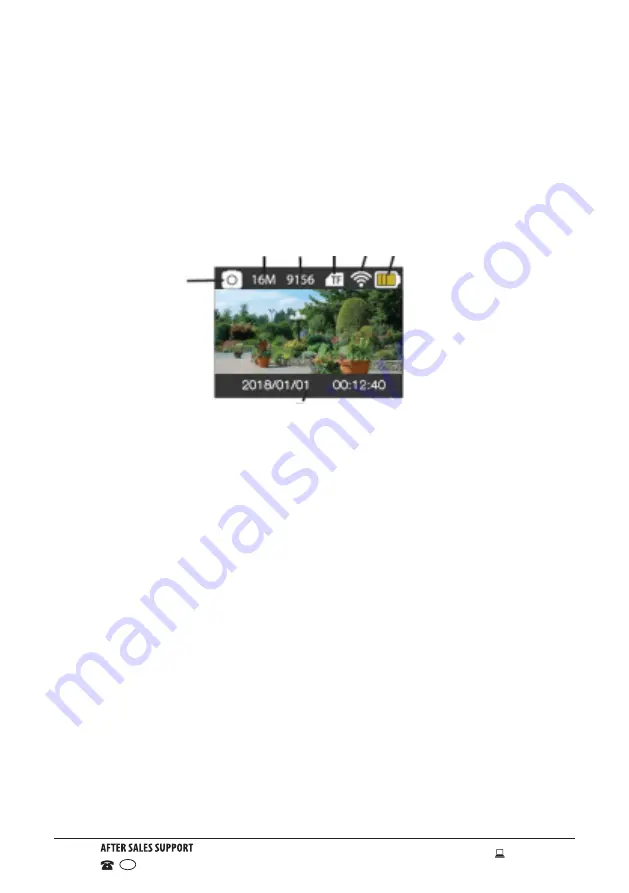
In Photo mode, the LCD screen will display the following icons: 

1.  Mode:

 Indicates that the current mode is in Photo mode.

2.  Image resolution:

 Indicates the current image resolution.

3.  Image counter:

 Indicates the number of pictures available to be taken.

4.  Micro SD card:

 Indicates that an SD card is inserted.

5.  Wi-Fi: 

Indicates if Wi-Fi is on or off.

6.  Battery:

 Indicates battery level.

7.  Date and time: 

Shows the date and time on the device’s display.

For more photo settings please refer to the settings section.

1

2

7

3 4 5 6

Содержание AAVCW-0419

Страница 1: ...INSTRUCTION MANUAL Model Number AAVCW 0419 Action Camera 1300 886 649 Model AAVCW 0419 Product Code 64588 04 2019 www tempo org AUS...

Страница 2: ...2 1300 886 649 Model AAVCW 0419 Product Code 64588 04 2019 www tempo org AUS...

Страница 3: ...product All products brought to you by BAUHN are manufactured to the highest standards of performance and safety and as part of our philosophy of customer service and satisfaction are backed by our c...

Страница 4: ...mpo org AUS Welcome 3 General Information Safety Instructions 5 Product Overview 6 Accessories 7 Getting Started 9 Instructions 12 Settings 20 Specifications 24 Other Useful Information 25 Warranty De...

Страница 5: ...oof housing If sand has settled on the camera or lens gently blow it off Storage conditions Store the camera in a cool and dry place with good ventilation Avoid storage in areas that are excessively h...

Страница 6: ...Micro SD card for photo video storage 8 Microphone For audio recording during video recording 9 Charging indicator Lights up in red when the camera is charging 10 Working indicator Lights up in blue...

Страница 7: ...terproof Case 2 Bicycle Mount 3 Pedestal 4 Carrying Case 5 Back Clip 6 Switch Support 7 Commutator 8 Helmet Mount 9 Velcro Straps x2 10 Locking Strap x2 11 Cable Ties x3 12 3M Adhesive Pads x2 13 Wire...

Страница 8: ...on the top clasp 2 Push down on the clasp to release it from the case 3 Lift the clasp up to open the case andaccess the camera Assembly Instructions and Suggestions Waterproof Case Removal Accessorie...

Страница 9: ...he cable is damaged Read this manual to familiarise yourself with the product including its buttons functions and accessories Pay particular attention to the safety instructions on the previous pages...

Страница 10: ...ecision electronic component Always handle it with care Protect the card from static electricity and strong shocks If you are installing a previously used memory card into the camera make sure to back...

Страница 11: ...vent water intrusion Getting Started Cont Before using the camera in wet conditions Before sealing the case ensure the rubber seal of the camera housing is clean even a single hair or grain of sand ca...

Страница 12: ...ery power has dropped to extremely low levels the icon will appear on the LCD screen and you will have to recharge the battery When the icon turns red and flashes the camera will automatically power o...

Страница 13: ...y Indicates the quality and frame rate of the recording 3 Storage available Shows remaining space on the SD Card 4 Micro SD card Indicates that an SD card is inserted 5 Wi Fi Indicates if Wi Fi is on...

Страница 14: ...icons 1 Mode Indicates that the current mode is in Photo mode 2 Image resolution Indicates the current image resolution 3 Image counter Indicates the number of pictures available to be taken 4 Micro...

Страница 15: ...ing Press the Mode button to enter Movement mode 1 Mode Indicates that the current mode is Motion Mode recording 2 Video Quality Indicates that the quality and framerate of video being recorded 3 Stor...

Страница 16: ...Action Camera and your chosen external display Playback Mode Enter playback mode to browse your photos and videos and to play videos recorded by the camera Turn on the camera and press the mode key to...

Страница 17: ...d item will be highlighted Then use the Up Down buttons for adjustment Press the OK button to confirm your entry or press the Power Mode button to cancel the setup and return Connecting with a PC The...

Страница 18: ...your smartphone 1 Search for XDV in Google Play for Android OS to find the app and install it according to the instructions 2 Search for XDV in App Store for iOS to find the app and install it accord...

Страница 19: ...is not supported For an Android device please download the video to the device before preview Select Media Device then press the down arrow on the top right corner and select Download DISCLAIMER The X...

Страница 20: ...Record one frame in the selected times for example set to 5s it will record one frame every 5 seconds and the video will playback in normal speed for example 30 frames per second this will make a fast...

Страница 21: ...K button is pressed so that the camera will take photos after the selected delay duration has passed Default is Close Auto Close 3S 10S 15S 20S 30S Similar to the Timer function the camera will take a...

Страница 22: ...t cloudy environments Incandescent light Suitable for dimly lit environments Fluorescent light Suitable for artificial light source environments Image Rotation Checkbox Rotate images that appear upsid...

Страница 23: ...nactivity before the camera automatically switches off Time Watermark Checkbox Choose to show the time on videos photos System Settings Main Menu Submenu Description Language English Japanese Italian...

Страница 24: ...ution 4K 3840 x 2160 30fps Interpolated 2 7K 30fps Interpolated FHD 1920 x 1080 30fps FHD 1920 x 1080 60fps HD 1280 x 720 30fps HD 1280 x 720 60fps HD 1280 x 720 120fps Storage medium Micro SD card TF...

Страница 25: ...posal of electrical consumer goods and dispose of it appropriately for recycling Contact your local authorities for advice on recycling facilities in your area Never throw the product or battery into...

Страница 26: ...aired replaced or refunded at our discretion The benefits conferred by this warranty are in addition to all rights and remedies in respect of the product that the consumer has under the Competition an...

Страница 27: ...or all of your stored data may be lost We recommend you save this data elsewhere prior to sending the product for repair You should also be aware that rather than repairing goods we may replace them w...

Страница 28: ...es Warranty returns Should you for any reason need to return this product for a warranty claim make sure to include all accessories with the product Product does not work If you encounter problems wit...

Отзывы: