background image

Page 4

For technical questions, please call 1-888-866-5797.

Item 58253 


SA

FE

TY

OP
ERA

TI

O

N

MAINT

ENANC

E

SE

TUP

q.  The warnings, precautions, and instructions 

discussed in this instruction manual cannot 

cover all possible conditions and situations 

that may occur.  It must be understood by the 

operator that common sense and caution are 

factors which cannot be built into this product, 

but must be supplied by the operator.

4. 

Power tool use and care

a. 

Do not force the power tool. Use the correct 

power tool for your application.  

The correct 

power tool will do the job better and safer 
at the rate for which it was designed.

b. 

Do not use the power tool if the switch 

does not turn it on and off.  

Any power 

tool that cannot be controlled with the switch 
is dangerous and must be repaired.

c. 

Disconnect the plug from the power 

source and/or remove the battery pack, 

if detachable, from the power tool before 

making any adjustments, changing 

accessories, or storing power tools.  

Such preventive safety measures reduce the 
risk of starting the power tool accidentally.

d. 

Store idle power tools out of the reach of 

children and do not allow persons unfamiliar 

with the power tool or these instructions 

to operate the power tool.  

Power tools are 

dangerous in the hands of untrained users.

e. 

Maintain power tools and accessories. 

Check for misalignment or binding of moving 

parts, breakage of parts and any other 

condition that may affect the power tool’s 

operation. If damaged, have the power tool 

repaired before use.  

Many accidents are 

caused by poorly maintained power tools.

f. 

Keep cutting tools sharp and clean.  

Properly 

maintained cutting tools with sharp cutting edges 
are less likely to bind and are easier to control.

g. 

Use the power tool, accessories and tool bits 

etc. in accordance with these instructions, 

taking into account the working conditions 

and the work to be performed.  

Use of the 

power tool for operations different from those 
intended could result in a hazardous situation.

h. 

Keep handles and grasping surfaces 

dry, clean and free from oil and grease.  

Slippery handles and grasping surfaces 
do not allow for safe handling and control 
of the tool in unexpected situations.

5. 

Service

a. 

Have your power tool serviced by a 

qualified repair person using only identical 

replacement parts.  

This will ensure that 

the safety of the power tool is maintained.

b.  Maintain labels and nameplates on the tool.   

These carry important safety information.   

If unreadable or missing, contact 

Harbor Freight Tools for a replacement.

6. 

Safety instructions for routers

a.  Hold the power tool by insulated gripping 

surfaces only, because the cutter may contact 

its own cord.  Cutting a “live” wire may make 

exposed metal parts of the power tool “live” 

and could give the operator an electric shock.

b.  Use clamps or another practical way to 

secure and support the workpiece to a 

stable platform.  Holding the work by 

your hand or against the body leaves it 

unstable and may lead to loss of control.

c.  Let bit cool before touching, changing 

or adjusting it.  Bits heat up dramatically 

while in use, and can burn you.

7. 

Vibration Safety

This tool vibrates during use.  

Repeated or long-term exposure to vibration may 

cause temporary or permanent physical injury, 

particularly to the hands, arms and shoulders.  

To reduce the risk of vibration-related injury:
a.  Anyone using vibrating tools regularly or for 

an extended period should first be examined 

by a doctor and then have regular medical 

check-ups to ensure medical problems are not 

being caused or worsened from use.  Pregnant 

women or people who have impaired blood 

circulation to the hand, past hand injuries, 

nervous system disorders, diabetes, or 

Raynaud’s Disease should not use this tool.  

If you feel any symptoms related to 

vibration (such as tingling, numbness, 

and white or blue fingers), seek medical 

advice as soon as possible.

b.  Do not smoke during use.  Nicotine reduces 

the blood supply to the hands and fingers, 

increasing the risk of vibration-related injury.

c.  Wear suitable gloves to reduce the 

vibration effects on the user.

d.  Use tools with the lowest vibration 

when there is a choice.

e.  Include vibration-free periods each day of work.
f.  Grip tool as lightly as possible (while still keeping 

safe control of it).  Let the tool do the work.

g.  To reduce vibration, maintain the tool as 

explained in this manual.  If any abnormal 

vibration occurs, stop use immediately.

 SAVE THESE INSTRUCTIONS.

Содержание 19121E-B

Страница 1: ...rence 21i When unpacking make sure that the product is intact and undamaged If any parts are missing or broken please call 1 888 866 5797 as soon as possible Copyright 2021 by Harbor Freight Tools All rights reserved No portion of this manual or any artwork contained herein may be reproduced in any shape or form without the express written consent of Harbor Freight Tools Diagrams within this manua...

Страница 2: ...moderate injury Addresses practices not related to personal injury IMPORTANT SAFETY INFORMATION General Power Tool Safety Warnings Read all safety warnings instructions illustrations and specifications provided with this power tool Failure to follow all instructions listed below may result in electric shock fire and or serious injury Save all warnings and instructions for future reference The term...

Страница 3: ...key or wrench before turning the power tool on A wrench or a key left attached to a rotating part of the power tool may result in personal injury e Do not overreach Keep proper footing and balance at all times This enables better control of the power tool in unexpected situations f Dress properly Do not wear loose clothing or jewelry Keep your hair clothing and gloves away from moving parts Loose ...

Страница 4: ...ow for safe handling and control of the tool in unexpected situations 5 Service a Have your power tool serviced by a qualified repair person using only identical replacement parts This will ensure that the safety of the power tool is maintained b Maintain labels and nameplates on the tool These carry important safety information If unreadable or missing contact Harbor Freight Tools for a replaceme...

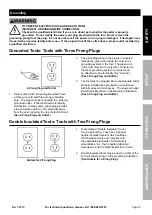
Страница 5: ... to carry electricity away from the user reducing the risk of electric shock See 3 Prong Plug and Outlet 2 The grounding prong in the plug is connected through the green wire inside the cord to the grounding system in the tool The green wire in the cord must be the only wire connected to the tool s grounding system and must never be attached to an electrically live terminal See 3 Prong Plug and Ou...

Страница 6: ...rd outdoors make sure it is marked with the suffix W A W in Canada to indicate it is acceptable for outdoor use 7 Make sure the extension cord is properly wired and in good electrical condition Always replace a damaged extension cord or have it repaired by a qualified electrician before using it 8 Protect the extension cords from sharp objects excessive heat and damp or wet areas TABLE A RECOMMEND...

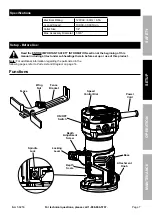
Страница 7: ... the ENTIRE IMPORTANT SAFETY INFORMATION section at the beginning of this manual including all text under subheadings therein before set up or use of this product Note For additional information regarding the parts listed in the following pages refer to Parts List and Diagram on page 14 Functions ON OFF Switch Fence Base Fence Bracket Power Cord Wing Nut Attachment Knob Depth Adjustment Screw Spee...

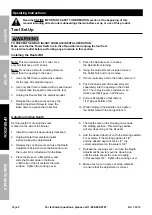
Страница 8: ... the Collet remove it 8 Push the shank end of the new bit sold separately into the opening in the Collet Nut There may be some resistance so make sure that it goes in all the way 9 Pull out bit slightly so that there is 1 16 gap at bottom of bit 10 While holding in the Spindle Lock tighten the Collet Nut with the Large Wrench Adjusting Cutting Depth Set the depth of cut using the scale marked on t...

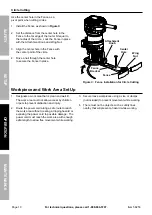
Страница 9: ...test cut on a piece of scrap material to ensure that the adjustment is correct Fence Attachment Knob Wing Nut Figure A Installing the Fence Setting up a Temporary Guide Clamp a temporary guide to the workpiece to make a straight cut which does not parallel the edge of the workpiece 1 Clamp a suitable straight board across the workpiece parallel to the desired location of the cut 2 Install the Fenc...

Страница 10: ... the Fence in place Fence Attachment Knob Center Hole Fence Bracket Wing Nut Figure C Fence Installation for Circle Cutting Workpiece and Work Area Set Up 1 Designate a work area that is clean and well lit The work area must not allow access by children or pets to prevent distraction and injury 2 Route the power cord along a safe route to reach the work area without creating a tripping hazard or e...

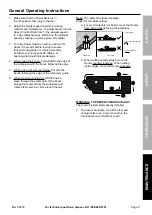
Страница 11: ...e the router bit into the workpiece and rotate the Router in a circle around the nail Note The router bit rotates clockwise Adjust for this while cutting a For most materials it is best to move the Router from left to right as facing the workpiece 1 1 Workpiece 2 Bit revolving direction Side View 3 Feed direction 3 2 Always route against the rotation direction of the router bit Move the router cou...

Страница 12: ...t the general condition of the tool Check for loose hardware misalignment or binding of moving parts damaged cord electrical wiring cracked or broken parts any other condition that may affect its safe operation 2 AFTER USE wipe external surfaces of the tool with clean cloth 3 Periodically wear ANSI approved safety goggles and NIOSH approved breathing protection and blow dust out of the motor vents...

Страница 13: ...ll 1 Allow tool to work at its own rate 2 Eliminate use of extension cord If an extension cord is needed use one with the proper diameter for its length and load See Extension Cords in Grounding section on page 5 Performance decreases over time 1 Carbon brushes worn or damaged 2 Router bit dull or damaged 1 Have qualified technician replace brushes 2 Use sharp bits Replace as needed Excessive nois...

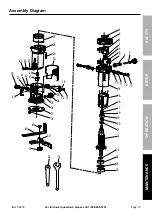
Страница 14: ...acket 1 41 Pinion Gear 1 42 Cylindrical Pin Φ4x4 1 43 Collet Nut 1 44 Collet 1 45 Spindle Lock Cap 1 46 Spring 1 47 Spindle Lock Pin 1 48 Bolt M6x10 1 49 Fence Bracket 1 50 Fence 1 51 Wing Nut 1 52 Small Wrench 1 53 Large Wrench 1 Parts List and Diagram PLEASE READ THE FOLLOWING CAREFULLY THE MANUFACTURER AND OR DISTRIBUTOR HAS PROVIDED THE PARTS LIST AND ASSEMBLY DIAGRAM IN THIS MANUAL AS A REFER...

Страница 15: ... call 1 888 866 5797 Item 58253 SAFETY OPERATION MAINTENANCE SETUP Assembly Diagram 1 2 3 4 6 7 8 9 10 11 12 13 14 15 16 19 20 21 22 23 24 25 26 27 28 29 30 33 32 18 31 34 35 36 37 38 43 44 47 46 45 39 40 41 48 49 42 51 50 52 53 5 17 18 35 ...

Страница 16: ...lusion or limitation of incidental or consequential damages so the above limitation of exclusion may not apply to you THIS WARRANTY IS EXPRESSLY IN LIEU OF ALL OTHER WARRANTIES EXPRESS OR IMPLIED INCLUDING THE WARRANTIES OF MERCHANTABILITY AND FITNESS To take advantage of this warranty the product or part must be returned to us with transportation charges prepaid Proof of purchase date and an expl...

Отзывы: