background image


3


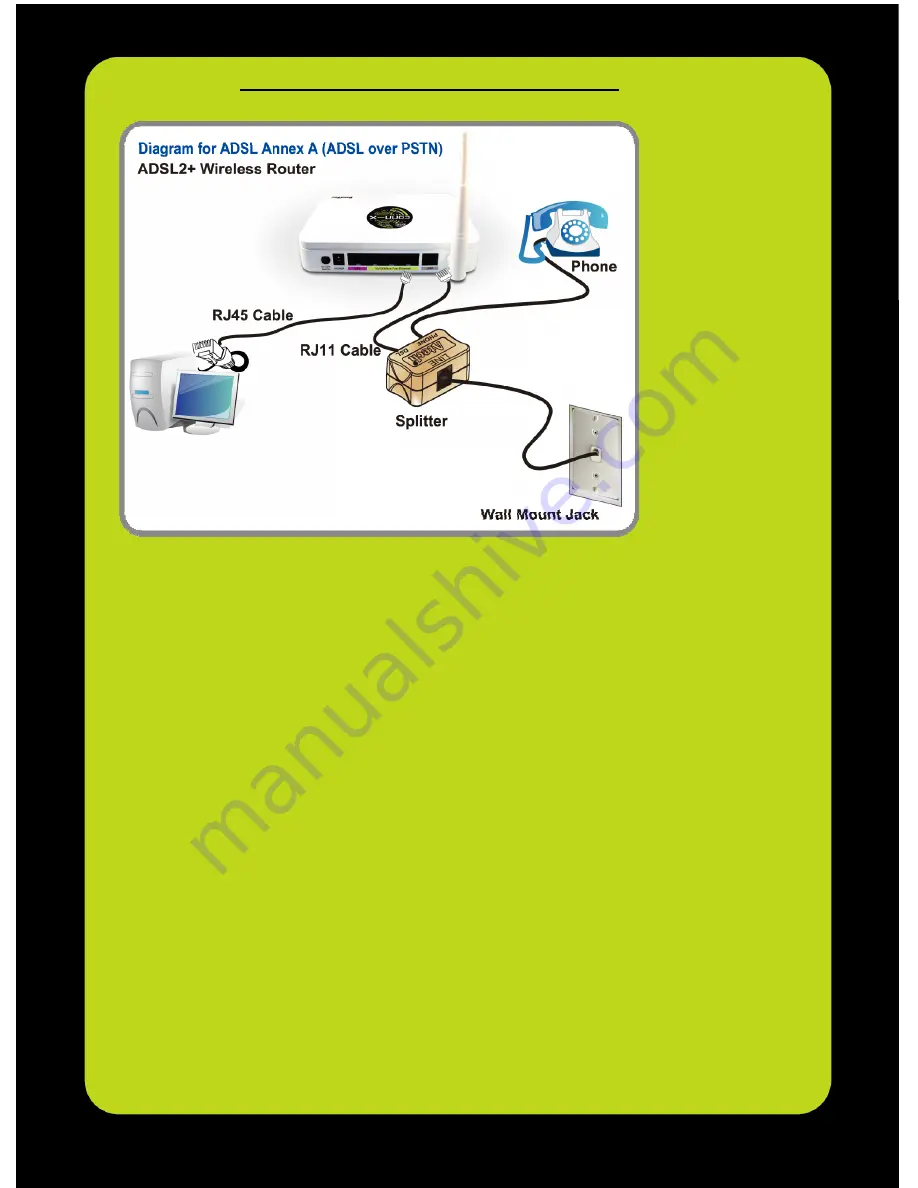
If you have a PSTN telephone line (normal analog line) connect the router 
as shown below:   


1. 

Connect the supplied RJ45 Ethernet cable from your PC's Ethernet port to 
one of the 3 

LAN

 ports of the ADSL2+ Router's. 

ATTENTION: The LAN 

port no 4 (purple marking) can only be used for Set-Top-Box (STB) 
connection. 

2. 

a)

 Connect the supplied RJ11 telephone cable from your home's telephone 

jack to the “

LINE

” port of your ADSL2+ Router. 

b)

 In case you use a telephone device on the same home telephone jack, 

please plug the RJ11 telephone cable from your home’s telephone jack to 
the “

LINE

” port of the supplied ATF085A1R splitter. Connect the second 

one supplied RJ11 telephone cable to the “

DSL

” port of the supplied splitter 

and the other end of this cable to the “

LINE

” port of your ADSL2+ Router. 

3. 

Connect an RJ11 telephone cable to the “

PHONE

” port of the splitter and 

connect the other end to your telephone device. In case you have more 
than one telephone devices on other telephone sockets in your house, you 
have to place a splitter between them and the telephone jack.    Connect 
together, using an RJ11 telephone cable, the “

LINE

” port of the splitter with 

your telephone jack. 

4. 

Connect the power adapter to the power inlet “

POWER

” of the ADSL2+ 

Router and turn the “

ON/OFF SWITCH

” to switch of your ADSL2+ Router 

on. And wait for 2 minutes before moving to the next step. 

Содержание TW263R4

Страница 1: ......

Страница 2: ...re Manual 3 Quick Installation Guide 4 2 x Telephone Cables RJ 11 5 Ethernet Cable RJ 45 6 AC Adaptor 7 Annex B Splitter ATF057 For Annex A TW263R4 A2 ADSL2 Router 1 ADSL2 Wireless Router 2 CD ROM Software Manual 3 Quick Installation Guide 4 2 x Telephone Cables RJ 11 5 Ethernet Cable RJ 45 6 AC Adaptor 7 2 x Annex A Splitter ATF085A1R Follow each STEP carefully and only go to the next step once y...

Страница 3: ...o the LINE port of the supplied ATF057 splitter Connect another RJ11 telephone cable to the MODEM port of the splitter and connect the other end of this cable to the LINE port of your WLAN ADSL2 Router 3 Connect a RJ11 telephone cable to the PHONE port of the splitter and connect the other end to the input which is underneath the NETMOD NT1 OTE unit 4 Connect the power adapter to the power inlet P...

Страница 4: ...port of the supplied ATF085A1R splitter Connect the second one supplied RJ11 telephone cable to the DSL port of the supplied splitter and the other end of this cable to the LINE port of your ADSL2 Router 3 Connect an RJ11 telephone cable to the PHONE port of the splitter and connect the other end to your telephone device In case you have more than one telephone devices on other telephone sockets i...

Страница 5: ... Internet Active indicator Wireless Active indicator Ethernet Active indicator Table 1 1 LED function Label Color On Flash Off Green Ready Not Ready Power Off Green Connect to DSLAM Disconnect to DSLAM N A Green Connect to Internet IDLE Transmit Receive Data Disconnect to Internet Green N A Wireless Active Deactivated Green Ethernet Connected Transmit Receive Data Ethernet Disconnected ...

Страница 6: ... kindly configure the PC computer as below to have automatic IP address DNS Server For Windows 98SE ME 2000 XP 1 Click on Start Control Panel in Classic View In the Control Panel double click on Network Connections to continue 2 Single right click on Local Area connection then click Properties ...

Страница 7: ...4 Check Obtain an IP address automatically and Obtain DNS server address automatically then click on OK to continue 5 Click Show icon in notification area when connected see screen image in 3 above then Click on OK to complete the setup procedures ...

Страница 8: ... Click on Start Control Panel in Classic View Network and Sharing Center In the Manage network connections double click on Manage network connections to continue 2 Single right click on Local Area connection then click Properties ...

Страница 9: ...ontinue 4 Double click on Internet Protocol Version 4 TCP IPv4 5 Check Obtain an IP address automatically and Obtain DNS server address automatically then click on OK to continue 6 You can see the screen will appear as shown in step 4 above then click on OK to complete the setup procedures ...

Страница 10: ...D should auto start displaying the window shown in 3 below If your CD does not start automatically go to Windows Explorer Select your CD drive and double click setup exe 3 Please choose your language Greek or English and then click button to continue 4 Please click Ethernet connection button to continue ...

Страница 11: ...hange the wireless settings via the wireless configuration menu see user manual on the CD Chapter 8 and other or if you want to change the network key now and or to change the password on device s login webpage please go to below step 5 In case the below settings do not appear on your computer please check your Wireless USB Stick or your Wireless Network Card User Manuals which are included in the...

Страница 12: ... you will find the key written on the sticker underneath the modem noted as WPA You can later change this network key via the wireless configuration menu see user manual on the CD Chapter 8 and other or if you want to change the network key now and or to change the password on device s login webpage please go below to chapter 5 ...

Страница 13: ...assword on device s login webpage launch your web browser Internet Explorer 6 0 and above or Netscape Navigator 7 0 and above and type http 192 168 1 1 6 Please enter user name admin is the default The password is written on the sticker underneath the modem named as Admin Password and click OK ...

Страница 14: ... of your desire for your new key you can type either letters or numbers symbols are excluded and then press SAVE write the password on a piece of paper in case you forget it For further details on Wireless Lan settings or on the different security modes such as WEP 64Bits WEP 128Bits WPA PSK WPA2 PSK please refer to the User Manual on the CD Chapter 8 and other ...

Страница 15: ...efault is admin Username and password the ADMIN PASSWORD which is written underneath the modem 9 Change User name and Password A In case you want to change the User name and Password the User name can be changed only once while the Password can be changed as many times as you wish open the Internet Explorer and type http www oteshop gr myservices myid B Please follow the instructions as these are ...

Страница 16: ... crossed out wheeled bin symbol is attached to a product it means the product is covered by the European Directive 2002 95 EC Please inform yourself about the local separate collection system for electrical and electronic products or contact the supplier of this product for further information on their environmental performances Please act according to your local regulations and do not dispose you...

Страница 17: ...16 ...

Отзывы: