background image

BATCO 

Hitting Cage Assembly Instructions 

Part Description 

72’ Batting Cage 54’ Batting Cage 

A. Net


               1 

       1 

B. Framing – 

Arc section with insert connection


C. Framing – 

Arc section without insert


D. Framing – 

Legs with insert connection


10 

E. Outdoor Leg Feet 

10 

F. Outdoor Leg Stakes 

20 

16 

G. Lynch Pins 

10 

H. Indoor Leg Boots 

10 

I. Adjustable End Straps 

J. Eye Bolts 

with nuts & washers


19 

16 

K. 18’ 

Top & Side Connecting Support Ropes


12 

L. Net

 Support Ropes 

[ 72’ or 54’ ]


Tools Needed for Assembly  


1.


Tape Measure 

2.


Twelve Stakes (Outdoors) or Marking Pen (Indoors) 

3.


9/16” Wrench 

4.


Hammer or Maul (Outdoors) 

5.


Step Ladder 

6.


Razor Knife 

Your cage comes complete with everything required 
for an indoor or outdoor setup except end anchors. 


For outdoor setup, first select a level piece of ground. Minimum space 
requirements are 22’ x 92’ for the 72’ cage <and/or> 22’ x 74’ for the 54’ cage. 


For an indoor set up and connecting to a wall or volleyball standard that can 
be securely fastened to the floor, the end distance (distance from the last arc 
frame to the end support) can be shortened from 10’. It is recommended that 
the end support be at least 7’ off the ground or floor. 

*** Read All Directions Carefully & View Video Tape  

Instructions Before Beginning *** 

Содержание CA54-O-1

Страница 1: ...welve Stakes Outdoors or Marking Pen Indoors 3 9 16 Wrench 4 Hammer or Maul Outdoors 5 Step Ladder 6 Razor Knife Your cage comes complete with everything required for an indoor or outdoor setup except end anchors For outdoor setup first select a level piece of ground Minimum space requirements are 22 x 92 for the 72 cage and or 22 x 74 for the 54 cage For an indoor set up and connecting to a wall ...

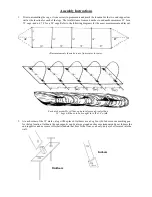
Страница 2: ...ent and layout All measurements shown here are from center to center Each arch assembly will have a natural spread greater than 18 Legs will have to be brought in to the 18 width 2 At each corner of the 18 marks a leg will be placed Outdoors use a Leg Foot E Indoors use a marking pen for the leg location Outdoors the end supports can be a large ground anchor or permanent end post Indoors the end s...

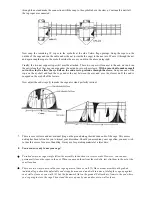
Страница 3: ...ap The two arcs that contain the extra eyebolt are to be inserted into the end sleeves All others may be placed in any sleeve Insert the leg s D insert end into the pre slit opening on the bottom of the vinyl sleeve approximately 30 from each end of the vinyl sleeve Feed the legs into the sleeve until they connect into the bottom or the arc sections Align the holes and bolt with eyebolts and washe...

Страница 4: ...he eyebolt of the last arc Now adjust the end straps I to make the cage arcs stand perfectly vertical 7 There is excess sleeve and net material lying on the ground along the sides and ends of the cage This excess netting has been left on for you to trim at your discretion Should you accordion your cage often you may wish to trim this excess for ease of handling It may use for patching material at ...

Страница 5: ...talled and maintained The following instructions are recommendations that will maintain your net for a long life One major cause of net failure is the constant pounding on the net behind the batter To prevent this excessive wear it is recommended that a vinyl canvas or other durable material be hung behind the batter If your cage is installed outdoors in areas where rabbits squirrels or other anim...

Отзывы: