background image

9/26/2018

Thyme Manual

https://bastl-instruments.github.io/thyme/manual.html#/Introduction

32/48

MIDI

Using beat clock messages from MIDI input

Change Clock Source

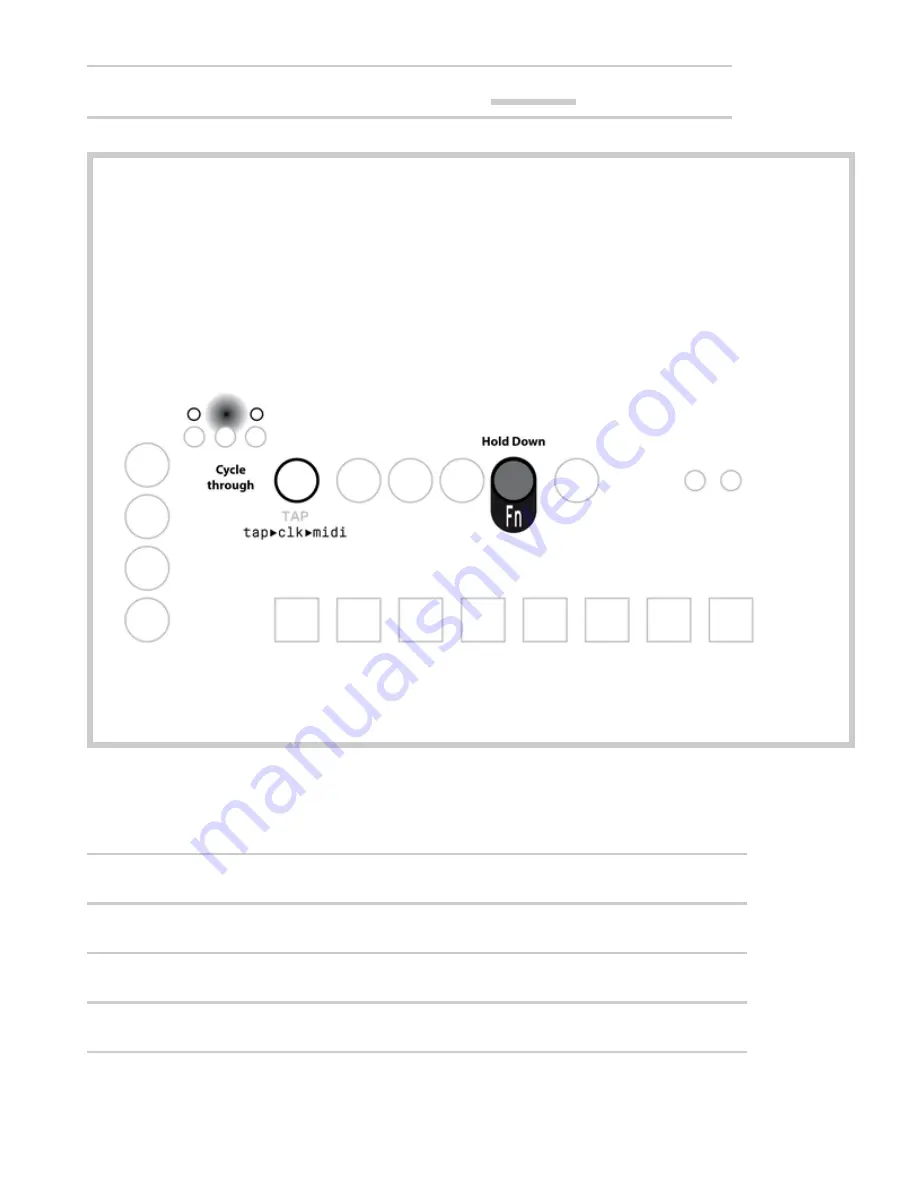
You can change the clock source by holding down 

FN

 and pressing 

TAP

 to cycle through

the three options: Tap Tempo / Analog Clock / MIDI Clock.

While 

FN

is being pressed the current clock source is indicated by the three LEDs above

FREEZE

/

LINK

/

SYNC

 in the order indicated below the 

TAP

 button.

The signal of the selected clock is permanently shown on the 

TAP

 LED.

For each clock source there are four divider options.

Tap

Analog Clock

MIDI

A

2 steps per tap

1 substep per edge

8 substeps per quarter note

B

1 step per tap

1 substep per 2 edges

4 substeps per quarter note

C

2 substeps per tap

1 substep per 4 edges

2 substeps per quarter note

D

1 substep per tap

1 substep per 8 edges

1 substep per quarter note

When the divider option is being changed, the sequencer will remain phase-aligned with the
input clock.

18

Содержание Thyme

Страница 1: ...he digital sound processing performed by Thyme can be summarized as a Sequenceable Robot Operated Digital Tape Machine Here you see a greatly simpli ed illustration of its core functionality Imagine t...

Страница 2: ...we took a brief look in the previous section Its operation is de ned by 9 parameters which can be tweaked manually or each by their own dedicated Robot All settings of all parameters and all Robots c...

Страница 3: ...of 20dB factor 10 It is the only parameter that cannot be controlled by a Robot and is constant for every Sound Set and Forget The white LED indicates that some signal is detected at the input the red...

Страница 4: ...ead heads is scaled by this factor before it will be fed back to the input signal On full you get a loop gain of exactly one provided Levels is off Filter Next to scaling you can also lter the feedbac...

Страница 5: ...cable into the audio input it would normally be interpreted and output as a stereo signal with one channel being silent To avoid this activate Mono Input Mode which uses the single channel of the inpu...

Страница 6: ...b being equipped with a dimmable LED that indicates the current value of the knob from 0 to full amount A knob can be frozen meaning the value it holds indicated by the LED does not match the physical...

Страница 7: ...behavior of the signal processing chain You can activate them independently from each other with their dedicated buttons Delay Sync The position of the main read head de nes the time between writing t...

Страница 8: ...rder to compensate for any effect on the delay time In other words Tweaking the tape speed will not affect the nal delay time Freeze Mode The Freeze Mode turns Thyme into a looping device To achieve t...

Страница 9: ...the loop is controlled by the FEEDBACK knob When it is on full there will be a steady loop if it is lower the signal will fade out over time The signal from the three extra read heads is not mixed int...

Страница 10: ...additional ltering This will cause interesting aliasing effects Furthermore the upsampling process is intentionally made less accurate with low tape speeds emphasising this character even more HiFi Ta...

Страница 11: ...les the corresponding setting on off The current state of each setting is shown by the knob LED Sounds There are eight Sounds and one Bypass Sound to switch between The regular Sounds are pre con gure...

Страница 12: ...e Manual https bastl instruments github io thyme manual html Introduction 12 48 Switch Sounds You can switch between the Sounds by pressing one of the 1 8 buttons or BYPASS The active Sound is indicat...

Страница 13: ...ttps bastl instruments github io thyme manual html Introduction 13 48 Robots All parameters except for input gain each have their dedicated modulation source called the Robot This is indicated by the...

Страница 14: ...All other parameters will display the output of their Robot To select a Robot for a different parameter simply move the corresponding knob slightly The selection change is directly indicated by full...

Страница 15: ...ontrols have a speci c meaning but in general you can say that Rate refers to how fast the waveform changes and Shape changes its decoration The Modes can be divided into two groups oscillators and no...

Страница 16: ...d off half of the time at regular intervals during one period On top of that parts of the waveform are inverted due to a XOR modulation Stepped Ramp Like the Stepped Triangle but with a ramp as basic...

Страница 17: ...dulate any parameter with the dynamics of the input signal in the bass low mid high mid or high frequency region It will quickly react on peaks and then settle fast or slowly depending on the Shape yo...

Страница 18: ...instruments github io thyme manual html Introduction 18 48 Change Robot Mode You can select the Mode by holding down ROBOT SELECT and pressing the 1 8 button corresponding to the Mode symbol The sele...

Страница 19: ...ers Rate and Shape are set by the same knob hold down ROBOT SELECT to adjust SHAPE release it to adjust RATE The AMOUNT knob like all other knobs is always active regardless of the ROBOT SELECT button...

Страница 20: ...s is indicated by the LED The possible multiplications divisions of the tempo are 1 32 1 16 1 8 1 4 1 3 1 2 1 2 3 4 6 8 12 16 32 48 56 and so forth Robot Polarity A Robot can modify a parameter in thr...

Страница 21: ...While ROBOT SELECT is being pressed the current polarity is indicated by an LED Robot Phase When activating a Sound all Robots are setup according to the settings stored for this particular Sound Robo...

Страница 22: ...y When you activate stereo polarity on a Robot it will in uence the left and right channel in the opposite direction For oscillator type Robot Modes this means phase shifting the waveforms for both ch...

Страница 23: ...by setting their Robots to CV Mode the voltage is not interpreted linearly but as volt per octave This means that when a steady voltage of 1V is applied to the jack the tape speed or delay length wil...

Страница 24: ...tivated is de ned by a Pattern The speed of the play head moving through the pattern is de ned by the active clock source Pattern A Pattern is 8 steps long with each step being divided into 4 substeps...

Страница 25: ...s indicated by a blink on the WRITE LED At the start of the sequence when the rst step is being activated all PATTERN LEDs blink together once Playback will always start from the rst step Change Patte...

Страница 26: ...he Write Mode lets you precisely view the current position of the sequencer and set individual steps Switch Between Live and Write Mode You can switch between the two modes by pressing WRITE The curre...

Страница 27: ...ning you temporarily overwrite Sound changes by pressing and holding the corresponding 1 8 button or BYPASS Once you release the button the sequencer will continue playing the active pattern You can p...

Страница 28: ...llow edits while the sequencer is not running Playback The 1 8 buttons and LEDs now indicate the eight steps of the pattern When you start the sequencer in write mode you will see a blinking LED trave...

Страница 29: ...l Introduction 29 48 Select A Sound to Write Press and hold down SOUND The 1 8 LEDs and the BYPASS LED will now indicate the selected Sound Press the corresponding button to change the selection There...

Страница 30: ...he substeps holds the selected Sound By shortly pressing the corresponding button set all substeps to Bypass When the LED is off all substeps are set to a different Sound another regular Sound or Bypa...

Страница 31: ...set to the selected Sound Pressing the button will set the substep to Bypass If a PATTERN LED is off the corresponding substep is set to a Sound different from the selected one can be a regular Sound...

Страница 32: ...e FREEZE LINK SYNC in the order indicated below the TAP button The signal of the selected clock is permanently shown on the TAP LED For each clock source there are four divider options Tap Analog Cloc...

Страница 33: ...lock signal is shown by the PATTERN LEDs Tap Tempo When Tap is selected as a clock source the speed of the sequencer can be set by the TAP button The average time between two button presses will be ta...

Страница 34: ...ative option is to manually overwrite one or multiple parameters This means they will not be controlled anymore by the sounds of the pattern but directly by their knob Overwrite a Parameter Parameter...

Страница 35: ...ese independent Banks Please note that although switching Banks is usually fast it can temporarily disturb syncing of delay time and oscillator Robots The sound processing however is guaranteed to be...

Страница 36: ...d To copy the active Sound hold down FN and press WRITE To paste the stored copy top the active Sound hold down FN and press PLAY Clear Sound or Pattern You can reset Sounds and Patterns to their defa...

Страница 37: ...nd press a 1 8 button The corresponding LED will blink once shortly to indicate success Clearing a Sound is not possible in Write Mode because the 1 8 buttons indicate Steps not Sounds Clear Pattern T...

Страница 38: ...ve all changes in the current Bank all eight Sounds and all 4 Patterns hold down FN and press SOUND The 1 8 LEDs will blink three times to indicate a successful operation Persistent Settings A few set...

Страница 39: ...w level adjust 3 5mm stereo Footswitch Input 3 5mm mono attach passive switch that connects sleeve and tip CLK Input 3 5mm mono 100k input impedance trigger threshold at 0 5V rising edge maximum 5V Co...

Страница 40: ...ape machine parameters and all Robots but only within a limited range around current values MIDI Practically everything you set on the device itself can be achieved with MIDI commands Routing All rece...

Страница 41: ...indicated right away as described above Control Change With Control Change Messages you can control all parameters of the selected Sound The data byte of any midi control message is interpreted in one...

Страница 42: ...CC5 Select Robot Mode CC6 Select Robot Phase CC7 Select Robot Polarity CC8 Switch Robot Stereo Polarity CC9 Switch Robot Sync CC10 CC18 Multiple Wet Dry Settings Block CC19 CC27 Multiple Tape Speed Se...

Страница 43: ...er Dump the settings of the current Sound to MIDI output Pitchbend Modify Tape Speed in range to 3 relative to current value Notes Note On Off 0 Select Deselect Bypass Sound Note On Off 1 8 Select Des...

Страница 44: ...notes the feedback is reduced for low notes This feature can be enabled disabled by CC89 Realtime Messages In general all realtime messages are forwarded like any other message Depending on the active...

Страница 45: ...SysEx messages which are unpacked by the device bootloader and written to the internal ash memory To upload a new rmware you rst need to boot the device into Bootloader mode Enter Bootloader Mode To...

Страница 46: ...four PATTERN buttons while powering up the device The four PATTERN LEDs indicate that you have entered test mode There are six different hardware tests which can be run in a row to perform a general...

Страница 47: ...Knob LEDs fade in one after another Smooth Fading None 3 Buttons Press button closest to the LED that lights up Pressing the wrong button is an error None LED closest to button that trigged unexpecte...

Страница 48: ...and Persistent Settings are reset None None Changelog List of major changes made to this manual Date Changes 9 April 2018 Initial release 11 May 2018 Improved rmware update section Added Parameter Ov...

Отзывы: