background image

Configuring the Camera

BASLER A202

k

4-3

DRAFT

4.1.3 Configuration Tool Basics

The RAM memory in the camera contains the set of parameters that controls the current operation
of the camera. This set of parameters is known as the Work Set (see Sectio

3.12

). The CCT+ is

used to view the present settings for the parameters in the Work Set or to change the settings.

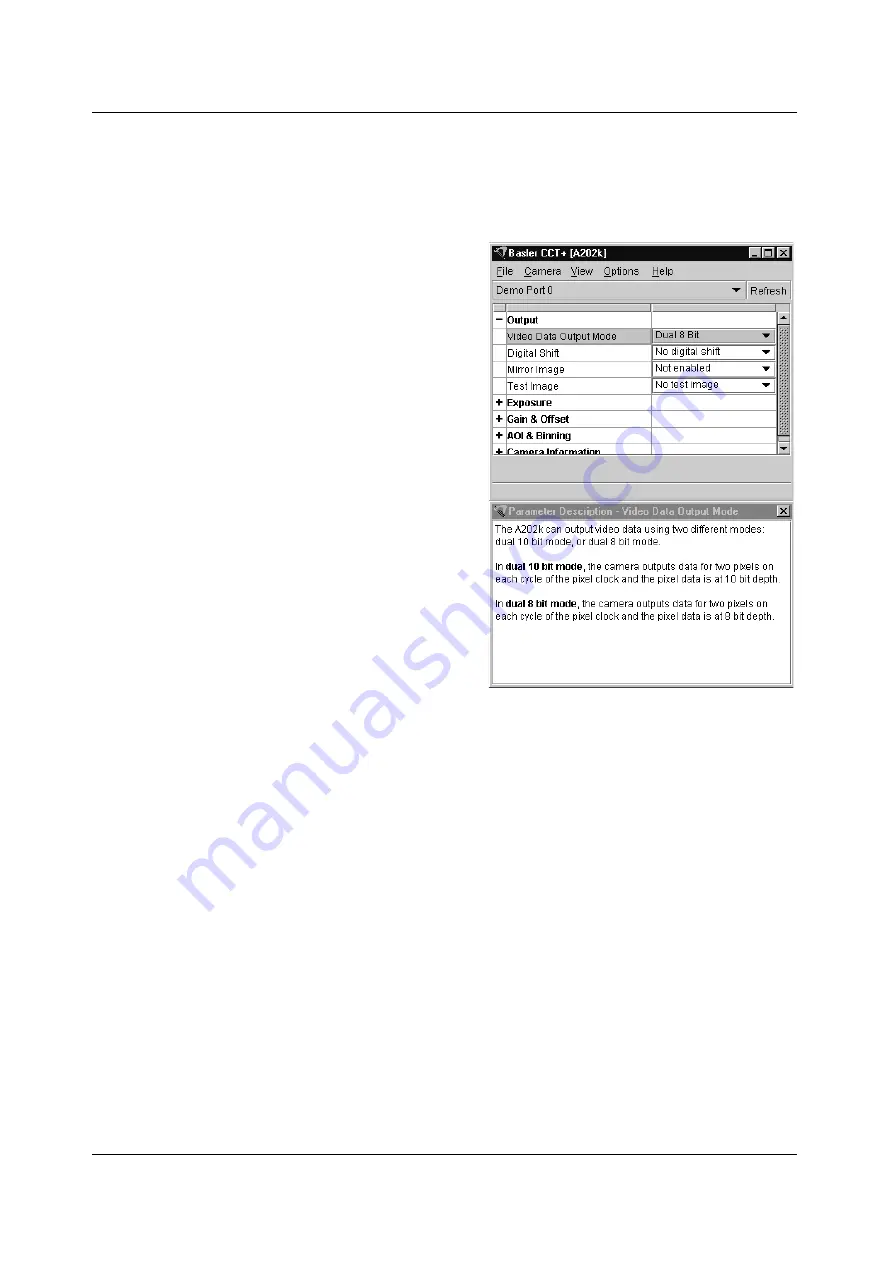
When the CCT+ is opened and a port is
selected, it queries the camera and displays
a list of the current settings for the
parameters in the Work Set. 

To simplify navigation, parameters are
organized in related groups. For example, all
parameters related to the camera output can
be found in the Output group (Figure 4-1).

When you click on the plus or minus sign
beside a group (+ or -), the parameters in
this group will be shown or hidden,
respectively.

To get an overview of all parameters
available on the connected camera,
maximize the CCT+ window and click the +
sign beside each group. 

The camera parameter names always
appear in the left column of the list. The
current setting for each parameter appears
in the right column.

By default, an additional 

Parameter

Description

 window is displayed. In this

window, you can find basic information on
the selected parameter and if present, on
the dependencies that may exist between
the selected parameter and other
parameter(s).

If you make a change to one of the settings, that change will instantly be transmitted from the
CCT+ to the camera’s Work Set. Because the parameters in the Work Set control the current
operation of the camera, you will see an immediate change in the camera’s operation.

By default, the CCT+ automatically updates the displayed settings every 5 seconds. The feature
behind this behavior is called Auto Refresh. If 

Auto Refresh

 is not enabled, the display will not

update when a camera setting is changed using another tool, when power to the camera is
switched off and on, or when the connected camera is exchanged while the CCT+ is displaying
the camera settings. To manually refresh the display, you can use the 

Refresh

 button in the top

right corner of the tool. 

Figure 4-1: CCT+

Содержание A202k

Страница 1: ...Basler A202k USER S MANUAL Document Number DA0440 Version 08 Language 000 English Release Date 29 June 2007 Draft...

Страница 2: ...his manual must be used with this equipment in order to comply with the limits for a computing device pursuant to Subpart J of Part 15 of FCC Rules For customers in Canada This apparatus complies with...

Страница 3: ...3 599 vc support europe baslerweb com Americas Basler Inc 855 Springdale Drive Suite 160 Exton PA 19341 U S A Tel 1 877 934 8472 Fax 1 877 934 7608 vc support usa baslerweb com Asia Basler Asia Pte Lt...

Страница 4: ......

Страница 5: ...Information 2 4 2 2 1 Camera Link Cable 2 4 2 2 2 Power Cable 2 4 2 3 Camera Link Implementation in the A202k 2 4 2 4 Input Signals 2 6 2 4 1 ExSync Controls Frame Readout and Exposure Time 2 6 2 5 O...

Страница 6: ...When Using Binary Commands 3 16 3 5 3 Setting the Offset 3 18 3 5 4 Balancing the Left Side and Right Side Offset 3 19 3 5 4 1 Balancing Offset Settings When Using Binary Commands 3 19 3 5 5 Balancing...

Страница 7: ...arameters 4 11 4 2 4 1 Video Data Output Mode 4 11 4 2 4 2 Exposure Time Control Mode 4 12 4 2 4 3 Timer 1 4 13 4 2 4 4 Timer 2 4 13 4 2 4 5 Digital Shift 4 14 4 2 4 6 Area of Interest Starting Column...

Страница 8: ...ate Command 4 31 4 2 9 Camera Reset Command 4 32 5 Mechanical Considerations 5 1 Camera Dimensions and Mounting Facilities 5 2 5 2 Sensor Positioning Accuracy 5 3 5 3 C Mount Adapter Dimensions 5 4 5...

Страница 9: ...shutter via electronic exposure control Square sensor cells High Signal to Noise ratio Programmable via an RS 644 serial port Area of Interest AOI scanning Correlated double sampling Industrial housi...

Страница 10: ...ional Basler Interface Controller Video Output Formats Dual 8 Bit or Dual 10 Bit Synchronization Via external ExSync signal or free run Exposure Time Control Level controlled programmable or free run...

Страница 11: ...Introduction BASLER A202k 1 3 DRAFT 1 3 Spectral Response The spectral response for the A202k monochrome camera is shown in Figure 1 1 Figure 1 1 A202k Mono Spectral Response...

Страница 12: ...700 720 nm to 1100 nm A suitable filter is included in the C mount adapter The F mount adapter does not include the filter A suitable filter type is the B W486 for example Caution A202kc cameras shipp...

Страница 13: ...additional cooling such as fans or heat sinks if necessary 1 5 Precautions To ensure that your warranty remains in force Powerrr Warning Without sufficient cooling the camera can get hot enough during...

Страница 14: ...nsporting Only transport the camera in its original packaging Do not discard the packaging Cleaning Avoid cleaning the surface of the CCD sensor if possible If you must clean it use a soft lint free c...

Страница 15: ...e camera a 26 pin 050 Mini D Ribbon MDR female connector used to transmit video data control signals and configuration commands a 6 pin micro miniature push pull receptacle used to provide power to th...

Страница 16: ...amera Link Transmitter 6 Tx X3 18 Tx Clk Output Camera Link LVDS Clock from Camera Link Transmitter 5 Tx Clk 12 CC4 Input RS 644 LVDS Reserved for Future Use 25 CC4 24 CC3 Output RS 644 LVDS Integrate...

Страница 17: ...rt HR10A 7P 6S A Hirose locking plug will be shipped with each camera This plug should be used to terminate the cable on the power supply for the camera For proper EMI protection the power supply cabl...

Страница 18: ...heets for these components are available at the National Semiconductor web site www national com The data sheets contain all of the information that you need to implement Camera Link including applica...

Страница 19: ...Camera Interface BASLER A202k 2 5 DRAFT Figure 2 3 Camera Frame Grabber Interface...

Страница 20: ...signal two exposure time control modes are available level controlled and programmable For more detailed information on the two modes see Section 3 2 ExSync can be a periodic or non periodic function...

Страница 21: ...k is normally 40 MHz However when horizontal or full binning is enabled the pixel clock is 20 MHz 2 5 2 Frame Valid Bit As shown in Figures 2 4 and 2 5 the frame valid bit indicates that a valid frame...

Страница 22: ...T6 Odd Pixel Bit 5 Odd Pixel Bit 5 Port A6 TxIN27 RxOUT27 Odd Pixel Bit 6 Odd Pixel Bit 6 Port A7 TxIN5 RxOUT5 Odd Pixel Bit 7 Odd Pixel Bit 7 MSB Port B0 TxIN7 RxOUT7 Odd Pixel Bit 8 Even Pixel Bit 0...

Страница 23: ...ion for line one begins the line valid bit will become high Ten of the bits transmitted during this clock cycle will contain the data for pixel number one in line one and ten of the bits will contain...

Страница 24: ...e pixel clock the line valid bit will be high Ten of the bits transmitted during this clock cycle will contain the data for pixel number five in line two and ten of the bits will contain data for pixe...

Страница 25: ...ransferred while frame valid is high one line valid low time immediately following the fall of ExSync will be 15 5 s 3 The diagram assumes that the area of interest AOI feature is not being used With...

Страница 26: ...the rise of ExSync starts exposure If ExSync rises while a frame is being transferred while frame valid is high one line valid low time immediately following the fall of ExSync will be 15 5 s 3 The d...

Страница 27: ...from the camera are not attached to the pins in the frame grabber end of the cable Instead the wires are unterminated and are folded back inside of the connector housing on the frame grabber end see...

Страница 28: ...nnection See Section 4 2 for details on the binary command format 2 6 1 Making the Serial Connection Frame grabbers compliant with the Camera Link specification are equipped with a serial port integra...

Страница 29: ...anual and the k BIC installation guide 2 8 DC Power The A202k requires 12 VDC 10 power A 12 V power supply is available from Basler as a stock item part 1000013046 The camera s maximum power consumpti...

Страница 30: ...6 BASLER A202k DRAFT 2 9 Status LED The A202k has a status LED on the back of the camera The LED is used to indicate that power is present and to indicate an error condition if one is detected See Sec...

Страница 31: ...the CCD vertical shift registers The charges from the bottom line of pixels in the CCD array are then moved into two horizontal shift registers as shown in Figure 3 1 Charges from the left side of th...

Страница 32: ...Operation and Features 3 2 BASLER A202k DRAFT Figure 3 1 A202k Sensor Architecture...

Страница 33: ...al period determines the camera s frame rate Frame Rate 1 ExSync Signal Period Exsync can be periodic or non periodic When the camera is operating with an ExSync signal it has two modes of exposure ti...

Страница 34: ...Mode When using the ExSync level controlled mode to control exposure several general guidelines must be followed The ExSync signal must toggle The ExSync signal must remain high for at least 4 s The E...

Страница 35: ...igh as shown in Figure 3 4 The actual start of exposure can be up to 25 s later than the fall of the ExSync signal This is commonly referred to as an exposure start jitter The actual length of the exp...

Страница 36: ...me Valid Low If the ExSync signal falls while frame valid is low as shown in Figure 3 5 Exposure will start after a delay of 4 4 s The actual length of the exposure time will be equal to the ExSync si...

Страница 37: ...riod is equal to 1 Maximum Frame Rate where the maximum frame rate is determined by the formula on page 3 27 If the binning feature is being used the minimum ExSync signal period is equal to 1 Maximum...

Страница 38: ...hown in Figure 3 6 The actual start of exposure can be up to 25 s later than the rise of the ExSync signal This is commonly referred to as an exposure start jitter The actual length of the exposure ti...

Страница 39: ...s shown in Figure 3 7 The actual start of exposure can be up to 11 5 s later than the rise of the ExSync signal This is commonly referred to as an exposure start jitter The actual length of the exposu...

Страница 40: ...g edge of internal control signal see Figure 3 8 In this mode the exposure time can be programmed as desired by varying the setting of the Timer 1 parameter Figure 3 8 Free run Programmable Mode You c...

Страница 41: ...setting must be greater than 1 Maximum Frame Rate where the maximum frame rate is determined by the formula on page 3 27 If the binning feature is being used the sum of the Timer 1 setting plus the Ti...

Страница 42: ...binary commands you use the Video Data Output Mode binary command 3 4 Integrate Enabled Signal An output signal called Integrate Enabled IntEn is available on A202k cameras The integrate enabled signa...

Страница 43: ...e 3 1 Consequently gain and offset must be adjusted separately for the left side and the right side Due to variations in the camera s electronics the gain and offset needed on the left side channel to...

Страница 44: ...tly different setting Increasing the gain setting to more than 288 maps a smaller portion of the sensor s linear output range to the ADC s input Increasing the gain is useful when at your brightest ex...

Страница 45: ...annel match All cameras have default gain settings and reference gain values which match the output of a factory master camera of the same type This output is referred to as 0 dB So if a camera s gain...

Страница 46: ...ng the camera s calibration procedure using the Read Reference Values binary command see Section 4 2 5 10 For our example we will assume that the camera returned the following reference gain values By...

Страница 47: ...mula A or formula B below Since our calculated XLS is less than 10 0 we would use formula A Left Side Gain Setting 442 65 Round up to 443 XLS 20 log 10 658 RGLS 658 RGLS 8 15 G Where G Desired gain in...

Страница 48: ...the left side offset and the Right Side Offset binary command to set the right side offset see Section 4 2 4 11 and 4 2 4 13 The left side and right side offset settings can be programmed on a decima...

Страница 49: ...These stored values can be used to calculate higher or lower offset settings that will keep the left side and right side channels in balance and comparable to other cameras of the same type If you us...

Страница 50: ...decimal point 0x19 Byte 12 High byte left side reference offset before decimal point 0x00 Byte 13 Low byte right side reference offset after decimal point 0x00 Byte 14 High byte right side reference o...

Страница 51: ...lue differences between the left and right side of the image result from gain imbalance and or offset imbalance To balance gray value differences between the left and right side of the image addressin...

Страница 52: ...02k uses 10 bit ADCs to digitize the output from the CCD sensor When the camera is operating in 10 bit output mode by default the camera transmits the 10 bits that are output from each ADC Shift Once...

Страница 53: ...e to 400 3 6 2 Digital Shift in 8 bit Output Modes No Shift As mentioned in Section 3 1 the A202k uses 10 bit ADCs to digitize the output from the CCD sensor When the camera is operating in 8 bit outp...

Страница 54: ...om each ADC The result of shifting twice is that the output of the camera is effectively multiplied by four For example assume that the camera is set for no shift that it is viewing a uniform white ta...

Страница 55: ...the brightest pixels If any of the readings are above 512 do not use digital shift If all of the readings are below 512 you can safely use the 2X digital shift setting If all of the readings are belo...

Страница 56: ...th in columns as 16 the starting line as 5 and the height in lines as 10 the AOI will be as shown in Figure 3 12 Figure 3 12 Area of Interest You can set the area of interest using either the Camera C...

Страница 57: ...rmal operation the camera is set to use all of the pixels in the array To use all of the pixels the starting column should be set to 1 the width in columns should be set to 1004 the starting line shou...

Страница 58: ...ransmission is complete To better understand the timing and output changes that occur when using AOI refer to Figure 3 13 This timing chart shows what would happen if the AOI was set up with a startin...

Страница 59: ...Operation and Features BASLER A202k 3 29 DRAFT Figure 3 13 Timing and Output Changes with AOI TIMING CHART IS NOT TO SCALE...

Страница 60: ...nds see Section 4 2 With the configuration tool you use the Horizontal Binning and Vertical Binning settings in the AOI Binning group to enable binning For full binning you must enable both Horizontal...

Страница 61: ...mage The mirror image feature will cause a horizontal switch around the center line of the sensor In other words the left side of the image will become the right side and the right side will become th...

Страница 62: ...each block of four pixels one pixel sees only red light one sees only blue light and two pixels see only green light This combination mimics the human eye s sensitivity to color Figure 3 15 Bayer Fil...

Страница 63: ...of 254 on the pixel 502 The third line starts with a gray value of 253 on the pixel 502 and so on The right half of test image one consists of lines with repeated gray scale gradients ranging from 255...

Страница 64: ...rtical gradient begins in column 247 The pixels in column 247 have a value of 0 the pixels in column 248 have a value of 1 the pixels in column 249 have a value of 2 and so on This pattern continues u...

Страница 65: ...he Work set into one of the User Sets The configuration tool or binary commands can be used to copy the Work Set into one of the User Sets Startup Pointer When power to the camera is switched off the...

Страница 66: ...guration Tool Plus You can use the Camera Status information in the Camera Information group see Section 4 1 and the configuration tool s on line help to check a list of several possible errors and an...

Страница 67: ...ication the following settings can also be configured Gain Offset Digital Shift Area of Interest Binning Mirror Image The A202k is programmable via the Camera Link serial port on the frame grabber Two...

Страница 68: ...se programs If not please refer to your Microsoft Windows manual 4 1 1 Opening the Configuration Tool 1 Make sure that the properties for the RS 644 serial port on your frame grabber are properly conf...

Страница 69: ...ra parameter names always appear in the left column of the list The current setting for each parameter appears in the right column By default an additional Parameter Description window is displayed In...

Страница 70: ...ges you make to the Work Set using the configuration tool will be lost when the camera is switched off To save changes you make to the Work Set open the Camera menu of the configuration tool and save...

Страница 71: ...use either the API from the DLL delivered with the grabber or the Basler CPA driver for executing the binary commands The Basler CPA Camera Port Access is a software framework which standardizes acce...

Страница 72: ...r is on the left highest bit of the command ID and the LSB of the descriptor is on the right lowest bit of the data length DATA Data field Size Number of bytes indicated in the Data Length portion of...

Страница 73: ...ACK NAK Response Positive frame acknowledge negative frame acknowledge Size 1 byte The value for a positive frame acknowledgement is 0x06 and for a negative frame acknowledgement is 0x15 L All values...

Страница 74: ...f the camera receives a read command with an unknown command ID in the descriptor it will respond with an ACK but will not send a frame If the host sends a read command and gets no ACK NAK the host ca...

Страница 75: ...in the response No data bytes are actually included in the read command 0xC1 is the block check character BCC See page 4 10 for instructions on calculating a BCC 0x03 is the ETX The ETX is always 0x03...

Страница 76: ...s are shown in their binary form so in the sample calculations shown below the hexadecimal digits in our command have been converted to binary To find the XOR sum of two binary numbers you must add th...

Страница 77: ...5 4 2 for an explanation of the available video data output modes Type This is a read or write command Read Command Cmd ID R W Flag Data Length Data 0xC0 1 1 Response Cmd ID R W Flag Data Length Data...

Страница 78: ...ime control modes Type This is a read or write command Read Command Cmd ID R W Flag Data Length Data 0xA0 1 1 Response Cmd ID R W Flag Data Length Data 0xA0 0 1 1 Byte Write Command Cmd ID R W Flag Da...

Страница 79: ...2 Mid byte of the Timer 1 setting Byte 3 High byte of the Timer 1 setting Data Range Timer 1 settings can range from 13 s to 16777215 s 0x00000D to 0xFFFFFF Purpose To set Timer 2 or read the current...

Страница 80: ...ta 0xA5 1 1 Response Cmd ID R W Flag Data Length Data 0xA5 0 1 1 Byte Write Command Cmd ID R W Flag Data Length Data 0xA5 0 1 1 Byte Response None Data Format Byte 1 An ID that specifies the digital s...

Страница 81: ...000 to 0x03EB When you set column n using this command the actual starting column will be n 1 For example if you set the starting column to 0 with this command the actual starting column 0 1 1 Purpose...

Страница 82: ...0000 to 0x03EB When you set line n using this command the actual starting line will be n 1 For example if you set the starting line to 0 with this command the actual starting line 0 1 1 Purpose To set...

Страница 83: ...left side gain setting Byte 2 High byte of left side gain setting Data Range Left side gain settings can range from 288 to 569 0x0120 to 0x0239 Purpose To set the offset for the left side of the CCD a...

Страница 84: ...ght side gain setting Byte 2 High byte of right side gain setting Data Range Right side gain settings can range from 288 to 569 0x0120 to 0x0239 Purpose To set the offset for the right side of the CCD...

Страница 85: ...ies the binning status see the table below ID Binning 0x00 Horizontal binning not enabled 0x01 Horizontal binning enabled Purpose To enable or disable vertical binning See Section 3 8 for an explanati...

Страница 86: ...This is a read or write command Read Command Cmd ID R W Flag Data Length Data 0xC1 1 1 Response Cmd ID R W Flag Data Length Data 0xC1 0 1 1 Byte Write Command Cmd ID R W Flag Data Length Data 0xC1 0...

Страница 87: ...ommand Cmd ID R W Flag Data Length Data 0xA1 1 1 Response Cmd ID R W Flag Data Length Data 0xA1 0 1 1 Bytes Write Command Cmd ID R W Flag Data Length Data 0xA1 0 1 1 Byte Response None Data Format Byt...

Страница 88: ...eeded Purpose To read the camera s model number Type This is a read only command Read Command Cmd ID R W Flag Data Length Data 0x02 1 16 Response Cmd ID R W Flag Data Length Data 0x02 0 16 16 Bytes Da...

Страница 89: ...re needed Purpose To read the camera s version information Type This is a read only command Read Command Cmd ID R W Flag Data Length Data 0x05 1 3 Response Cmd ID R W Flag Data Length Data 0x05 0 3 3...

Страница 90: ...Flag Data Length Data 0x40 0 3 3 Bytes Data Format Byte 1 Low byte of firmware version BCD coded Byte 2 High byte of firmware version BCD coded Byte 3 Register Layout ID Purpose To read the FPGA firmw...

Страница 91: ...mperature below 0 C is present If the MSB is 0 the temperature is 0 C or higher For temperatures below 0 C a two s complement representation is used that is to obtain the actual temperature the digita...

Страница 92: ...te before the decimal point for the left side reference gain value Byte 5 Low byte after the decimal point for the right side reference gain value Byte 6 High byte after the decimal point for the righ...

Страница 93: ...mand will return the ID for no active set This condition indicates that no valid Factory Set or User Sets were found It will also cause the orange LED on the back of the camera to show six pulses Type...

Страница 94: ...only command Write Command Cmd ID R W Flag Data Length Data 0x46 0 1 1 Byte Response None Data Format Byte 1 An ID that specifies the user set see the table below Set ID Set 0x01 User Set 1 0x02 User...

Страница 95: ...g Type This is a read or write command Read Command Cmd ID R W Flag Data Length Data 0x47 1 1 Response Cmd ID R W Flag Data Length Data 0x47 0 1 1 Byte Write Command Cmd ID R W Flag Data Length Data 0...

Страница 96: ...set to 1 the error condition assigned to that bit is present If the bit is set to 0 the error is not present Byte 1 Bit 0 No ExSync signal in the last 5 seconds Bit 1 A reset has occurred Bit 2 The c...

Страница 97: ...00 0x19 57600 0x1A 76800 0x1B 115200 L When changing the bitrate for serial communication use the following procedure 1 Issue the write command with the new bitrate 2 Wait one second 3 Change the bitr...

Страница 98: ...Purpose Initiates a camera reset The behavior is similar to a power up reset Type This is a write only command Write Command Cmd ID R W Flag Data Length Data 0x42 0 2 2 Bytes Response None Data Format...

Страница 99: ...manufactured with high precision Planar parallel and angular sides guarantee precise mounting with high repeatability Caution The camera is shipped with a cap on the lens mount To avoid collecting dus...

Страница 100: ...ns and Mounting Facilities The dimensions for A202k cameras are as shown in Figure 5 1 A202k cameras are equipped with four M4 mounting holes on the front and two M4 mounting holes on each side as ind...

Страница 101: ...Mechanical Considerations BASLER A202k 5 3 DRAFT 5 2 Sensor Positioning Accuracy The sensor positioning accuracy is as shown in Figure 5 2 Figure 5 2 Sensor Positioning Accuracy in mm or degrees...

Страница 102: ...Mechanical Considerations 5 4 BASLER A202k DRAFT 5 3 C Mount Adapter Dimensions Figure 5 3 C Mount Adapter Dimensions in mm 5 4 F Mount Adapter Dimensions Figure 5 4 F Mount Adapter Dimensions in mm...

Страница 103: ...s with a longer thread length is used the IR cut filter will be damaged or destroyed and the camera will no longer operate Figure 5 5 Maximum Lens Thread Length on A102k Cameras Caution A202kc cameras...

Страница 104: ...Mechanical Considerations 5 6 BASLER A202k DRAFT...

Страница 105: ...camera is not lit it means that power to the camera is not present or is less than 10 8 Volts LED Description On Continuous The camera is OK 3 flashes ExSync has not changed state for 5 seconds or lon...

Страница 106: ...Replace the power source Yes Connect the power source to the camera and then check the LED on the back of the camera Is the LED lit constantly Use a voltmeter to check the power source for the camera...

Страница 107: ...image one Can the test image be seen Correct the setting Go to the interfacing troubleshooting chart Replace the camera No No Yes Are you controlling the camera with an ExSync signal or is the camera...

Страница 108: ...make sure that you are setting the camera correctly No Images are too bright or too dark Images look noisy Other image problems Do the following Make sure that the lens cap has been removed Check the...

Страница 109: ...manual Before you call for support be sure to make note of the camera settings and the frame grabber settings you are using You should also have a captured live image and a captured test image availa...

Страница 110: ...644 port on the list Do the camera settings appear in the right side column of the CCT The port is present but the CCT can not access the port Make sure that no other program has access to the port Y...

Страница 111: ...o your nearest Basler support center Or you can write an e mail listing the requested pieces of information and with the requested files attached Our technical support contact numbers are shown in the...

Страница 112: ...ameters that you were using when the problem occurred To make a copy of the parameters open the parameter set in the CCT and save or dump the settings to a file Send the generated file to Basler techn...

Страница 113: ...es 2 11 and 2 12 Described the Camera Temperature feature page 3 36 Updated from the Classic Camera Configuration Tool to the Camera Configuration Tool Plus page 4 2 Corrected the possible range of Ti...

Страница 114: ...ltage in Section 1 5 Added warnings not to reverse polarity of input power in Sections 1 5 and 2 8 Modified Section 3 5 to include offset balance Added Sections 3 5 4 and 3 5 5 Renamed the register an...

Страница 115: ...A202k iii DRAFT Feedback Your feedback will help us improve our documentation Please click the link below to access an online feedback form Your input is greatly appreciated http www baslerweb com umf...

Страница 116: ...Feedback iv BASLER A202k DRAFT...

Страница 117: ...on sets explained 3 35 manipulating with binary commands 4 27 4 28 configuration tool see camera configuration tool configuring the camera with binary commands 4 5 with the config tool 4 2 connector t...

Страница 118: ...serial connection 2 14 S sensor pixel size 1 2 positioning accuracy 5 3 size 1 2 type 1 2 serial connection see RS 644 serial connection serial number viewing with binary commands 4 23 specifications...

Отзывы: