Bartscher PRO 2,5L Скачать руководство пользователя страница 18


Installation and operation 

16 / 22   


150159 

EN 

Mixing Process 

1.  Plug the appliance into a suitable single socket.  

2.  Switch the appliance on by setting the ON/OFF switch in 

'I'

 (ON) position. 

WARNING! 

Hold the mixing beaker firmly by the handle during mixing. 

 
3.  Use the RPM controller to select the right speed in the range of 

'MIN'

 to 

'MAX'

Rotate the controller clockwise to increase speed or anti-clockwise to reduce it. 

The appliance processes the ingredients very quickly. 
 
4.  Observe the mixing process.  

5.  After mixing, switch the appliance off and check the consistence of the mixed 

ingredient.  

6.  If needed, switch the appliance back on after cooling off. 

7.  After each mixing wait for the appliance to cool down in order to prevent 

overheating due to too long an operation. 

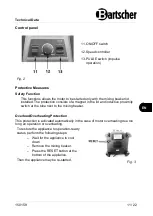
8.  When ingredients are supposed to be mixed shortly, use the 

PULSE

 function 

with the appropriate pulse operation switch.  

This function makes the motor operating at the maximum speed when the switch is 
on. 
 
9.  If needed, you may use the opening in the lid to add subsequent ingredients 

during operation; to this end, remove the transparent lid plug.  

10. If needed, use the enclosed pusher to move the added ingredients towards the 

knife.  

The pusher is designed in such way that it does not touch the knife at the beaker 
bottom. 
 
11. Close the lid again with the plug. 

12. Do not process too much of solid or hard products in one batch. For better 

results process them in smaller amounts.  

13. If the knife is blocked, and the motor starts to seize, proceed in the following 

way: 

–  switch the appliance off immediately, 
–  disconnect the plug from the socket, 
–  remove some of the ingredients from the mixing beaker, 
–  mix the ingredients manually in the mixing beaker, 
–  continue with mixing by pressing the ON/OFF switch. 


Содержание PRO 2,5L

Страница 1: ...PRO 2 5L 150159...

Страница 2: ...scher GmbH Franz Kleine Str 28 D 33154 Salzkotten Germany Phone 49 5258 971 0 Fax 49 5258 971 120 Technical Support Hotline 49 5258 971 197 www bartscher com Version 2 0 Date of preparation 2022 02 18...

Страница 3: ...6 2 3 Declaration of Conformity 6 3 Transport Packaging and Storage 7 3 1 Delivery Check 7 3 2 Packaging 7 3 3 Storage 7 4 Technical Data 8 4 1 Technical Specifications 8 4 2 Functions of the Applian...

Страница 4: ...ing of the appliance Additionally accident prevention occupational health and safety and legal regulations in force in the area the appliance is used apply Before you start using the appliance especia...

Страница 5: ...the mains voltage To avoid short circuit the appliance should be kept dry If there are malfunctions during operation disconnect the appliance from the power supply Do not touch the appliance s plug wi...

Страница 6: ...iance The appliance may only be used when its technical condition is flawless and allows for safe operation The appliance may only be used when all connections are executed according to rules of law i...

Страница 7: ...d use The following is an intended use Mincing mixing mashing shaking and chopping of suitable food products 1 4 Unintended Use An unintended use may lead to personal injuries or property damages caus...

Страница 8: ...troduced by the user usage of unapproved spare parts We reserve the right to introduce technical modifications to the product intended for improvement of the appliance and its performance 2 2 Copyrigh...

Страница 9: ...used to store the appliance when relocating or when shipping the appliance to our service point in the case of any damages The packaging and its elements are made of recyclable materials Particularly...

Страница 10: ...Material plastic ABS Mixing beaker material plastic Knife design stainless steel Volume in l 2 5 Usable volume in l 2 0 Rotational speed RPMs max 25000 Connected load 1 5 kW 220 240 V 50 60 Hz Dimensi...

Страница 11: ...l with use of RPM controller Pulse operation function ON OFF switch Safety switch Feet hard rubber Other features filling opening at top of the appliance integrated dosing cap anti slip stand handy ha...

Страница 12: ...cal Data 10 22 150159 EN 4 3 List of Components of the Appliance Fig 1 1 Lid 2 Lid plug 3 Tube lid sensor 4 Mixing beaker 5 Mixing beaker handle 6 Knife 7 Motor block 8 Control panel 9 Feet 4 pcs 10 P...

Страница 13: ...magnet in the lid and inductive proximity switch at the tube next to the mixing beaker Overload Overheating Protection This protection is activated automatically in the case of motor overheating due...

Страница 14: ...oblem any more The enclosed acoustic mat provides for additional noise volume reduction and protects the surface against scratching Material plastic Designed for Blender PRO 2 5L Version Front flap lo...

Страница 15: ...ance in humid or wet environment Place the appliance in a way making the connections easily accessible so that they may be quickly disconnected if such a need arises The appliance should be placed on...

Страница 16: ...on an unsuitable object will be inserted through the opening in the mixing beaker lid it may be caught by the knife and inflict injuries in the user Use the enclosed pusher only Risk of scalding with...

Страница 17: ...ker only up to 2 3 of the maximum operational volume of 2 000 ml ATTENTION There is a risk of damaging the appliance if the mixing beaker is inserted onto the motor block when the appliance is on Disc...

Страница 18: ...ents are supposed to be mixed shortly use the PULSE function with the appropriate pulse operation switch This function makes the motor operating at the maximum speed when the switch is on 9 If needed...

Страница 19: ...leaning disconnect the appliance from the power supply Leave the appliance to cool down completely Make sure water does not enter the appliance Do not immerse the appliance in water or other liquids d...

Страница 20: ...ng beaker is very sharp Never put hands into the mixing beaker during cleaning 1 Remove the mixing beaker with the lid from the motor block 2 If needed empty the mixing beaker 3 Wash the plug lid and...

Страница 21: ...s not work Incorrectly connected plug Remove the plug and insert it properly into a socket Lid is not inserted on the mixing beaker or is inserted incorrectly Place the lid correctly on the beaker in...

Страница 22: ...ppliances must be disposed of and recycled in a correct and environmentally friendly manner You must not dispose of electric appliances with household waste Disconnect the appliance from the power sup...

Отзывы: