background image


- 35 - 

6.3 Safety instructions for maintenance 


o

  Inspect the power cable regularly for damage. Never use the device if the cable is 

damaged. If the power cable is damaged, have an authorised service center or 
qualified electrician replace it. 

o

  In case of damage or malfunction, please contact your stockist or our customer 

service centre. Pay attention to the troubleshooting tips in pt. 7. 

o

  Only a qualified technician and using original spare parts and accessories should 

carry out repairs and maintenance of the device. Do not attempt to repair the 
device yourself.


7. Possible Malfunctions 


Problem 

Cause 

Solution 

No cooling 

  Power cable improperly 

connected 

  Safety fuse has been 

activated. 
 

  Power outage 

  Damaged temperature 

regulator. 

  Remove plug and connect it 

again. 

  Check safety fuse, check the 

device by connecting it to 
another socket. 

  Check the power supply 

  Contact a sales agent 

Weak cooling 

  Heat source too close or 

device exposed to direct 
sunlight. 

  Poor air circulation in the 

device. 


  Temperature set 

improperly.  

  Device is overfilled. 

  Ensure sufficient space 

between device and heat 
source. 

  Ensure sufficient space 

between device's walls and 
other objects 

  Check settings, set a lower 

temperature. 

  Do not overfill device, remove 

excess products.  

The aforementioned problems are only examples. If these or other problems 
appear, turn the device off immediately and stop using it. Ask for help from 
qualified specialist personnel in examining and repairing the device. 

Содержание Buffet

Страница 1: ...s 18 Instruction manual Refrigerated showcase from page 19 to 36 Mode d emploi Vitrine r frig r e de page 37 page 54 Gebruiksaanwijzing Koelvitrine blz 109 t m 126 Instrukcja obs ugi Witryna ch odnicz...

Страница 2: ...ackung 6 3 3 Lagerung 6 4 Technische Daten 7 4 1 Technische Angaben 7 4 2 Baugruppen bersicht 8 5 Installation und Bedienung 9 5 1 Sicherheitshinweise 9 5 2 Aufstellen und Anschlie en 10 5 3 Bedienung...

Страница 3: ...bolerkl rung Wichtige sicherheits und ger tetechnische Hinweise sind in dieser Bedienungsanleitung durch Symbole gekennzeichnet Die Hinweise sind unbedingt zu befolgen um Unf lle Personen und Sachsch...

Страница 4: ...die sich aus der Nichtbeachtung der Bedienungsanleitung ergeben bernimmt der Hersteller keine Haftung Die Bedienungsanleitung ist unmittelbar am Ger t und zug nglich f r alle Personen die am oder mit...

Страница 5: ...f hrdungen und zur Sicherung der optimalen Leistung d rfen am Ger t weder Ver nderungen noch Umbauten vorgenommen werden die durch den Hersteller nicht ausdr cklich genehmigt worden sind Das Ger t dar...

Страница 6: ...r f r den gewerblichen Gebrauch konzipiert und gebaut und vom Fachpersonal in K chenbetrieben zu bedienen Die Betriebssicherheit des Ger tes ist nur bei bestimmungsgem er Verwendung entsprechend der A...

Страница 7: ...der Inbetriebnahme das u ere und innere Verpackungsmaterial vollst ndig vom Ger t HINWEIS Falls Sie die Verpackung entsorgen m chten beachten Sie die in Ihrem Land geltenden Vorschriften F hren Sie w...

Страница 8: ...usswert 140 W 230 V 50 Hz Abmessungen Ger t B 1050 x T 845 x H 640 mm maximale Innenh he unten 205 mm oben 175 mm Gewicht 61 0 kg Zubeh r Zwischenablage aus Glas B 925 x T 250 mm Technische nderungen...

Страница 9: ...et ren Bedienseite Rechte Glasscheibe Zwischenablage Untere Abstellfl che Luftauslass Geh use Stellf e LED Beleuchtungsleiste Luftansaugung Linke Glasscheibe Abgerundete Frontscheibe Digitaler Tempera...

Страница 10: ...Netzkabel Netzkabel nicht ber Teppichstoff oder andere W rmeisolierungen verlegen Netzkabel nicht abdecken Netzkabel von Arbeitsbereichen fernhalten und nicht in Wasser oder andere Fl ssigkeiten einta...

Страница 11: ...das Geh use des Ger tes auf eine ebene Fl che und montieren Sie die einzelne Glaselemente an dem Geh use der K hlvitrine laut folgenden Montageanleitung 1 Setzen Sie die rechte Seitenscheibe in die r...

Страница 12: ...Glasscheibe an der Querhalterung fest 7 Legen Sie die Zwischenablage auf die an den Seitenscheiben vormontierten Auflageschienen 8 Setzen Sie die Innen Glasschiebet r an der R ckseite des Ger tes ein...

Страница 13: ...ienperson Verdecken Sie niemals die L ftungs ffnungen des Ger tes Stellen Sie das Ger t nicht an Pl tzen mit hoher Luftfeuchtigkeit auf Zuviel Feuchtigkeit kann zu Besch digungen am Ger t f hren In un...

Страница 14: ...an eine geerdete Einzelsteckdose an In der Digitalanzeige erscheint der voreingestellte Temperaturwert und die LED K hlanzeige leuchtet auf Lassen Sie das Ger t erst die eingestellte Temperatur erreic...

Страница 15: ...nderung des Sollwertes dr cken Sie kurz die Taste der eingestellte Wert beginnt kurz darauf zu blinken den Wert nach Bedarf mit den Tasten oder erh hen oder vermindern den eingestellten Temperaturwert...

Страница 16: ...Lebensmittel vor HINWEIS Keine warmen Speisen in die K hlvitrine stellen die Speisen zuerst auf Raum temperatur abk hlen lassen Die Best ckung der K hlvitrine erfolgt ber die bedienseitige Glasschiebe...

Страница 17: ...Desinfektionsreiniger und einem weichen Tuch o Zur leichteren Reinigung k nnen die Glasschiebet ren an der Bedienseite heraus genommen werden Reinigen Sie diese mit einem geeigneten Reinigungsmittel...

Страница 18: ...er Strom versorgung hat ausgel st Stromausfall Temperaturregler defekt Netzstecker ziehen und richtig einstecken Sicherung kontrollieren Ger t an anderer Steckdose testen Stromversorgung pr fen H ndle...

Страница 19: ...t sich mit einer auf Entsorgung spezialisierten Firma Kontakt aufzunehmen oder sich mit der Entsorgungsabteilung Ihrer Kommune in Verbindung zu setzen WARNUNG Damit der Missbrauch und die damit verbun...

Страница 20: ...storage 24 3 1 Delivery check 24 3 2 Packaging 24 3 3 Storage 24 4 Technical data 25 4 1 Technical specification 25 4 2 Overview of parts 26 5 Installation and operation 26 5 1 Safety instructions 27...

Страница 21: ...servicing maintenance or cleaning 1 2 Key to symbols In this manual symbols are used to highlight important safety instructions and any advice relating to the device The instructions should be followe...

Страница 22: ...ot following the instructions for use The instruction manual should be kept near the device easily accessible for anyone wishing to work with or using it We reserve the right to make technical changes...

Страница 23: ...hazards and to ensure optimum efficiency no modifications or alterations to the device that are not explicitly approved by the manufacturer may be undertaken This device may only be operated in techn...

Страница 24: ...d constructed only for commercial use and should be operated by qualified personnel Safe operation is only guaranteed when using the device for its intended purpose Any technical interventions as well...

Страница 25: ...The outer and inner packing material should be removed completely from the device before installation NOTE If you liked to dispose the packing consider the regulations applicable in your country Supp...

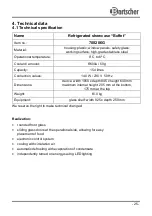
Страница 26: ...50 Hz Dimensions device width 1050 x depth 845 x height 640 mm maximum internal height 205 mm at the bottom 175 mm at the top Weight 61 0 kg Equipment glass shelf width 925 x depth 250 mm We reserve t...

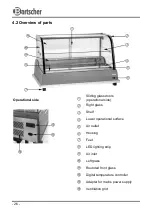
Страница 27: ...Sliding glass doors operational side Right glass Shelf Lower operational surface Air outlet Housing Feet LED lighting strip Air inlet Left glass Rounded front glass Digital temperature controller Adap...

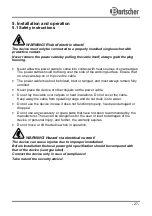
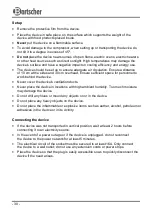
Страница 28: ...on the power cable Do not lay the cable over carpets or heat insulations Do not cover the cable Keep away the cable from operating range and do not dunk it into water Do not use the device in case it...

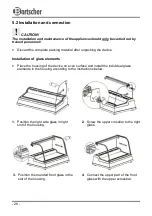
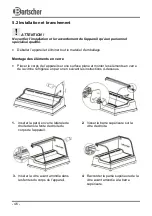
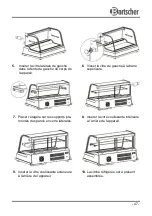
Страница 29: ...nstallation of glass elements Place the housing of the device on even surface and install the individual glass elements in the housing according to the instructions below 1 Position the right side gla...

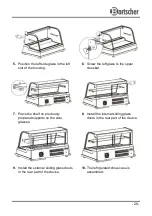
Страница 30: ...ass to the upper crossbar 7 Place the shelf on previously prepared supports on the side glasses 8 Install the internal sliding glass doors in the rear part of the device 9 Install the external sliding...

Страница 31: ...behind the device Never cover the device s ventilation ducts Never place the device in locations with high ambient humidity Too much moisture may damage the device Do not drill any holes or mount any...

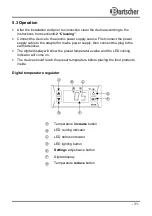
Страница 32: ...or mains power supply then connect the plug to the earthed socket The digital display will show the preset temperature value and the LED cooling indicator will come on The device should reach the pres...

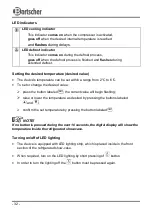
Страница 33: ...set or change the desired value press the button labeled the current value will begin flashing raise or lower the temperature as desired by pressing the buttons labeled and confirm the set temperature...

Страница 34: ...propriate food products inside Prepare the appropriate food products NOTE Warm food should be cooled to room temperature prior to placing in the refrigerated show case The food is placed in the show c...

Страница 35: ...e washed periodically with use of soft cloth and disinfecting agent certified for the food industry o In order to facilitate cleaning remove the sliding glass doors Clean the doors with use of appropr...

Страница 36: ...ble improperly connected Safety fuse has been activated Power outage Damaged temperature regulator Remove plug and connect it again Check safety fuse check the device by connecting it to another socke...

Страница 37: ...ance with the national regulations It is advisable to contact a company which is specialized in waste disposal or just contact the local disposal service in your community WARNING To exclude any abuse...

Страница 38: ...spection suite au transport 42 3 2 Emballage 42 3 3 Stockage 42 4 Donn es techniques 43 4 1 Indications techniques 43 4 2 Aper u des composants 44 5 Installation et utilisation 45 5 1 Consignes de s c...

Страница 39: ...ion 1 2 Explication des symboles Les consignes de s curit et informations techniques importantes concernant l appareil sont indiqu es dans la pr sente notice d utilisation par des symboles Il est imp...

Страница 40: ...r sultant du non respect de la notice d utilisation Cette derni re doit tre conserv e directement avec l appareil et tre accessible toute personne travaillant sur et avec l appareil Nous nous r servon...

Страница 41: ...antir une performance optimale de l appareil celui ci ne doit tre ni modifi ni transform sans autorisation expr s du fabricant N utiliser l appareil que lorsque celui ci est en parfait tat de s curit...

Страница 42: ...n conforme ATTENTION L appareil a t con u et fabriqu uniquement pour un usage industriel et ne peut tre utilis que par un personnel qualifi La s curit de fonctionnement de l appareil est garantie uniq...

Страница 43: ...es Retirer compl tement les emballages ext rieur et int rieur avant la mise en service de l appareil REMARQUE Si vous d sirez liminer l emballage respectez les consignes en vigueur dans votre pays R i...

Страница 44: ...t 140 W 230 V 50 Hz Dimensions appareil larg 1050 x prof 845 x H 640 mm hauteur int rieure maximum en bas 205 mm en haut 175 mm Poids 61 0 kg Accessoires tag re en verre larg 925 x prof 250 mm Sous r...

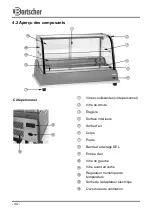
Страница 45: ...issantes c t personnel Vitre de droite tag re Surface int rieure Sortie d air Corps Pieds Bande d clairage DEL Entr e d air Vitre de gauche Vitre avant arrondie R gulateur num rique de temp rature Sor...

Страница 46: ...ordon sur la moquette ou autres isolations thermiques Ne pas couvrir le cordon Tenir le cordon loign des zones de travail Ne pas utiliser l appareil lorsque celui ci ne fonctionne pas correctement est...

Страница 47: ...s de l appareil sur une surface plane et monter les l ments en verre de la vitrine r frig r e un par un en suivant les instructions ci dessous 1 Ins rer la paroi en verre lat rale de droite dans la fe...

Страница 48: ...er la vitre de gauche la barre sup rieure 7 Placer l tag re sur les supports pr mont s des parois en verre lat rales 8 Ins rer la vitre coulissante int rieure l arri re de l appareil 9 Ins rer la vitr...

Страница 49: ...ce suffisant pour le personnel du c t accessible par l utilisateur Ne jamais obstruer les ouvertures de ventilation de l appareil Ne pas installer l appareil dans un endroit fort taux d humidit Une tr...

Страница 50: ...la fiche une prise raccord e la terre La temp rature r gl e s affiche sur l cran num rique et l indicateur DEL de r frig ration s allume Avant de placer des aliments dans l appareil attendre que la t...

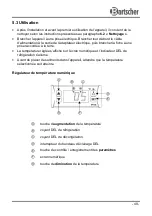
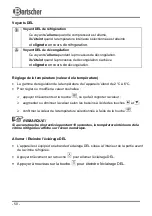
Страница 51: ...pareil s tend de 2 C 6 C Pour r gler ou modifier la valeur souhait e appuyer bri vement sur la touche ce qui fait clignoter la valeur augmenter ou diminuer la valeur selon les besoins l aide des touch...

Страница 52: ...aliments pour qu ils soient adapt s l appareil REMARQUE Ne pas placer de plats chauds dans la vitrine r frig r e attendre que les aliments atteignent la temp rature ambiante Mettre en place les alime...

Страница 53: ...d sinfectant approuv pour l industrie agroalimentaire o Pour faciliter le nettoyage retirer les vitres coulissantes Nettoyer les vitres avec un produit nettoyant adapt et un chiffon souple puis bien s...

Страница 54: ...l raccord Le coupe circuit lectrique s est activ Panne d lectricit Le r gulateur de temp ra ture est endommag Retirer la fiche et la rebrancher correctement V rifier le fusible et essayer l appareil e...

Страница 55: ...a dur e de vie conform ment aux prescriptions nationales Il est recommand de contacter une entreprise sp cialis e dans la gestion des l ments us s ou de contacter le d partement d limination de votre...

Страница 56: ...3 1 Controle bij aflevering 114 3 2 Verpakking 114 3 3 Bewaring 114 4 Specificaties 115 4 1 Technische Gegevens 115 4 2 Overzicht van onderdelen 116 5 Installatie en bediening 117 5 1 Veiligheidsvoors...

Страница 57: ...ke veiligheids en technische instructies zijn in deze gebruiksaanwijzing aangeduid door symbolen Deze instructies moeten bij het gebruik van dit apparaat absoluut in acht worden genomen om ongelukken...

Страница 58: ...jzing Bewaar de gebruiksaanwijzing in de buurt van het product en zorg dat hij toegankelijk is voor alle personen die met het apparaat werken Wij behouden ons het recht voor om technische veranderinge...

Страница 59: ...erking te garanderen mag het apparaat zonder uitdrukkelijke toestemming van de fabrikant niet veranderd of omgebouwd worden Het apparaat mag alleen gebruikt worden als het zich in goede technische en...

Страница 60: ...geconstrueerd voor professioneel gebruik en moet worden bediend door gekwalificeerd gastronomisch personeel De veiligheid is alleen dan gegarandeerd als het apparaat gebruikt wordt in overeenstemming...

Страница 61: ...ele schade aan ons servicepunt moet sturen Verwijder voor de ingebruikname het buitenste en binnenste verpakkingsmateriaal volledig van het apparaat AANWIJZING Indien u de verpakking wilt weggooien le...

Страница 62: ...0 W 230 V 50 Hz Afmetingen apparaat B 1050 x D 845 x H 640 mm maximale binnenhoogte onderaan 205 mm bovenaan 175 mm Gewicht 61 0 kg Accessoires tussenschab uit glas B 925 x D 250 mm Wijzigingen voorbe...

Страница 63: ...ifdeuren bedieningszijde Rechtse glasruit Tussenschab Onderste plaatsingsvlak Luchtuitlaat Behuizing Stelvoetjes LED verlichtingslijst Luchtaanzuiging Linkse glasruit Afgeronde voorruit Digitale tempe...

Страница 64: ...abel niet onder tapijt of andere warmte isolatie leggen De kabel niet afdekken De kabel weghouden van het werkvlak en niet in water onderdompelen Gebruik het apparaat niet als het niet juist functione...

Страница 65: ...menten Plaats de behuizing van het apparaat op een effen vlak en monteer de afzonderlijke glazen elementen op de behuizing van de koelvitrine volgens de montage instructie hieronder 1 Plaats de rechts...

Страница 66: ...kse glasruit aan de dwarslat vast 7 Leg het tussenschab op de aan de zijruiten voorgemonteerde oplegrails 8 Monteer de binnenste glazen schuifdeur aan de achterkant van het apparaat 9 Monteer de buite...

Страница 67: ...nt De ventilatieopeningen van het apparaat nooit bedekken Zet het apparaat niet op plaatsen waar een hoge luchtvochtigheid voorkomt Te hoge luchtvochtigheid kan beschadiging van het apparaat veroorzak...

Страница 68: ...een geaard enkel stopcontact Op de digitale display verschijnt de vooraf ingestelde temperatuurwaarde en de LED van de koelaanduiding gaat branden Wacht totdat het apparaat de ingestelde temperatuur b...

Страница 69: ...veranderen van de gewenste waarden druk kort op knop direct daarna begint de ingestelde waarde te knipperen verhoog of verlaag deze waarde naar wens met behulp van de knoppen of bevestig de ingesteld...

Страница 70: ...worden geplaatst Maak de geschikte voedingswaren klaar AANWIJZING Plaats geen warme gerechten in de koelvitrine laat de gerechten eerst afkoelen tot kamertemperatuur De bevoorrading van de koelvitrine...

Страница 71: ...desinfecterende reiniger en een zachte doek o Om het schoonmaken te vergemakkelijken kunnen de glazen schuifdeuren aan de bedieningszijde uit het apparaat worden genomen Maak deze schoon met een gesch...

Страница 72: ...de stroom voorziening is uitgeslagen Stroomuitval Defecte temperatuur regelaar Steek de stekker goed in het stopcontact Controleer de zekering probeer of het apparaat werkt in een ander stopcontact C...

Страница 73: ...orden verwijderd in overeenstemming met in uw land geldende voorschriften Aanbevolen wordt om contact op te nemen met een bedrijf dat gespecialiseerd is in verwijdering WAARSCHUWING Om misbruik en de...

Страница 74: ...ynowanie 186 3 1 Kontrola dostawy 186 3 2 Opakowanie 186 3 3 Magazynowanie 186 4 Parametry techniczne 187 4 1 Dane techniczne 187 4 2 Zestawienie podzespo w urz dzenia 188 5 Instalacja i obs uga 188 5...

Страница 75: ...ce bezpiecze stwa oraz kwestii technicznych oznaczono w niniejszej instrukcji obs ugi odpowiednimi symbolami Wskaz wek tych nale y bezwzgl dnie przestrzega aby unikn ewentualnych wypadk w uszczerbku...

Страница 76: ...awartych w instrukcji obs ugi Instrukcj obs ugi nale y przechowywa bezpo rednio przy urz dzeniu ponadto musi by ona dost pna dla wszystkich os b pracuj cych z urz dzeniem Zastrzegamy sobie prawo do wp...

Страница 77: ...czne i bezawaryjne u ytkowanie urz dzenia O ile nie uzyskano wyra niej zgody producenta zabrania si dokonywa jakichkolwiek zmian lub modyfikacji urz dzenia aby unikn ewentualnych zagro e i zapewni opt...

Страница 78: ...e i skonstruowane tylko do u ytku przemys owego i powinno by obs ugiwane przez wykwalifikowany personel Urz dzenie pracuje bezpiecznie tylko wtedy kiedy jest u ywane zgodnie ze swoim przeznaczeniem Ws...

Страница 79: ...ca kowicie usun z niego zewn trzny i wewn trzny materia opakowaniowy WSKAZ WKA Przy utylizacji opakowania nale y przestrzega przepis w obowi zuj cych w danym kraju Materia y opakowaniowe nadaj ce si...

Страница 80: ...Hz Wymiary urz dzenie szer 1050 x g 845 x wys 640 mm maksymalna wysoko wewn trz na dole 205 mm u g ry 175 mm Ci ar 61 0 kg Wyposa enie szklana p ka szer 925 x g 250 mm Zastrzegamy sobie prawo dokonyw...

Страница 81: ...ne szklane drzwi strona obs ugowa Prawa szyba P ka Dolna powierzchnia u ytkowa Wylot powietrza Obudowa Stopki Listwa o wietlenia LED Wlot powietrza Lewa szyba Zaokr glona szyba przednia Cyfrowy regula...

Страница 82: ...ni na innych materia ach termoizolacyjnych Przewodu nie wolno zakrywa Przew d nale y trzyma z dala od obszaru roboczego i nie wolno zanurza go w wodzie Nie nale y u ywa urz dzenia je li jest ono niesp...

Страница 83: ...niowy Monta szklanych element w Ustawi obudow urz dzenia na r wnej powierzchni i zamontowa poszczeg lne szklane elementy do obudowy witryny ch odz cej wed ug poni szych wskaz wek monta owych 1 W prawe...

Страница 84: ...szyb do g rnej poprzeczki 7 Na wcze niej zamontowanych podp rkach przy szybach bocznych po o y p k 8 W tylnej cz ci urz dzenia osadzi wewn trzne szklane drzwi przesuwne 9 W tylnej cz ci urz dzenia os...

Страница 85: ...dla osoby obs uguj cej Nigdy nie zakrywa otwor w wentylacyjnych urz dzenia Nie ustawia urz dzenia w miejscach w kt rych wyst puje du a wilgotno powietrza Zbyt du a ilo wilgoci mo e spowodowa uszkodzen...

Страница 86: ...t pnie pod czy wtyczk do uziemionego gniazda Na wy wietlaczu cyfrowym pojawi si ustawiona warto temperatury i za wieci si wska nik ch odzenia LED Przed umieszczeniem artyku w spo ywczych urz dzenie po...

Страница 87: ...ia lub zmiany warto ci danej kr tko nacisn przycisk kr tko po tym ustawiona warto zaczyna miga odpowiednio do potrzeb zwi kszy lub zmniejszy warto za pomoc przycisku lub ustawion warto temperatury zat...

Страница 88: ...rtyku y spo ywcze WSKAZ WKA W witrynie ch odniczej nie nale y umieszcza ciep ych potraw potrawy musz najpierw ostygn do temperatury pokojowej Umieszczanie artyku w w witrynie odbywa si poprzez przesuw...

Страница 89: ...i rodka dezynfekcyjnego dopuszczonego dla bran y spo ywczej o W celu u atwienia czyszczenia mo na wyj przesuwne szklane drzwi Drzwi nale y czy ci za pomoc odpowiedniego rodka czyszcz cego i mi kkiej...

Страница 90: ...du pr dowego Zanik zasilania Uszkodzony regulator temperatury Wyci gn wtyczk i ponownie j pod czy poprawnie Sprawdzi bezpiecznik spraw dzi urz dzenie po pod czeniu do innego gniazdka Sprawdzi zasilani...

Страница 91: ...urz dzenie nale y podda utylizacji zgodnie z obowi zuj cymi w danym kraju regulacjami Zalecamy skontaktowa si ze specjalistyczn firm lub nawi za kontakt z kom rk ds utylizacji we w adzach gminy UWAGA...

Отзывы: