background image


Installation and operation 

18 / 22 

100533 

EN 

During grilling, the grease and left-overs are drained through the left-hand side 
grease drain opening to the grease collection tray.  

If needed, using a suitable metal scraper to this end, move grilling left-overs from 
the roasting surface over the grease drain opening and down to the grease 
collection tray.  

 
6.  Check the grease collection tray regularly, and, if needed, empty it after it has 

cooled down. 

7.  Remove grilled and ready products from the roasting surface, using suitable 

grilling utensils (grill thongs, grill fork, etc.). 

8.  When the grilling process is finished and the griddle plate is no longer used, 

rotate the temperature controller(s) to '0' position.  


Grilling / Roasting Foods in Salamander  

1.  Depending on the type of the prepared food or the height of the food container, 

select one of the grill grate guides and insert the grate into the appliance. 

2.  Insert the grease collection tray into the appliance, underneath the grill grate. 

3.  Place food in a suitable container (plates, baking trays, etc.) on the grill grate 

and under the radiator heating element.  

WARNING! 

Fire hazard! 

Make sure the food on the grill grate does not come in contact with radiator 
heating element. 

 
4.  Set the desired temperature using the power output controller:  

–  select the highest setting of the power output controller for roasting and 

grilling, 

–  select a lower setting for heating up or temperature maintenance. 

 
During heating up the orange salamander heating up indicator light is on. As soon 
as the set temperature is reached, the indicator light goes off. If the temperature in 
the appliance drops and radiator heating element is switched on again by the power 
output controller, the heating up indicator light lights up again. This process is 
repeated until the power output controller is rotated to '0' (OFF) position. 

 
5.  If needed, select one of the time storing keys 1

–6. In order to set time, follow 

indications in section 

'Settings/Timer'

.  

6.  Remove the ready food in containers fro the salamander, using dish-washing 

cloths or doilies and serve. 

7.  Remove the grill grate from the appliance using the handles. 

Содержание 6640

Страница 1: ...6640 100533...

Страница 2: ...cher GmbH Franz Kleine Str 28 D 33154 Salzkotten Germany Phone 49 5258 971 0 Fax 49 5258 971 120 Technical Support Hotline 49 5258 971 197 www bartscher com Version 1 0 Date of preparation 2022 05 02...

Страница 3: ...7 2 3 Declaration of Conformity 7 3 Transport Packaging and Storage 8 3 1 Delivery Check 8 3 2 Packaging 8 3 3 Storage 8 4 Technical Data 9 4 1 Technical Specifications 9 4 2 Functions of the Applian...

Страница 4: ...included in this manual is a prerequisite for safe and proper handling of the appliance Additionally accident prevention occupational health and safety and legal regulations in force in the area the...

Страница 5: ...nt Too high a mains voltage or incorrect installation may cause electric shock The appliance may be connected only if data on the rating plate correspond with the mains voltage To avoid short circuit...

Страница 6: ...h fire Never use the appliance near flammable or inflammable materials e g petrol spirit alcohol etc High temperature triggers evaporation of these materials and as a result of contact with sources of...

Страница 7: ...ce The appliance may only be used in a technically flawless condition providing for safe use The appliance may only be used with connections in a technically flawless condition providing for safe use...

Страница 8: ...intended use The following is an intended use grilling of meat fish and vegetables toasting suitable food 1 4 Unintended Use An unintended use may lead to personal injuries or property damages caused...

Страница 9: ...troduced by the user usage of unapproved spare parts We reserve the right to introduce technical modifications to the product intended for improvement of the appliance and its performance 2 2 Copyrigh...

Страница 10: ...used to store the appliance when relocating or when shipping the appliance to our service point in the case of any damages The packaging and its elements are made of recyclable materials Particularly...

Страница 11: ...re range from to in C 50 300 Number of heating zones 2 Salamander temperature range up to in C 190 Number of salamander heating elements 1 Number of salamander heating zones 1 Grill grate dimensions w...

Страница 12: ...ease collection tray for griddle plate for salamander Digital display Control knob electronic ON OFF switch Indicator lights ON OFF heating up Endergebnis 4 2 Functions of the Appliance The space savi...

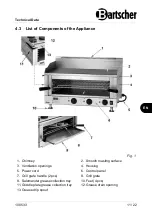
Страница 13: ...1 1 Chimney 2 Smooth roasting surface 3 Ventilation openings 4 Housing 5 Power cord 6 Control panel 7 Grill grate handle 2 pcs 8 Grill grate 9 Salamander grease collection tray 10 Feet 4 pcs 11 Griddl...

Страница 14: ...pliance remove all external and internal packaging elements and shipment safeguards CAUTION Choking hazard Prevent children from accessing package materials for instance plastic bags and EPS If the ap...

Страница 15: ...items Connection Electrical connection of the appliance to mains power supply must be executed by a qualified electrician according to international national and local regulations in force Verify if...

Страница 16: ...Fire hazard Never place any kitchen utensils towels paper etc on the roasting surface during operation Do not place plastic nor any other containers on the roasting surface Preparation of the Applian...

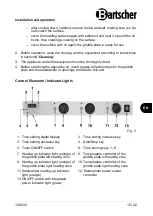
Страница 17: ...on insert grease collection trays for the griddle plate and the salamander in openings provided to this end Control Elements Indicator Lights Fig 2 1 Time setting digital display 2 Time setting incre...

Страница 18: ...be introduced within the range of 50 300 C The majority of grilling processes require the temperature of 180 240 C During the heating up phase the orange heating up indicator light of a given heating...

Страница 19: ...or light in the ON OFF switch lights up Preparing Food on Griddle Plate 1 Oil the roasting surface slightly NOTE The entire roasting surface is divided into two heating zones which may be independentl...

Страница 20: ...eath the grill grate 3 Place food in a suitable container plates baking trays etc on the grill grate and under the radiator heating element WARNING Fire hazard Make sure the food on the grill grate do...

Страница 21: ...mains power supply 6 Cleaning 6 1 Safety Instructions for Cleaning Before cleaning disconnect the appliance from the power supply Leave the appliance to cool down completely Make sure water does not...

Страница 22: ...emove all traces of the cleaning agent 4 Dry the roasting surface thoroughly ATTENTION Do not scour the griddle plate too excessively with the metal scraper If it is scoured to the point that it shine...

Страница 23: ...soft cloth or sponge 3 Rinse in fresh water 4 Dry grease collection trays thoroughly before you insert them again in the appliance Appliance 1 Wipe the housing of the appliance chimney and anti splas...

Страница 24: ...ontroller has not been operated Rotate the temperature controller or power output controller to the required setting Damaged thermostat Contact the supplier Damaged heating element Contact the supplie...

Отзывы: