background image

5.1 INSTALLATION AND START-UP

The device can be used in any standard 

flush or cavity wall box. Remove the glass 
touch attachment from the mounting fra-
me by loosening the four allen screws (Fig. 

1) with the supplied allen wrench. 

Attach the mounting frame, connect the 
glass touch to the power supply and attach 

the cover again using the allen screws.
t

The programme running can be stopped 

by pressing the pause button . By pressing 
the pause button again, the programme 
will continue. When the pause button is 

pressed for more than 3 seconds, the con-
troller will be turned off.
The start programme can be stored by 
pressing the pause button for more than 

10 seconds, after the supply voltage is at-

tached. In this case the controllers will be 
turned off.

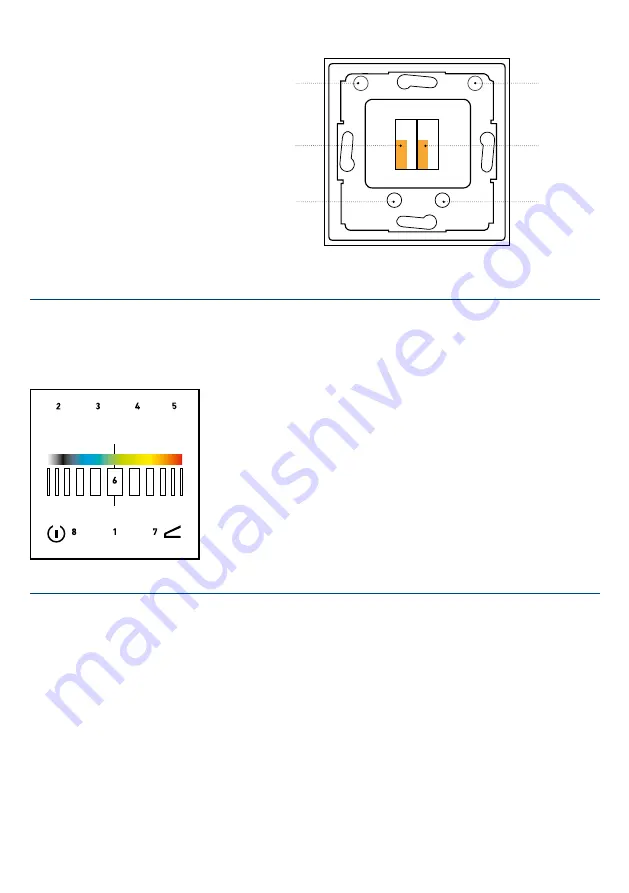
5.2. KEY ASSIGNMENTS | FUNCTIONS 

DIE TASTEN DES GLASS TOUCH SIND 
NACH FOLGENDEM SCHEMA BELEGT:

FIG.: 1

ABB.: 2

When the slider is used, without having 
pressed one of the select buttons, a colour 
from the colour templates can be chosen. 

This colour template can be edited using 

“ProCEd” software and USB dongle.

When a select button (e.g. red ) is pressed 
first, the slider will control the brightness 

of this colour. This feature will remain acti-
vated for 3 seconds –status LED is blinking
A short press on thedim button and the 
dim feature is activated on the slider 
which can be noticed by a blinking LED. 
This dim value also applies for the colour 

Allen screw

Connection terminal 

+

Connection terminal 

-

Allen screw

Allen screw

Allen screw

changes. 
A short press of the dim button also 
activates the feature buttons. Keypad 
configuration as follows:

•  Select button white

»

 programme plus 

(editable via software)

•  Select button blue 

»

programme minus 

(editable via software) 

•  Select button green 

»


(editable via software)

•  Select button red 

»

 colour –  

(editable via software)

PROGRAMMES:

1.   Fixed colours

2.  Normal colour change 
3.  Medium colour change
4.  Slow colour change
5.   „Blob“-   

randomly up lighted/dimmed colours 

6.  „LSD“- randomly changing colours
7.  „Fire“ -Fire simulation 

8. Flashes

9.    „Bursts“: Randomly selected,  

non-synchronised flashes

10.   User effect #1  

(adjustable via Software ProCEd)

11.   User effect #2  

(adjustable via Software ProCEd)

12.   User effect #3  

(adjustable via Software ProCEd)

W

B

G

 Status  LED

  Select button white resp. 2. Feature 

Standard: Pr 

  Select button blue resp. 2. Feature 

Standard: Programm - 

  Select button green resp. 2. Feature  

Standard: Color + 

 Select button red resp. 2. Feature 

Standard: Color - 

 Slider

 Select button dim or 
activates 2. feature 

 Short  press  PAUSE 

Long press OFF

Содержание CHROMOFLEX PRO GLASS TOUCH

Страница 1: ...FLEX Pro Modulen Die getätigten Einstellungen können auf den CHROMOFLEX Pro Modulen gespei chert werden so dass beim erneuten Ein schalten der Versorgungsspannung der gewünschte Effekt oder die gewünschte Farbe automatisch startet Die Steuerung verwendet kontaktlose berührungsemp findliche Bereiche und einen berührungs empfindlichen Schieberegler Die CHROMOFLEX Pro Serie verwendet die in der EU Sc...

Страница 2: ...bleibt für ca 3 Sekunden nach Betätigung dieser Funktionstaste aktiv zu erkennen an der blinkenden Status LED Bei kurzem Druck auf dieDimm Taste wird der Schieberegler zur Dimmerleiste zu erkennen an der blinkenden Status LED Dieser Dimmwert gilt dann auch für die Farbprogramme Madenschraube Anschlussklemme Anschlussklemme Madenschraube Madenschraube Madenschraube Zugleich werden bei kurzem Druck ...

Страница 3: ...TEN STAND 06 2016 6 VERNETZUNG Im einfachsten Fall wird nur ein einzelnes Modul betrieben Die Fernbedienung muss daher nur mit einem einzigen Modul kom munizieren Die Werkseinstellungen sind so dass jedes Modul auf jede Fernsteue rung mit Werkseinstellung reagiert Netz 10 Mithilfe der PC Software ProCEd und dem USB Dongle können Gruppen gebil det werden so lassen sich mehrere Netze unabhängig vone...

Страница 4: ...ven if connected for a short time only Please remove and replace empty batte ries because they could leak We decline any liability loss or damage caused by improperly used modules Gu arantee is also lost in such cases This product is not a toy keep away from children 1 INTRODUCTION CHROMOFLEX Pro is an advancement of CHROMOFLEX I II and RC The PRO version consists of up to 4 channels for modern R ...

Страница 5: ...eature will remain acti vated for 3 seconds status LED is blinking A short press on thedim button and the dim feature is activated on the slider which can be noticed by a blinking LED This dim value also applies for the colour Allen screw Connection terminal Connection terminal Allen screw Allen screw Allen screw changes A short press of the dim button also activates the feature buttons Keypad con...

Страница 6: ...ote control responds to all units within radio range If the master is out of this range it will proceed sending his set tings to the slaves Therefore it is import ant that the master is within the range of the remote control 8 CONTENTS Every CHROMOFLEX Pro Glass Touch is shipped with this manual The instruc tions are an integral part of the equip ment to which they relate and must be handed to the...

Отзывы: