background image

73

BARRETT 4050 HF SDR TRANSCEIVER - OPERATING AND INSTALLATION MANUAL

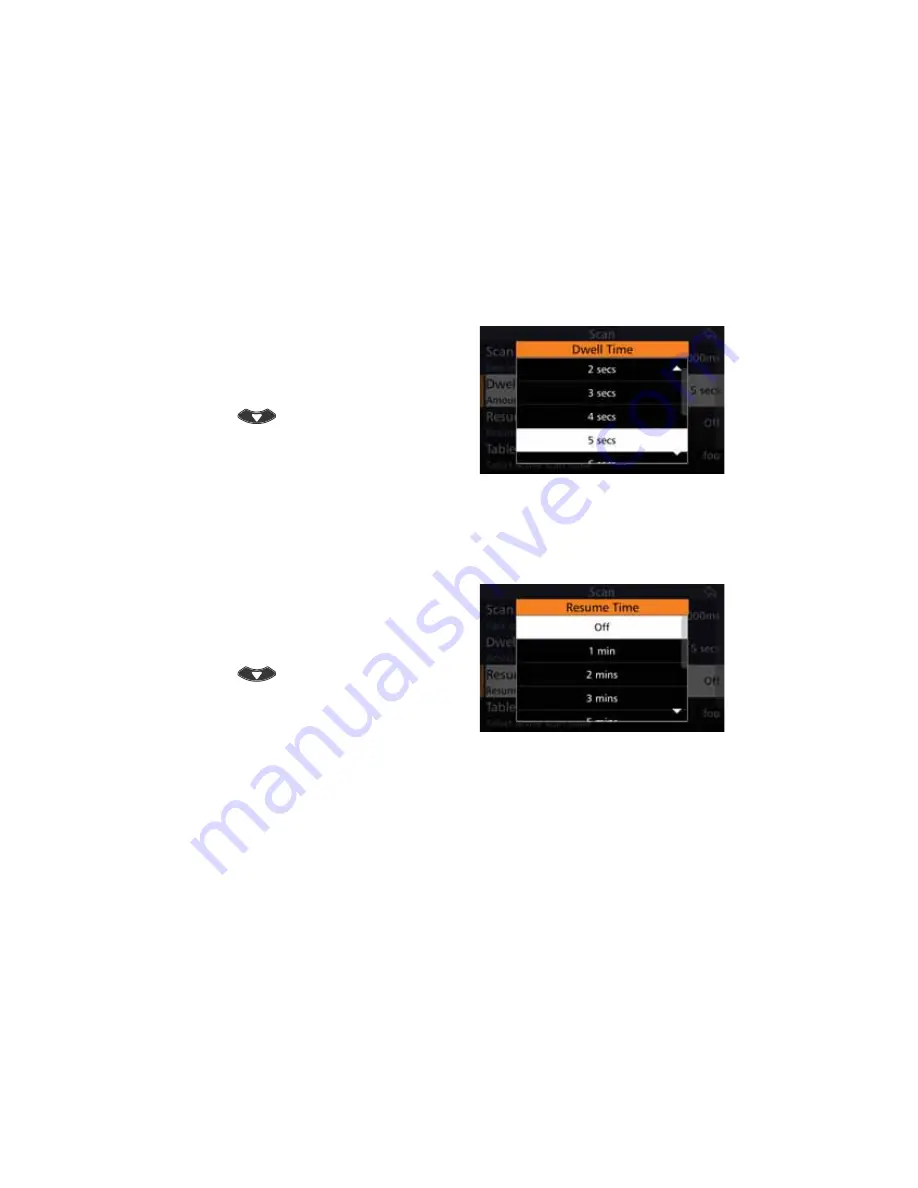
Dwell Time

Select the length of time the Transceiver dwells (waits) on a channel after scan 

has been stopped by signal strength level (if signal strength level mute is set) or 

voice activity (if audio mute is set).

Tap 

'ZHOO7LPH

 from the Scan 

screen to display the Dwell Time 

screen. 
To reveal more items, either swipe 

down on the touch screen or press 

.

Select between one and ten seconds.

Resume Time

Set the time period after which the Transceiver will automatically resume scan-

ning from the last operation. For example, after a key press or PTT.

Tap 

Resume Time

 from the Scan 

screen to display the Resume Time 

screen. 
To reveal more items, either swipe 

down on the touch screen or press 

.

Select either: Off, 1, 2, 3, 5, 10, 15, 

20, or 30 minutes.

Table Selection

Select the Scan Table to be used when the Transceiver is put into scan mode, or 

if enabled, when scan resume occurs. 

There can be up to eight Scan Tables.

Note: When scrolling through the Scan Tables to make a selection, only Scan Tables 

with channels entered will display. If none of the Scan tables have any channel 

entries, the message “All Scan Tables Empty“ displays.

Содержание 4050 HF SDR

Страница 1: ...Communications Pty Ltd 47 Discovery Drive Bibra Lake WA 6163 Australia Tel 61 8 9434 1700 Fax 61 8 9418 6757 Email information barrettcommunications com au www barrettcommunications com au Operating and Installation Manual Barrett 4050 HF SDR Transceiver ...

Страница 2: ...witching the Transceiver Off 19 Volume 19 Power Button Menus 20 Capture 20 Reboot Shutdown 21 Resync 21 Locking and Unlocking the Screen 21 Display 22 Using the Microphone 24 Programming Functions 25 Program a New Channel from the Front Panel 25 Emergency Calls 26 Receiving an Emergency Call 27 Barrett Selective Calling System 28 Summary of Calling Systems 28 Selective Call Selcall 29 Selcall Self...

Страница 3: ...g Allcalls Group Calls and Sub group Calls 34 Receiving an Allcall Group Call or Sub group Call 35 Telcall 35 Send a Telcall 35 Last Number Redial 37 Receive a Telcall 37 Pagecall 38 Send a Pagecall 38 Receive a Pagecall 39 GPS Req 40 GPS Pos 41 Hangup 42 Status 43 Requesting Another Station s Status 43 Secure 44 Contacts 45 Favourites 46 Call History 47 All 47 Received 47 Sent 48 Menus 49 Setting...

Страница 4: ... Calls Hop Rate 58 Secure Call Code 58 TC2 Programming Mode 58 Labels 59 Add a Channel Label 59 Edit a Channel Label 60 Delete a Channel Label 60 Channels 60 Search For a Channel 61 Add a Channel 61 Number 62 Label 62 Rx Frequency 62 Tx Frequency 63 Mode 63 Tx Power 63 Selcall Format 64 ALE Channel 64 Antenna Socket 64 Save Channel 65 Edit a Channel 65 Delete a Channel 66 Contacts 66 Sort Contacts...

Страница 5: ...dit Scan Tables 74 Add a Scan Table 74 Scan Table Name 75 Antenna Socket 75 Scan Table Channel List 75 Save a Scan Table 76 Edit a Scan Table 76 Delete a Scan Table 76 Mute 77 Syllabic Sensitivity 77 Signal Strength Level 77 Selcall 78 Audio in Tx 78 Preamable Time 79 Default Int Selcall ID 4 Digits 79 Default Int Selcall ID 6 Digits 79 OEM Privacy Key 80 OEM Selcall ID 4 Digits 80 OEM Selcall ID ...

Страница 6: ... 5 RQÀJXUDWLRQ 88 7 RQÀJXUDWLRQ 89 Audio Bandwidth 89 Line Audio 90 Line Follows Digital Voice 90 Line Out Level 91 Line In Level 91 Audio Record 91 RF 92 Rx Preamp 92 Tx Over Beep 93 Transmit Timeout 93 Noise Blanker 94 Tx Power Level 94 AGC Hang 95 Broadcast Filter 95 Preselector 95 IO 96 RS232 Out 96 RS232 Baud Rate 97 EXT Alarm Type 97 Antenna 1 Type 98 Antenna 2 Type 99 ALE 100 ALE Set up Ove...

Страница 7: ...veraging 108 LSU Mode 109 ALE 3G Channels 110 ALE 3G Addresses 110 Save the ALE Settings 110 System Info 111 System Status 111 Version Information 112 Transceiver Options 113 Enter Option PINs 113 4050 Serial Number 114 Call History 114 Export 114 Display 115 Level of Display Backlight 116 Backlight Timeout 116 Display Timeout Behaviour 116 Transmit Meter Mode 117 Receive Meter Mode 117 Temperatur...

Страница 8: ...hannels 130 Selecting a Channel 131 Search For a Channel 131 Hop 132 Selecting the Hop Band 132 Entering the Security Code 132 Security Codes and Bandwidths 132 To Enable Hopping Mode 133 To Disable Hopping Mode 133 Tune 134 Mode 134 NR 135 Scan 135 Selcall Scan 136 Signal Strength Scan SSL Scan 136 Voice Syllabic Scan 136 Mute 137 Swipe Menu 138 Wireless Application 139 Downloading the Barrett SD...

Страница 9: ...rom the SDR 146 Cooling Fan 147 Installing the Cooling Fan 147 Connectors 148 Power Connector 148 GPS Connector 148 Aux Control Head BoB Connector 149 Auxiliary Connector 149 ATU Connector 151 Microphone Connector 151 Control Head Rear Panel Connector 152 Cooling Fan Connector 152 6SHFLÀFDWLRQV 153 General 153 Receiver 154 Transmitter 155 Installation 156 Mobile Pack 156 Land Based Systems 159 Fix...

Страница 10: ...Station Installations 177 Connection Details for a 4050 Transceiver and 4011 Automatic QWHQQD 7XQHU LQ D DVH 6WDWLRQ RQÀJXUDWLRQ 178 Mobile Installations 180 Site Selection Recommendations 180 Power Wiring 181 Earthing 181 Antenna 182 Antenna Mounting 182 Antenna Feed Cables 182 Voltage Standing Wave Ratio VSWR 182 Noise Suppression 182 Interference Suppression Kit 183 General Noise Suppression Ti...

Страница 11: ...050 Transceiver and 911 Automatic Antenna Tuner in a Marine Installation 201 Overview of HF Operation 203 HF Propagation 203 Radio Wave Propagation 204 Factors Which Affect HF SSB Communications 205 Frequency Selection 205 Time of Day 205 Weather Conditions 205 Man made Electrical Interference 206 6 VWHP RQÀJXUDWLRQ DQG QVWDOODWLRQ 206 HF Communications Compared with VHF or UHF Short Distance Comm...

Страница 12: ...HIÀFLHQW FRROLQJ V VWHP option The Barrett 4050 Transceiver can be operated in either a local desktop con ÀJXUDWLRQ IRU EDVH VWDWLRQ DSSOLFDWLRQV RU ZLWK WKH DGGLWLRQ RI DQ LQH SHQ VLYH PRELOH SDFN LQ D UHPRWH FRQWURO WUXQN PRXQW FRQÀJXUDWLRQ IRU PRELOH applications The Barrett 4050 Transceiver can be controlled from all major mobile and desktop platforms The Barrett 4050 handset app supports iOS ...

Страница 13: ...CIR 2QH RI PDQ SRVVLEOH 6HOFDOO IRUPDWV DV GHÀQHG E WKH Consultative Committee on International Radio CCIR CW Continuous Wave used for Morse code dB Decibels dBm Power ratio in decibels dB of the measured power refer enced to one milliwatt mW DSP Digital Signal Processing ESU Encryption Synchronisation Unit FHSS Frequency Hopping Spread Spectrum FSK Frequency Shift Keying GPS Global Positioning Sy...

Страница 14: ...adio Frequency RFDS Royal Flying Doctor Service Selcall Format Rx Receive Scan Table A list of channels used when scanning for incoming calls Selcall Selective Calls SCF Suppressed Carrier Frequency SSL Signal Strength Level Station ID The ID of the station being called the receiving station s Self ID Self ID 7KH SURJUDPPHG DGGUHVV LGHQWLÀFDWLRQ QXPEHU RI D ORFDO station Used by other stations to ...

Страница 15: ...L Exploring the 4050 HF Transceiver Transceiver Front Panel Power button which combines switching the Transceiver on and off with adjusting the volume This will be represented as throughout the manual USB WiFi Socket Touchscreen Keypad Mini USB Socket Microphone socket ...

Страница 16: ...ther to initiate an emergency call See page 26 for further information Transceiver Front Panel Rear View 15 way Transceiver plug for remote front panel interface cable Speaker jack Stand offs supplied to enable the front panel to be detached and an interface cable to be secured in position The front panel may be detached from the Transceiver for remote operation by pulling the front panel away fro...

Страница 17: ...PS receiver P N BCA40009 for vehicle tracking location applications ANT Main antenna socket ATU Interface for Barrett automatic tuning mobile antenna and marine automatic antenna tuners AUXILIARY 25 way auxiliary interface SPEAKER Output for loudspeaker P N BCA40015 AUX CONTROL HEAD BoB This can be used to attach a secondary control head via a six metre cable in addition to the front panel This ca...

Страница 18: ... MANUAL Switching the Transceiver On Off Switching the Transceiver On Momentarily press to turn the Transceiver on A progress bar displays beneath the logo The Splash screen displays whilst the keypad illuminates white green red and white The Home screen displays ...

Страница 19: ...nsceiver returns to the Home VFUHHQ DQG EULHÁ GLVSOD V D UHG FRQ ÀUPDWLRQ PHVVDJH WKDW WKH GHYLFH LV Shutting Down A progress bar displays the status of the shutting down process Volume Rotate clockwise to increase the volume and anti clockwise to decrease The rectangular icon beneath the loudspeaker icon increases and de creases in length correlating with the volume ...

Страница 20: ...Power Button menu to perform a screen capture FRQÀUPDWLRQ PHVVDJH GLVSOD V DQG the screen capture is stored in the Transceiver To transfer the screen capture from the Transceiver to a PC connect a cable with a mini USB plug into the Transceiver s front USB port and plug the other end with a standard USB plug into a PC s USB port From the Transceiver s home screen select Menu Export to display the ...

Страница 21: ... FRQ ÀUPDWLRQ PHVVDJH WKDW WKH GHYLFH LV shutting down Resync Tap 5HV QF from the Power Button menu to resynchronise the Transceiver data with the control head Whilst resynchronising the keypad illuminates green and the Busy status indi cator animates Locking and Unlocking the Screen Press and hold IRU ÀYH VHFRQGV to lock the screen The following screen displays and the locked icon is visible on t...

Страница 22: ...ALLATION MANUAL Display 14 15 Tune Status page 134 Digital Voice page 138 Status Indicators Access Point WiFi Low Voltage Screen Lock Busy GPS USB Call Received BoB Active page 120 page 118 page 21 page 148 Import page 127 Export page 114 page 31 page 123 ...

Страница 23: ...s page 49 Antenna page 64 ALE Channel Status page 60 Selective Call Mode page 64 Transmit Power page 63 Mode page 63 Receive Strength Indicator Channel Label page 59 Frequency page 62 14 Channel Number page 62 15 ALE System Status page 102 See page 115 for further information on Display Settings ...

Страница 24: ... with the PTT transmit switch for a set time period after which the Transceiver switches to receive until the PTT transmit button is released and re keyed This facility prevents the transmitter transmitting for long periods of time if for example the microphone becomes jammed between seats in a vehicle causing the PTT transmit switch to be held down Enabling disabling and changing the time of the ...

Страница 25: ...ge 127 Program a New Channel from the Front Panel Note To program a channel from the front panel it is necessary to have this func tion enabled via the Barrett 4050 HF SDR Programming Software P N BCA40001 Each channel requires the following parameters to be set Channel Number Channel Label Rx Frequency Tx Frequency Channel Mode USB LSB FSK CW or AM Channel Power 10 30 125 or 150 watt Note 150 W n...

Страница 26: ...emergency Selcall sequence twice on each channel pro grammed as an emergency channel Royal Flying Doctor Service RFDS alarm Two tone alarm 880 Hz 1320 Hz continuous Australian use only alerts the Royal Flying Doctor Service on RFDS channels The RFDS alarm will continue transmitting for ten seconds even if you have released the and buttons To cancel the RFDS alarm press the PTT button or the button...

Страница 27: ...ION MANUAL Receiving an Emergency Call On receipt of an emergency Selcall a distinctive audio alarm is emitted and the following message displayed If the Transceiver sending the emer JHQF 6HOFDOO LV ÀWWHG ZLWK D 36 receiver the position will also be displayed ...

Страница 28: ...th other major HF manufacturers including those using encryption Includes Selcall Telcall Beacon Call Emergency call Pagecall and GPS call 5 IRXU GLJLW 6HOHFWLYH DOO V VWHP DV VSHFLÀHG E 5 ALE FED STD 188 MIL STD 188 141B option MIL STD Automatic Link Establishment system refer to the Automatic Link Establishment ALE section on page 100 Summary of Calling Systems Call Type International OEM CCIR E...

Страница 29: ...essed to the relevant ID OEM or International Calls for each format type will only be decoded if there is at least one Self ID of that format programmed into the Transceiver Self ID group Selcall Transmit 6HOFDOO IRUPDWV LQ WUDQVPLW DUH FKDQQHO VSHFLÀF RU H DPSOH RQO FDOO W SHV programmed for the channel are permitted This means International and CCIR format calls can only be sent on channels that...

Страница 30: ...ot been programmed by the Barrett 4050 HF SDR Programming Software P N BCA40001 a default privacy key of 99999999 is automatically used for transmission Six digit Page calls also use the privacy key but unlike the other calls the user has the option to manually enable or disable the privacy key When disabled the data is sent as plain text Emergency GPS calls are automatically sent as plain text fo...

Страница 31: ...two areas The narrow left hand area has four menu options The broader right hand area displays the screens for each of the menu options The Call menu options are Call Type Contacts Favourites and Call History These options are described below Menu Options for calls Call Type Press and if necessary tap to display the Manual Call screen From this screen choose the type of call to be made The choices...

Страница 32: ...est to use either subse quent Selcalls or Telcalls Note both stations must be programmed for Selcall or Telcall operation Send a Beacon Call LVWHQ IRU WUDIÀF RQ RXU VHOHFWHG FKDQQHO I WUDIÀF LV KHDUG FKDQQHO is occupied select another channel and try again Press and if necessary tap to display the Manual Call screen Tap HDFRQ to display the Selcall ID screen Use the keyboard to type the Selcall ID...

Страница 33: ...o display the Manual Call screen Tap 6HOFDOO to display the Selcall ID screen Use the keyboard to type the Selcall ID then tap Enter or press and wait for the Selective Call to be sent Listen for revertive tone from the called station that indicates the call was successful I WKH UHYHUWLYH WRQH LV QRW KHDUG RU LW ZDV GLIÀFXOW WR KHDU WU DQRWKHU FKDQQHO and repeat the process until a good channel is...

Страница 34: ...to dis play the Call History screen Refer to the Call History section on page 47 Receiving Allcalls Group Calls and Sub group Calls Stations can send a Selective Call that will alert different groupings of mobiles as follows In four digit format Allcall A station sending X000 will be received by stations X000 X999 up to 890 stations Group call A station sending XX00 will be received by stations XX...

Страница 35: ...isplays For details of previously received Selcalls press and then tap to dis play the Call History screen Refer to the Call History section on page 47 Telcall Telcall uses this digital Selective Call system to send a telephone number on an HF network Telcalls are primarily used to send to stations equipped with a telephone interconnect unit to initiate phone calls onto the PSTN 1RWH RU 6HOFDOO DQ...

Страница 36: ...press to display the Telcall screen From the Telcall screen tap either Enter phone number or 6HOHFW IURP FRQWDFW If Enter phone number was selected the Phone Number screen displays Type the phone number using the keyboard and either press or tap Enter to return to the home screen and send the Telcall The home screen momentarily dis plays the Telcall ID ...

Страница 37: ...when the call is successful wait for telephone connection to be made and then proceed with the call When the call is complete or if the line is busy send a Hang Up call see page 42 Last Number Redial Press four times and the last telephone number sent displays Press once more and the Telcall sequence will be re sent Receive a Telcall Note To receive a Telcall your Transceiver must be programmed wi...

Страница 38: ...on displays and a periodic audio reminder is emitted After the timeout the call received icon displays For details of previously received Telcalls press and then tap to dis play the Call History screen Refer to the Call History section on page 47 Pagecall Pagecall SMS allows messages of up to 32 characters in International format or 64 characters in OEM format to be sent or received to and from ot...

Страница 39: ...ss to send Receive a Pagecall When a Pagecall is received an audible alarm sounds any mute is disabled and the Pagecall screen displays The Pagecall screen shows the Selcall ID and message Tap Stop to stop the audible alarm but maintain the Pagecall screen Tap Close To close the Pagecall screen The audible alarm will sound for 60 seconds and then time out To cancel the alarm before the time out pe...

Страница 40: ...W FKDQQHO Note Use a Beacon Call initially to select the best channel see page 32 I WUDIÀF LV QRW KHDUG SUHVV and if necessary tap to display the Man ual Call screen Tap GPS Req to display the Selcall ID screen Use the keyboard to type the Selcall ID then tap Enter or press The station you called returns its position The GPS Data screen displays the caller s Selcall Alias if available or alternati...

Страница 41: ...ing position information when using the GPS call option Use and to select the channel you want to send the GPS call on DQG OLVWHQ IRU WUDIÀF RQ WKDW FKDQQHO Note Use a Beacon Call initially to select the best channel see page 32 I WUDIÀF LV QRW KHDUG SUHVV and if necessary tap to display the Man ual Call screen Tap GPS Pos to display the Selcall ID screen Use the keyboard to type the Selcall ID th...

Страница 42: ... necessary tap to display the Manual Call screen Tap Hangup to display the Selcall ID screen Use the keyboard to type the Selcall ID then tap Enter or press When the hang up Selcall has com pleted transmitting listen for hang XS UHYHUWLYH WRQH ZKLFK FRQÀUPV WKDW the hang up was successful When hanging up a telephone in terconnect call the hang up process may be repeated until a revertive tone is h...

Страница 43: ... status request Selcall Forward power output level VSWR of the antenna Temperature Selcall ID of the last radio called Requesting Another Station s Status Use and to select the channel you want to send the Status UHTXHVW FDOO RQ DQG OLVWHQ IRU WUDIÀF RQ WKDW FKDQQHO Note Use a Beacon Call initially to select the best channel see page 32 I WUDIÀF LV QRW KHDUG SUHVV and if necessary tap to display t...

Страница 44: ...Call screen Tap 6HFXUH to display the Selcall ID screen Use the keyboard to type the Selcall ID then tap Enter or press and wait for the Selective Call to be sent Note To make a secure call to multiple stations use a group call ID encom passing the required stations Listen for the secure call revertive tone from the called station which indicates the call was successful Note The secure call revert...

Страница 45: ...formation on adding editing and deleting contacts Press and if necessary tap to display the Contacts screen A list of contacts displays From the Contacts screen either Select a contact from the Contact list Scroll down the list to reveal more contacts by either swiping down on the touch screen or pressing and then tapping the desired contact Search for Contacts by tapping WKH RQWDFWV ÀHOG WR UHYHD...

Страница 46: ...creen either Select a contact from the favour ites list Scroll down the list to reveal more contacts by either swiping down on the touch screen or pressing and then tapping the desired contact Search for Contacts by tapping WKH DYRXULWHV ÀHOG WR UHYHDO D keyboard Tap the search criteria LQWR WKH DYRXULWHV ÀHOG Either tap or press or to display the results of the search To add a contact see page 67...

Страница 47: ...in the Sent tab Each history buffer can store up to 100 entries Press and if necessary tap to display the Call History screen The Call History screen has three tabs All Received and Sent These are described below All This tab displays a list of all calls sent and received The list also details the Selcall ID and the times of the calls Received This tab lists all types of Selcalls that have been re...

Страница 48: ...l types of Selcalls that have been transmitted From the Call History screen tap Sent to display a list of all calls sent Select the call displayed in any of the three Call History tabs to display the channel number frequency date and time Tap Call to proceed with a call to the selected number ...

Страница 49: ...ys the following menus Settings Channels Hop Tune Mode NR Scan Mute These menus are described in the following sections Settings Select the Settings menu to display the Settings screen which enables access to the following sub menus General Security Labels Channels Contacts Scan Mute Selcall Audio RF IO ALE System Info Call History Export Display Network BoB if connected Import Update To reveal su...

Страница 50: ...ansceiver Lock Beep Level Alarm Audio Level Ring Tones 5 RQÀJXUDWLRQ 7 RQÀJXUDWLRQ Audio Bandwidth Line Audio Line Follows DV Line Out Level Line In Level Audio Record Scan Rate Dwell Time Resume Time Table Selection Edit Scan Tables Syllabic Sensitivity Signal Strength Level Delete Edit Add Delete Edit Add Number Label Rx Frequency Tx Frequency Mode Tx Power Selcall Format ALE Channel Antenna Soc...

Страница 51: ...acklight Backlight Timeout Display Timeout Behaviour Transmit Meter Mode Receive Meter Mode Temperature Units System Status Version Information Transceiver Options 4050 Serial Number ALE State 2G Preset Map Response Control Sounding Control Sounding Address LQA Exchange LQA Averaging LQA Decay Rate Threshold Test SINAD Threshold BER Threshold RS 232 Out RS232 Baud Rate Ext Alarm Type Antenna 1 Typ...

Страница 52: ...cription of each of the LWHPV ZKLFK PD EH FRQÀJXUHG LV described beneath the items The current status of each of the items is displayed to the right Each item on the list is described below Transceiver Name Tap 7UDQVFHLYHU 1DPH from the HQHUDO RQÀJXUDWLRQV VFUHHQ WR display the SDR Name screen The numbers in the parenthesis indicate how many characters you have used total number of characters allo...

Страница 53: ...e HQHUDO RQÀJXUDWLRQV VFUHHQ WR GLV play the Mic Up Down Keys screen Select either Disabled Channel or Volume See page 24 for information on how to use the microphone Date and Time Tap DWH DQG 7LPH from the Gen HUDO RQÀJXUDWLRQV VFUHHQ WR GLVSOD the Date Time screen Set the Transceiver s date and time by swiping the touch screen vertically against the columns for hour min ute day month and year KH...

Страница 54: ...ically populate the ÀHOGV LQ WKH DWH DQG 7LPH VFUHHQ BITE Test Tap BITE Test to perform internal testing These tests essentially include all the hardware which make up the Transceiver The built in test is also automatically performed when the Transceiver is switched on Language Tap Language from the General RQÀJXUDWLRQV VFUHHQ WR GLVSOD WKH Language screen Change the display language from the list...

Страница 55: ...LVSOD WKH Security Settings screen OLVW RI LWHPV WKDW PD EH FRQÀJ ured is displayed A brief description of each of the items is described beneath the items The current status of each of the items is displayed to the right Each item is described below Hopping PIN Tap RSSLQJ 3 1 from the Security Settings screen to display the Hop ping PIN screen Type the Hopping PIN maximum 8 characters and then ta...

Страница 56: ...t either Standard or High OEM Secure Type This displays whether a scrambler has been installed and the name of the scrambler See below for further information OEM Secure Key The Audio Scrambler option is only available to Transceivers using the internally ÀWWHG DXGLR VFUDPEOHU DFFHVVRU PRGXOH WKDW SURYLGHV EDFNZDUGV FRPSDWLELOLW to the 900 series audio inversion scrambler P N BCA20031 Telsy or the...

Страница 57: ... to EH HQWHUHG LQWR WKH 7 PRGXOH ÀUVW using a third party TC2 tool Tap 6HFXUH LJLWDO 9RLFH H from the Security Settings screen to display the Secure Digital Voice Key screen Select between 1 and 15 The Transmit Transceiver must have the same number key as the Receive Transceiver in order to communicate Secure Data Key The Secure Data Key is used to secure data Keys need to be entered into WKH 7 PR...

Страница 58: ...Rate screen Select either Standard or High Secure Call Code Tap 6HFXUH DOO RGH from the Security Settings screen to display the Secure Call Code screen Type the four digit PIN and tap Enter TC2 Programming Mode I WKH 7UDQVFHLYHU LV ÀWWHG ZLWK D 7 module this option enables TC2 to be programmed Tap TC2 Programming Mode from the Security Settings screen to display the TC2 Programming Mode screen Sel...

Страница 59: ... channel is used for For example UNHCR Geneva Note Channel labels may be applied to channels when adding a channel See page 62 Tap Labels from the Settings screen to display the Channel Labels screen A list of currently used channel labels display Add a Channel Label To add a channel label tap to display the Add Label screen Use the keyboard to type the name of the label then tap yp to save ...

Страница 60: ...any characters you have used total number of characters allowed Use the keyboard to edit the name of the label then tap to save Delete a Channel Label To delete a channel label from the Channel Labels screen select the channel label you wish to delete then tap and hold for three seconds FRQÀUPDWLRQ PHVVDJH GLVSOD V Tap Yes Channels Tap Channels from the Settings screen to display the Channels scre...

Страница 61: ...d a Channel To add a channel tap to display the Add Channel screen A list of attributes that may be con ÀJXUHG LV GLVSOD HG 7R UHYHDO PRUH attributes either swipe down on the touch screen or press A brief description of each of the DWWULEXWHV ZKLFK PD EH FRQÀJXUHG LV described beneath the attribute The current status of each of the attributes is displayed to the right Each attribute on the list is...

Страница 62: ...o represent the desired channel number then tap Enter Label Tap Label from the Add Channel screen to display the Label screen Select a label from the Label screen To reveal more items either swipe down on the touch screen or press See page 59 for information on Channel labels Rx Frequency Tap 5 UHTXHQF from the Add Channel screen to display the Chan nel Receive Frequency screen Tap DFN WR FOHDU WK...

Страница 63: ...gits to represent the desired values in kHz Mode Tap Mode from the Add Channel screen to display the Mode screen To reveal more items either swipe down on the touch screen or press The choices are Upper Sideband Lower Sideband Frequency Shift Key ing Continuous Wave Morse code and Amplitude Modulation Tx Power Tap Tx Power from the Add Channel screen to display the Tx Power screen Select either 10...

Страница 64: ...ither None INT CCIR OEM RFDS NW1 NW2 NW3 NW4 or NW5 Refer to page 28 for further infor mation on Selcall systems ALE Channel Displays the ALE status of a channel either True False or Disabled Antenna Socket Tap QWHQQD 6RFNHW from the Add Channel screen to display the Anten na Socket screen Select either Antenna 1 or Antenna 2 Note As there is only one antenna socket on the Transceiver this option ...

Страница 65: ...DJH GLVSOD V Tap Yes Edit a Channel To edit a channel select the desired channel by using the and keys from the Channel screen page 60 and either tap the chan nel or press from the keypad The Channel Information screen GLVSOD V GLW WKH ÀHOGV DV GHVFULEHG above Add a Channel After the channel s attributes have EHHQ HGLWHG D FRQÀUPDWLRQ PHVVDJH displays Tap Yes ...

Страница 66: ... Settings screen to display the Contacts screen A list of contacts display Each contact shows their Selcall ID and telephone number Sort Contacts There are two sort icons 7R VRUW E ÀUVW QDPH WDS To sort by last name tap Only one sort icon will display at any time I WKH OLVW KDV DOUHDG EHHQ VRUWHG E ÀUVW QDPH WKH 6RUW DVW 1DPH LFRQ ZLOO display If the list has already been sorted by last name the S...

Страница 67: ...LQWR WKH RQWDFWV ÀHOG Either tap or press or to display the results of the search Add a Contact To add a contact tap The Add Contact screen displays OLVW RI LWHPV WKDW PD EH FRQÀJXUHG is displayed To reveal more items ei ther swipe down on the touch screen or press The current status of each of the items is displayed to the right Each item on the list is described below ...

Страница 68: ... to the Add Contact screen Surname Tap Surname from the Add Contact screen to display the Surname screen Tap the appropriate characters from WKH NH ERDUG LQWR WKH 6XUQDPH ÀHOG The numbers in the parenthesis indi cate how many characters you have used total number of characters allowed Tap to save and return to the Add Contact screen ID Type Tap 7 SH from the Add Contact screen to display the ID Ty...

Страница 69: ...rom the Id Type screen to display the Selcall ID screen Tap the appropriate characters from WKH NH ERDUG LQWR WKH 6HOFDOO ÀHOG Tap Enter to save and return to the Add Contact screen ARINC Tap 5 1 from the Id Type screen to display the ARINC Call screen Tap the appropriate characters from the keyboard into the ARINC Call ÀHOG 7KH QXPEHUV LQ WKH SDUHQWKHVLV indicate how many characters you have used...

Страница 70: ...from the Add Contact screen to display the ALE Addresses screen Tap the appropriate characters from the keyboard into WKH GGUHVV ÀHOG Tap to save and return to the Add Contact screen Email Address Tap Email Address from the Add Contact screen to display the Email Address screen Tap the appropriate characters from the keyboard into the Email Address ÀHOG 7KH QXPEHUV LQ WKH SDUHQWKHVLV indicate how ...

Страница 71: ... 3KRQH 1XPEHU ÀHOG Tap to save and return to the Add Contact screen Favourite Tap DYRXULWH from the Add Con tact screen to display the Favourite screen Select Yes to add to the favourite contacts Edit Contact To edit contact details select the de sired contact by using the and keys and either tap the con tact or press from the keypad The Edit Contact screen displays Edit the details as described a...

Страница 72: ...to display the Scan screen OLVW RI LWHPV WKDW PD EH FRQÀJ ured is displayed To reveal more items either swipe down on the touch screen or press Each item is described below Scan Rate Select the scan rate applicable to non Selcall scan channels Tap 6FDQ 5DWH from the Scan screen to display the Scan Rate screen To reveal more items either swipe down on the touch screen or press Select either 300 500...

Страница 73: ...r which the Transceiver will automatically resume scan ning from the last operation For example after a key press or PTT Tap Resume Time from the Scan screen to display the Resume Time screen To reveal more items either swipe down on the touch screen or press Select either Off 1 2 3 5 10 15 20 or 30 minutes Table Selection Select the Scan Table to be used when the Transceiver is put into scan mode...

Страница 74: ...ect to the entry number There are a maximum of 30 entries in each table Tap GLW 6FDQ 7DEOHV from the Scan screen to display the Selcall Scan Tables screen The example shows two scan tables which may be edited Each table reveals the name of the table the antenna the number of channels in the table and the channel numbers Add a Scan Table To add a Scan Table tap The Scan Table screen displays OLVW R...

Страница 75: ...ÀHOG Tap to save and return to the Scan Table screen Antenna Socket Tap QWHQQD 6RFNHW from the Scan Table screen to display the Antenna Socket screen Select either Antenna 1 or Antenna 2 Note As there is only one antenna socket on the Transceiver this option only applies if you are using a Break out box Scan Table Channel List Tap 6FDQ 7DEOH KDQQHO List from the Scan Table screen to display the Sc...

Страница 76: ...LRQ PHVVDJH GLVSOD V Tap Yes Edit a Scan Table To edit a table select the desired table and either tap the table or press from the keypad The Scan Table screen displays Edit the details as described above for Add a Scan Table Delete a Scan Table Select the table to be deleted then tap and hold for three seconds FRQÀUPDWLRQ PHVVDJH GLVSOD V Tap Yes ...

Страница 77: ...itivity screen Select either Low Medium or High sensitivity to voice activity on a channel Signal Strength Level Select the level at which the Signal Strength Level SSL mute squelch opens Tap 6LJQDO 6WUHQJWK HYHO from the Mute screen to display the Signal Strength Level screen Select either Low Medium or High When set to low the mute will open on a relatively low level of received signal When set ...

Страница 78: ...RQÀJXUHG is displayed A brief description of each of the items is described beneath the items The current status of each of the items is displayed to the right To reveal more items either swipe down on the touch screen or press Each item is described below Audio in Tx Tap Audio in Tx from the Selcall screen to display the Audio in Tx screen Select either Off Low or High ...

Страница 79: ... Network Selcall ID screen The default in this example is four digits 0000 Overtype the default by tapping the appropriate characters from the keyboard into the Network 6HOFDOO ÀHOG Tap Enter to save and return to the Selcall screen Default Int Selcall ID 6 Digits Tap HIDXOW QW 6HOFDOO from the Selcall screen to display the Network Selcall ID screen The default in this example is six dig its 00000...

Страница 80: ... in this example is six digits 0000 Overtype the default by tapping the appropriate characters from the keyboard into the Network 6HOFDOO ÀHOG Tap Enter to save and return to the Selcall screen OEM Selcall ID 6 Digits Tap 2 0 6HOFDOO from the Selcall screen to display the Network Selcall ID screen The default in this example is six dig its 000000 Overtype the default by tapping the appropriate cha...

Страница 81: ...edited Each Selcall Network reveal ing the name of the network alias the Selcall format the four and six digit Selcall ID Add a Selcall Network To add a Selcall Network tap The Selcall Network screen displays OLVW RI LWHPV WKDW PD EH FRQÀJXUHG is displayed A brief description of each of the items is described beneath the items The current status of each of the items is displayed to the right Each ...

Страница 82: ...g the appropriate characters from the key board into the Selcall Network Alias ÀHOG 7DS to save and return to the Selcall Network screen Selcall Format Tap 6HOFDOO RUPDW from the Selcall Network screen to display the Selcall Format screen Select either None INT CCIR OEM or RFDS 4 Digit Selcall ID Tap LJLW 6HOFDOO from the Selcall Network screen to display the Selcall ID screen The default ID is 00...

Страница 83: ...cters from the keyboard LQWR WKH 6HOFDOO ÀHOG Tap Enter to save and return to the Selcall Network screen Save a Selcall Network IWHU FRQÀJXULQJ WKH DERYH LWHPV tap to add the Selcall Network FRQÀUPDWLRQ PHVVDJH GLVSOD V Tap Yes Edit a Selcall Network To edit a Selcall Network select the desired network and either tap the network or press from the keypad The Selcall Network screen displays Edit the...

Страница 84: ...DWLRQ PHVVDJH GLVSOD V Tap Yes GPS Broadcast Enable Tap 36 URDGFDVW QDEOH from the Selcall screen to display the GPS Broadcast Enable screen Select either Disabled or Enabled This setting will either prevent or al low the periodic broadcasting of the Transceiver s GPS position Timings for the GPS broadcast are set via the Barrett 4050 HF SDR Program ming software P N BCA40001 ...

Страница 85: ...FHLYHU RFN from the Selcall screen to display the Selcall ID screen Use the keyboard to type the PIN then tap Enter The Transceiver Lock PIN screen displays Use the keyboard to type the PIN again then tap Enter The Transceiver Lock screen displays Tap Yes to send a Transceiver lock on the respective channel with the PIN Tap 1R to abort ...

Страница 86: ... to display the Audio screen OLVW RI LWHPV WKDW PD EH FRQÀJXUHG is displayed A brief description of each of the items is described beneath the items The current status of each of the items is displayed to the right To reveal more items either swipe down on the touch screen or press Each item is described below ...

Страница 87: ...ciated with key presses Annunciation beeps can be disabled for covert operations For other operations these are set purely for Operator feedback Tap HHS HYHO from the Audio screen to display the Beep Level screen Select either Off Low or High Alarm Audio Level Tap ODUP XGLR HYHO from the Audio screen to display the Alarm Au dio Level screen Select either Mute Low Med or High ...

Страница 88: ...ress 5 RQÀJXUDWLRQ This option sets where the unprocessed receiver audio in the Transceiver is sourced Normally this is set to internal in which case the Transceiver s receiver provides the unprocessed audio When used with a remote receiver in split site operations the audio path can be set to external In this case unprocessed received audio from the remote site can be input into the auxiliary soc...

Страница 89: ...n the path can be set to remote In this case the transmit audio is input into the auxiliary sockets 600 ohm balanced audio port Tap 7 RQÀJXUDWLRQ from the Au GLR VFUHHQ WR GLVSOD WKH 7 RQÀJX ration screen Select either Local or Remote Audio Bandwidth This section allows the audio bandwidth to be tailored to an Operator s com fort requirements Tap Audio Bandwidth from the Audio screen to display th...

Страница 90: ...condition currently in use The line output is usually set to Unmuted when using data modems Tap Line Audio from the Audio screen to display the Line Audio screen Select either Unmuted or Follows Mute Line Follows Digital Voice Line Follows Digital Voice may be used for example with a 2060 Tele phone Interconnect The 2060 PTTs the radio through the line and trans mits the voice From the drop down m...

Страница 91: ...l This setting adjusts the input level sensitivity of the auxiliary 600 ohm balanced audio input Tap LQH Q HYHO from the Audio screen to display the Line In Level screen Select either 9 6 3 0 3 6 9 12 18 24 dBm To reveal more items either swipe down on the touch screen or press Audio Record This option is used to monitor con versations It utilises the line audio to listen to the received and trans...

Страница 92: ... the items is displayed to the right To reveal more items either swipe down on the touch screen or press Each item is described below Rx Preamp QDEOHV RU GLVDEOHV WKH 5 SUH DPSOLÀHU 7KH SUH DPSOLÀHU SURYLGHV DQ DGGL WLRQDO UHFHLYHU JDLQ RI G HQHUDOO WKH 5 SUH DPSOLÀHU LV VZLWFKHG RII ZKHQ an automatic mobile antenna is in use as these antennas have a built in RF SUH DPSOLÀHU Tap Rx Preamp from the...

Страница 93: ...een to display the Tx Over Beep screen Select either Disabled or Enabled Transmit Timeout When this feature is enabled the Transceiver will stop transmitting if the PTT button is held on for more than the allowed time limit For example if the microphone is inadvertently jammed under a seat Releasing the PTT button will re enable transmission Tap Transmit Timeout from the RF screen to display the T...

Страница 94: ... nal power line noise is blanketing the receiver Tap 1RLVH ODQNHU from the RF screen to display the Noise Blanker screen Select either Off or On Note In certain situations noise blank ers can cause intermodulation in re ceivers In these cases the noise blanker should be disabled The noise blanker can also be con trolled from the Swipe menu see page 138 Tx Power Level This section sets the RF power...

Страница 95: ...aps in the received signal due to the slow AGC recovery Tap AGC Hang from the RF screen to display the AGC Hang screen Select either Hang Off or Hang AGC Broadcast Filter Tap URDGFDVW LOWHU from the RF screen to display the Broadcast Filter screen With the Broadcast Filter enabled strong broadcast signals below 0 ZLOO EH ÀOWHUHG RXW Select either Disabled or Enabled Preselector Tap 3UHVHOHFWRU fro...

Страница 96: ...played to the right To reveal more items either swipe down on the touch screen or press Each item is described below RS232 Out This setting enables or disables RS 232 Selcall information output from the Transceiver via the 25 pin auxiliary connector Tap RS232 Out from the IO screen to display the RS232 Out screen Select either Disabled or Enabled Note This command does not allow RS 232 control of ...

Страница 97: ...isplay the RS232 Baud Rate screen Select either 9600 or 115200 EXT Alarm Type This setting sets the action of the external alarm output when a Selcall is received by the Transceiver It can be set to either a pulse output for use with a horn where the output is activated 15 seconds on 15 seconds off or a con stant output for use with a rotating beacon Both are reset by pressing or the PTT button Ta...

Страница 98: ... tuning signals are emitted on channel change This selection should also be used when operating with a Barrett 2014 manu al tapped whip 910 Mobile Ant Using a Barrett 910 automatic tuning mobile antenna 911 Auto Tuner Using a Barrett 911 automatic tuner 2019 Mobile Ant Using a Barrett 2019 automatic tuning mobile HF antenna 2018 Loop Ant Using the 2018 Mobile magnetic loop HF antenna 4075 Linear 8...

Страница 99: ...screen or press Select an antenna type from the following Antenna Type Select when Base Station Base station antennas such as the Barrett 2012 series are used No tuning signals are emitted on channel change This selection should also be used when operating with a Barrett 2014 manu al tapped whip 910 Mobile Ant Using a Barrett 910 automatic tuning mobile antenna 911 Auto Tuner Using a Barrett 911 a...

Страница 100: ... information 100 FKDQQHO FRQÀJXUDWLRQV DQG D FRPELQDWLRQ RI DGGUHVV FRQÀJXUDWLRQV self address and other address Plus it has the ability to save unknown station information in an Auto Fill queue This allows new stations to join the ALE network without having to manually re program the network settings of HDFK 7UDQVFHLYHU LQ WKH QHWZRUN 7KHUH DUH VORWV DYDLODEOH IRU XWR ÀOO addresses ALE Set up Ove...

Страница 101: ...ever this feature can only be used if the ALE scan rate is set to 2 channels per second set in the Barrett 4050 HF SDR Programming Software P N BCA40001 ALE State Settings for 2G Tap ALE from the Settings screen to display the ALE Settings screen OLVW RI LWHPV WKDW PD EH FRQÀJXUHG is displayed To reveal more items either swipe down on the touch screen or press Note The list shown opposite is for a...

Страница 102: ...mode is shown on page 107 ALE State Tap ALE State from the ALE Set tings screen to display the ALE State screen Select either Disabled ALE 2G or ALE 3G Depending on your choice the list of items will change in the ALE Settings screen Preset Map Tap Preset Map from the ALE Set tings screen to display the ALE Preset Maps screen To reveal more items either swipe down on the touch screen or press Tap ...

Страница 103: ...bal or Preset Sounding Control ALE operates normally both transmitting and receiving sounds when Sounding Control is set to Enable In some circumstances it is desirable not to transmit soundings In this case Sounding Control is set to Disable Sounding is limited WR FHUWDLQ FKDQQHOV SUH SURJUDPPHG E WKH ÀOO SURJUDP 7KH V VWHP will continue to make and respond to calls depending on the Response Cont...

Страница 104: ...ddress used is dependent on the active channel Tap Sounding Address from the ALE Settings screen to display the ALE Call Self ID screen To reveal more items either swipe down on the touch screen or press Tap an ALE Call Self ID from the dis played list LQA Exchange This option enables or disables the exchange of LQA information with other stations Tap 4 FKDQJH from the ALE Settings screen to displ...

Страница 105: ...laced by the reading There are four different averaging formulas available Tap 4 YHUDJLQJ from the ALE Settings screen to display the LQA Averaging screen Select either No Averaging old new 2 3 old new 4 or 7 old new 8 LQA Decay Rate 7KLV RSWLRQ VHWV WKH DUWLÀFLDO GHFD UDWH IRU WKH OLQN TXDOLW LQIRUPDWLRQ WKDW LV stored in the link quality table within the ALE processor Switching the sounding off ...

Страница 106: ...ptable for communication Tap Threshold Test from the ALE Settings screen to display the Thresh old Test screen Select either None BER SINAD or Both SINAD Threshold This option sets the SINAD threshold in dB at which an ALE channel is considered usable Tap 6 1 7KUHVKROG from the ALE Settings screen to display the SINAD Threshold screen Type a value between 0 and 30 dB then tap Enter ...

Страница 107: ...link establishment process is rejected Depending on the retry setting the link establishment would continue on another link Tap BER Threshold from the ALE Settings screen to display the BER Threshold screen Type a value between 0 and 30 dB then tap Enter Selecting 30 effectively means that all links are allowed ALE State Settings for 3G Selecting ALE State 3G Mode displays a different menu shown o...

Страница 108: ... Link Timeout screen Type the number of seconds and tap Enter to save and return to the ALE Settings screen LQA Averaging This option sets the method used to update an existing link quality value stored in ALE processor memory when the new link quality value is worse than the stored value The option can be set to either replace the old values with the new values or replace the old values with diff...

Страница 109: ...ect the LSU mode to Synchro nous to set all the stations to be in synch However all Transceivers have to have GPS enabled so they can all scan at the same interval on the same channel Calls only need a short duration to enable other Transceivers to hear at the same time The advantages of synchronous include shorter calls shorter soundings and reduced QHWZRUN WUDIÀF Asynchronous If there is no GPS ...

Страница 110: ...lay the ALE 3G Channel List screen Tap the channel from the displayed list ALE 3G Addresses This option is only available if the ALE State is set to 3G Tap ALE3G Addresses from the ALE Settings screen to display the ALE 3G Address List screen Tap the address from the displayed list Save the ALE Settings IWHU FRQÀJXULQJ WKH DERYH LWHPV tap to save the ALE Settings FRQÀUPDWLRQ PHVVDJH GLVSOD V Tap Y...

Страница 111: ...tings screen to display the System Informa tion screen A list of items that may be viewed is displayed A brief description of each of the items is described beneath the items Each item is described below System Status Tap System Status from the System Information screen to display the System Information screen ...

Страница 112: ...LATION MANUAL Version Information Tap 9HUVLRQ QIRUPDWLRQ from the System Information screen to display the Software Version Information screen A list of items that may be viewed is displayed To reveal more items either swipe down on the touch screen or press ...

Страница 113: ...t may be viewed is displayed To reveal more items either swipe down on the touch screen or press Tap each option to toggle between enabling or disabling the options Enter Option PINs Tap QWHU 2SWLRQ 3 1V from the SDR Option Information screen to display the Option PIN screen Tap the appropriate characters from the keyboard into the Option PIN ÀHOG Tap Enter to save and return to the SDR Option Inf...

Страница 114: ...le by pressing Refer to page 47 for further information Export 7R H SRUW WKH GHYLFH V FRQÀJXUD tion settings insert a USB into the device s USB socket Use either the front USB socket using a mini USB or the USB socket located at the top of the device Tap Export from the Settings screen to display the Export screen 7DS SRUW RQÀJXUDWLRQ WR GLVSOD WKH RQÀJXUDWLRQ LOH 1DPH VFUHHQ The default name disp...

Страница 115: ...r con ÀUPLQJ WKH SURJUHVV RI WKH H SRUW When prompted tap 2 and remove the USB Display Tap LVSOD from the Settings screen to display the Display screen OLVW RI LWHPV WKDW PD EH FRQÀJXUHG is displayed A brief description of each of the items is described beneath the items The current status of each of the items is displayed to the right Each item is described below ...

Страница 116: ...High or Very High Backlight Timeout Set the backlight timeout after the last key press Tap DFNOLJKW 7LPHRXW from the Display screen to display the Back light Timeout screen Select either Short Timeout 1 min ute Long Timeout 3 minutes or Always On Note The Transceiver s power con sumption is reduced when the back light has a short timeout Display Timeout Behaviour Tap LVSOD 7LPHRXW HKDYLRXU from th...

Страница 117: ...rent units of value for the Re ceive Mode s signal strength dBm measures the units in decibels uV measures the units in microvolts and S Meter measures the units in S strength values For example 1 weakest to 7 strongest Tap 5HFHLYH 0HWHU 0RGH from the Display screen to display the Receive Meter Mode screen Select either dBm uV or S Meter Temperature Units This will enable the SDR to show which tem...

Страница 118: ...s WiFi Operation Mode Tap WiFi Operation Mode from the Network Settings screen to display the WiFi Operation Mode screen Select either Off WiFi Client or WiFi Access Point L L FOLHQW FRQQHFWV WR D VSHFLÀHG Internet IP address and port A WiFi Access Point is a device that creates a wireless local area network or WLAN and projects a Wi Fi signal to a designated area WiFi Client If WiFi Client was se...

Страница 119: ...ct to from the list You may be prompted for a password in order to connect to your chosen network Tap the 3DVVSKUDVH ÀHOG from the WiFi Network Setup screen to display the WiFi Passphrase screen Tap the appropriate characters from the keyboard into the WiFi Pass SKUDVH ÀHOG Tap to save and return to the WiFi Network Setup screen WiFi Passphrase 10 255 The password entered in the Pass SKUDVH ÀHOG L...

Страница 120: ...necting A further message displays con ÀUPLQJ WKH L L FRQQHFWLRQ HLWKHU successful or failed WiFi Access Point Mode If L L FFHVV 3RLQW was select ed from the WiFi Operation Mode screen the following screen displays WiFI Access Point Setup Tap L L FFHVV 3RLQW from the Net work Settings screen to display the WiFi Access Point screen ...

Страница 121: ...eyboard into the WiFi Access 3RLQW 66 ÀHOG Tap to save and return to the WiFi Access Point screen Password Tap Password from the WiFi Access Point screen to display the WiFi Ac cess Point Password screen Tap the appropriate characters from the keyboard into the WiFi Access 3RLQW 3DVVZRUG ÀHOG Tap to save and return to the WiFi Access Point screen FFHVV 3RLQW KDQQHO Tap FFHVV 3RLQW KDQQHO from the ...

Страница 122: ...ntry from the WiFi Access Point screen to display the Country screen Select the appropriate country WPS Push Button Tap WPS Push Button WiFi Pro tected Setup from the WiFi Access Point Mode screen to display the WPS Connection screen This option will initiate the WiFi pro tection setup ...

Страница 123: ...enu setting option is only avail able if the Transceiver is connected to a Break out Box BoB Tap BoB from the Settings screen to display the BoB screen OLVW RI LWHPV WKDW PD EH FRQÀJXUHG displays A brief description of each of the items is described beneath the items Each item is described below BoB Name Tap R 1DPH from the BoB screen to display the BoB Name screen The numbers in the parenthesis i...

Страница 124: ...on the list is described below DHCP QDPLF RVW RQÀJXUDWLRQ 3URWRFRO 3 LV D FOLHQW VHUYHU SURWRFRO WKDW automatically provides an Internet Protocol IP host with its IP address and RWKHU UHODWHG FRQÀJXUDWLRQ LQIRUPDWLRQ VXFK DV WKH VXEQHW PDVN DQG GHIDXOW gateway The DHCP is controlled by a DHCP server that dynamically distributes network FRQÀJXUDWLRQ SDUDPHWHUV VXFK DV 3 DGGUHVVHV IRU LQWHUIDFHV DQG...

Страница 125: ...sk Tap 1HWZRUN 0DVN from the BoB Network Settings screen to display the Network Mask screen The numbers in the parenthesis indi cate how many characters you have used total number of characters allowed Use the keyboard to type or edit the Network Mask then tap to save Default Gateway Tap HIDXOW DWHZD from the BoB Network Settings screen to display the Default Gateway screen The numbers in the pare...

Страница 126: ...any characters you have used total number of characters allowed Use the keyboard to type or edit the Primary DNS then tap p p p to save Secondary DNS Tap 6HFRQGDU 16 from the BoB Network Settings screen to display the Secondary DNS screen The numbers in the parenthesis indi cate how many characters you have used total number of characters allowed Use the keyboard to type or edit the Secondary DNS ...

Страница 127: ... either swipe down on the touch screen or press The current setting of each of the items is displayed to the right Import Update To update the Transceiver insert a thumb drive containing the update ÀOHV LQWR WKH 86 VRFNHW RQ WRS RI the front panel Tap PSRUW 8SGDWH from the Settings screen to display the Choose Action screen 6HOHFW HLWKHU PSRUW RQÀJXUDWLRQ RU Program Firmware These options are desc...

Страница 128: ...screen described above The Choose a File screen displays 6HOHFW WKH UHTXLUHG ÀOH WR LPSRUW FRQÀUPDWLRQ PHVVDJH GLVSOD V DVNLQJ LI WKH VHOHFWHG FRQÀJ ÀOH LV WR be imported Tap Yes WR GLVSOD WKH PSRUW RQÀJ uration screen A progress bar indicates the progress of the import 7KH 8SORDGLQJ RQÀJXUDWLRQ VFUHHQ displays showing the progress and completion of the upload ...

Страница 129: ...Firmware from the Choose Action screen described above The Choose a File screen displays 6HOHFW WKH UHTXLUHG ÀOH WR LPSRUW Tap Yes WR FRQÀUP WKH ÀOH LPSRUW The Firmware Update screen displays showing the progress of the process Tap the checkbox to automatically reboot after a successful update Tap Abort to stop the process ...

Страница 130: ...lly reboot after the update has been successful Channels Tap Channels from the Home screen to display the Select Channel screen A list of channels along with a brief description of the channel s attri butes is displayed For the highlighted example shown opposite the Channel number 0002 has a channel label BARRETT a frequency of 5940 kHz USB mode 125 W transmit power and an Inter national Selective...

Страница 131: ...l now displays on the Home screen The example shows the Channel number 0002 has a channel label BARRETT a frequency of 5940 kHz USB mode 125 W transmit power and an International Selective Call mode It also shows that the channel has 120 dBm and is receiving Search For a Channel Tap from the Select Channel screen to display the Channel Num ber screen Tap the appropriate digits for the search then ...

Страница 132: ...quency is NOT a centre frequency for the hop band It simply determines which of the preset hop bands are selected Entering the Security Code For hopping PIN code entry refer to SDR Options and Option PINs on page 113 The security PIN code is based on the information below Security Codes and Bandwidths Security codes 00000000 to 19999999 are used for hopping 2 kHz Security codes 20000000 to 4999999...

Страница 133: ...e Home screen to begin the hopping sequence As soon as the display indicates Hopping Mode communicating with other stations using the same channel frequency and the same hop ping code may commence To Disable Hopping Mode Either tap Hop or press to dis able hopping mode The display indicates Hopping Can celled ...

Страница 134: ...ner The 96 5 EULHÁ GLVSOD V EHORZ WKH IUHTXHQF LQGLFDWLQJ WKH HIÀFLHQF of the selected antenna Mode Tap Mode from the Home screen to cycle through USB LSB FSK CW or AM for the current channel The current mode is displayed in the lower left hand corner green background The example shows the Transceiver in USB mode Note The mode icon will only tem porarily set the mode for a selected channel the mod...

Страница 135: ...ncoming calls It is particularly useful as the nature of HF signal propagation means that not all channels are available for communications at one time For example a station calling a station that is in scanning mode can send a Beacon Call on any channel knowing the station it is calling is monitoring all its available channels A response from the scanning station will only occur on channels that ...

Страница 136: ...lcall The Transceiver will only stop scanning when a Selcall is detected Signal Strength Scan SSL Scan If the signal strength mute squelch is active and a signal with a level greater than the pre set threshold is received the scan will halt Scan will remain halted while the signal level stays above the preset threshold Once the signal decreases below the pre set threshold level for a period greate...

Страница 137: ...e The signal strength mute level can be set to three levels See page 77 Selcall Mute Select Selcall Mute squelch to enable the receiver audio after a Selcall sent to the unit has been received and de coded successfully Mute Disabled The example opposite shows SSL Mute After three seconds the Mute indi cator is hidden and replaced by the channel label A further indication of the mute status is show...

Страница 138: ...e 94 TC2 Program If a TC2 module is installed and TC2 Programming Mode is enabled the icon will display TC2 Program If TC2 Programming Mode is disabled the icon will be blank See page 58 Internal Modem If a TC2 module is not installed the TC2 Program icon will be replaced by the Internal Modem icon This will toggle between two internal modems 2020 or 4026 2 0 6HFXUH Enables Voice Encryption See pa...

Страница 139: ...Remote Control Head Setup App For Windows PCs Warning It is essential to install the Bonjour app prior to installing the Barrett Con trol Head Installer app 1 Download the BonjourPSSetup exe from https support apple com kb DL999 viewlocale en_US locale en_US Follow the online instructions to install the Bonjour app 2 Contact support barrettcommunications com au for instructions on downloading the ...

Страница 140: ...SDR Remote Control Head Setup App For Windows PCs Note Windows 7 is the minimum system requirement for running this app 3ULRU WR H HFXWLQJ WKH 6HWXS ÀOH check whether there is an existing installation of the app This must be XQLQVWDOOHG ÀUVW To install the app double click the Barrett SDR Remote Control Head 6HWXS H H ÀOH DQG IROORZ WKH RQOLQH instructions 7KH ÀQDO LQVWDOODWLRQ VFUHHQ LV VKRZQ opp...

Страница 141: ...devices can install the app by following the default Apple process after downloading Android devices installing the app from the SDR Front Panel need to follow these typical procedures Check whether there is an existing installation of the app This must be XQLQVWDOOHG ÀUVW To uninstall an application go to Settings Applications Select the existing installation Barrett SDR Control Head App Wi Fi Se...

Страница 142: ... MB used since 30 Sep Camera Microphone and Storage Connect the device to the SDR ensuring the OTG On The Go adapter is connected to the device and not the Transceiver After the connection is established the device s File Manager displays Select DUUHWW6 5 RQWURO HDG DSN BarrettSDRControlHead apk USB storage 0000 0073 USB storage Recent Files My Files MORE Search View As Device storage Download his...

Страница 143: ...e More Connection Settings Smart Manager Applications Sound 1RWLÀFDWLRQV Do not disturb Unknown sources Encrypt device Encrypt SD card Find My Mobile Info and app shortcuts 1RWLÀFDWLRQV RQ ORFN VFUHHQ Screen lock type Fingerprints Lock screen Allow installation of apps from Protect your device by encrypting No SD card inserted Locate and control your device Security Show app shortcuts or the devic...

Страница 144: ...Connecting the Wireless Device to the SDR Preparing the SDR Prior to invoking the wireless app HQVXUH WKH ZLÀ GRQJOH LV LQVHUWHG LQ the USB socket located on the top of the front panel of the SDR Also ensure the SDR s network setting s WiFi Operation mode is set to enable a connection between the SDR and the Wireless device The example shows the WiFi Oper ation mode set to WiFi Client and is conne...

Страница 145: ...e pro gram loads followed by a splash screen and then the Connect to SDR screen Overtype the SDR IP address if neces sary the example shows 192 168 3 2 then tap to connect the wireless device to the SDR The Busy icon animates as it attempts to connect the wireless device to the SDR After successfully connecting the animating icon disappears and WKH ZLÀ FRQQHFWLRQ LFRQ FKDQJHV from to ...

Страница 146: ...mn of icons replicating the keypad operations of the 4050 SDR Channel up scroll up Channel down scroll down Clear back one step Make a call Press to talk The functionality of the Wireless application and the 4050 SDR is essentially the same Disconnecting the Wireless Device from the SDR From the Home screen swipe hori zontally from left to right to display the following screen Tap FRQÀUPDWLRQ VFUH...

Страница 147: ...d by soft ware automatically activating when necessary Installing the Cooling Fan Attach the cooling fan to the SDR by carefully aligning the connector pins located beneath the cooling fan with the socket on top of the SDR as shown below Connector pins Four screws located in the four corners of the cooling fan are used to secure the cooling fan to the SDR To uninstall the cooling fan simply revers...

Страница 148: ...tors described below are viewed looking at the rear of the Trans ceiver Power Connector A3 A2 A1 A1 12 V DC 28 V DC A2 Reserved A3 Ground GPS Connector Signal Level A B C D E F A 1PPS B NMEA C 5 V GPS D CW Key E GND F Reserved 1 Pulse per second NMEA Data positive GP Voltage 5 V Active Low Ground ...

Страница 149: ...egative pin 8 CH Audio 9 Not Connected 10 Line Out 11 Linear amp ALC for Break out Box 12 13V8 Out 13 Line In 14 Line In 15 1PPS Auxiliary Connector 1 14 25 13 Pin Name Description of Function Level 1 Ground Ground 0 V 2 Rx Data RS 232 data input True RS 232 3 Tx Data RS 232 data output True RS 232 4 Reserved 5 Reserved 6 Reserved 7 RS 232 Gnd RS 232 Ground 0 V 8 ALC In Ext ALC from Linear Amp 0 1...

Страница 150: ...Reserved 15 Reserved 16 Reserved 17 Reserved 18 Aux dig out 4 Selcall alarm Active low 0 V 19 Aux dig out 5 Audio mute state Active low 0 V 20 Reserved 21 PTT C Mute PTT Out Receiver Cross Mute Active low 0 V 22 Reserved 23 13 8 V Fused Out 13 8 V Output to power auxiliary equipment 13 8 V 2 amp 24 Bal Tx Audio In Balanced Tx audio input with pin 11 G P WR 0 dBm 25 Bal Rx Audio Out Balanced Rx aud...

Страница 151: ...ne of RS 232 1 Pulse per second ATU Scan line ATU Tuned signal ATU Voltage 13V8 Transmit data line of RS 232 Microphone Connector Located on the Front Panel Signal Level 10 1 2 3 4 5 8 6 9 7 1 MicH 2 MicL 3 GND 4 PTT 5 CH UP 6 CH DN 7 Reserved 8 Reserved 9 SPKR 10 SPKR Microphone audio high Microphone audio low Ground Low going PTT Channel up Channel down Reserved Reserved Speaker microphone posit...

Страница 152: ...5 1 10 6 15 11 1 VCC 2 CAN Bus positive pin 3 CH Audio 4 SPKR 5 Ground 6 Ground 7 CAN Bus negative pin 8 CH Audio 9 SPKR 10 Head Detect 11 Not Connected 12 Not Connected 13 Not Connected 14 Not Connected 15 Not Connected Cooling Fan Connector Socket located on the top of the SDR 1 2 3 Viewed from the rear of the SDR 1 Ground 2 12 V DC 3 Fan detect ...

Страница 153: ...tional Frequency resolution 1 Hz tunable receiver Operating modes J3E USB LSB H3E AM J2A CW B2B AFSK soft ZDUH GHÀQHG ÀOWHU EDQGZLGWK Filter bandwidth XOO VRIWZDUH GHÀQHG URP WR DQG beyond Optionally up to 16 kHz Operating temperature 30 C to 70 C relative humidity 95 non condensing Frequency hopping 25 or 5 hops per second with External Synchronisa WLRQ 8QLW 68 VXSSOLHG ZKHQ WKH RSWLRQ LV ÀWWHG 7...

Страница 154: ...21 dBm 0 20 μV Pre amp off for 10dB SINAD Selectivity J3E 1 kHz and 4 kHz better than 70dB 2 kHz and 5 kHz better than 70dB 5 kHz and 8 kHz better than 70dB Selectivity J2B optional 500 Hz and 500 Hz better than 60 dB The level of an un wanted signal above the level of a wanted signal that will reduce the SINAD of the wanted signal from 20 dB SINAD to 14 dB SINAD Blocking 20 kHz and 20 kHz better ...

Страница 155: ...ransmitter RF output power 150 W PEP Voice with 24 V supply 125 W PEP Voice with 13 8 V supply Duty cycle 100 data with fan option Intermodulation Products Better than 31 dB below PEP 25 dB below two tone peak Audio frequency response Less than 6 dB variation 350 Hz to 2700 Hz Current consumption Voice average less than 9 amps typical Two tone less than 12 amps typical Standby Max 0 5 A 13 8 V DC ...

Страница 156: ...e the 4050 Transceiver from a desktop unit to a remote control trunk mount unit using the Mobile Pack P N BCA40501 Mobile Pack P N BCA40501 The mobile pack contains the following components Item Description Barrett P N Barrett installation kit BCA40004 1 Universal mounting cradle SA 45060 2 Screws and capstans MW 45027 ...

Страница 157: ...th DE 15 connectors SA 45100 To install the mobile pack complete the following steps 1 Invert the SDR and use a Posidrive 2 screwdriver to loosen but not remove the two front panel securing screws located immediately behind the front panel 2 Gently pull the front panel from the SDR to remove it 3 Fit the supplied capstans to the four holes as indicated ...

Страница 158: ...ided 7 Plug the six metre control head cable into the socket located at the front of the SDR and secure using the strain relief screws 8 Remove the two plug retaining screws from their storage location as LQGLFDWHG DQG ÀW VHFXUHO LQ SRVLWLRQ DERYH DQG EHORZ WKH FRQWURO KHDG connector CAUTION Do not over tighten 9 Plug the other end of the six metre control head cable into the rear of the front pan...

Страница 159: ... WKDW WKH FRPSOHWHG LQVWDOODWLRQ EH FKHFNHG E D VXLWDEO TXDOLÀHG WHFKQLFLDQ Q VRPH HTXLSPHQW FRQÀJXUDWLRQV WHFKQLFDO DGMXVWPHQW LV UHTXLUHG for the equipment to operate correctly 1RWH 6RPH HTXLSPHQW KDV VSHFLÀF LQVWUXFWLRQV VXSSOLHG ZLWK LW 7KRVH LQVWUXFWLRQV over ride the general guidance of this manual and must be followed in detail 8QSDFNLQJ DQG QVSHFWLRQ When unpacking the Transceiver check th...

Страница 160: ... performance of the system Little can be done to improve an installed system if for example the ambient RF noise is unacceptably high It is recommended that site evaluation be done before any system designs are ÀQDOLVHG WR DYRLG V VWHP SHUIRUPDQFH GLVDSSRLQWPHQW The following should be considered when choosing a position for the Trans ceiver Operating Convenience The Transceiver should be placed s...

Страница 161: ...VH I ÁRDW charging of batteries is required for installations with unreliable AC power supply it is recommended that a Barrett BC402200 or BC402201 be used as each pro vides a three stage charge facility to maintain a battery without the noise problem described above Voltage Drop The average current consumption of the Transceiver is low but during transmis sion of voice peaks high current is neede...

Страница 162: ...d are often the cause of complaints of poor Transceiver performance UDQJH RI DQWHQQDV LV DYDLODEOH IURP DUUHWW WR VXLW PRVW VPDOO À HG VWDWLRQV Detailed instructions are included with each antenna 912 Single Wire Broadband Dipoles Barrett P N BC91201 Barrett 912 single wire broadband dipoles are ideal for base stations that require operation on multiple frequencies throughout the HF spectrum using...

Страница 163: ...R DWWDFK KDO DUGV IRU WKLV FRQÀJXUDWLRQ Q WKLV FRQÀJXUDWLRQ WKH PLQLPXP distance between masts is reduced to 33 metres Support towers may be either lattice masts as illustrated tubular telomasts or other support structures that may be available locally It is recommended that the halyards used to support the antenna be either UV stabilised Dacron cord or wire rope and that pulleys should be of stai...

Страница 164: ...INSTALLATION MANUAL As with all antenna installations ensure the antenna is as far from sources of electrical interference as possible and in a position that makes it impossible for the antenna to come in contact with high voltage overhead mains wiring ...

Страница 165: ...HFRPHV IDLUO RPQL GL UHFWLRQDO Q WKH KRUL RQWDO FRQÀJXUDWLRQ WKH PLQLPXP GLVWDQFH EHWZHHQ WKH masts is 32 metres and the recommended mast height is 15 metres In the LQYHUWHG 9 FRQÀJXUDWLRQ WKH UHFRPPHQGHG PDVW KHLJKW LV PHWUHV DQG at this height the 2 metre stub masts are each installed at a minimum of 19 PHWUHV IURP WKH PDVW EDVH Q WKLV FRQÀJXUDWLRQ WKH PDVW PXVW KDYH DQ RIIVHW or out rigger brac...

Страница 166: ... on the top of the balun is used to attach the support halyard In WKH KRUL RQWDO FRQÀJXUDWLRQ WKH EDOXQ KDQJV EHORZ WKH DQWHQQD As with all antenna installations ensure the antenna is as far from sources of electrical interference as possible and in a position that makes it impossible for the antenna to come in contact with high voltage overhead mains wiring ...

Страница 167: ...vely the helical dipole can be mounted on top of a mast or tower Make sure that the site selected for the antenna is as far from any source of electrical interference as possible and that under no circum stances can come in contact with high tension power lines After mounting the helical dipole hub on the mounting pole remove the front circular cover pass the coaxial cable through the hole at the ...

Страница 168: ...ailable determine on each frequency the helical dipole was manufactured for at what frequency the best VSWR is obtained If this occurs at a frequency below the required frequency then the tips will have to be shortened on the pair of ele ments corresponding to that frequency If the best VSWR occurs on a frequency higher than the required frequency then the tips will have to be lengthened Adjust bo...

Страница 169: ...d V FRQÀJXUDWLRQ UHTXLUHV RQO RQH PDVW V D JXLGH ZKHQ LQVWDOOLQJ WKH PDVWV the length between insulators of a half wave wire dipole is 142 frequency of dipole in MHz metres To this an allowance should be made for extra insulators and halyards For example a 3 7 MHz dipole length between the insulators 142 3 7 38 38 metres LUH GLSROHV VXSSOLHG E DUUHWW DUH SUH FXW WR D VSHFLÀHG IUHTXHQF EXW KDYH DGM...

Страница 170: ... occurs on a frequency higher than the required frequency then the dipole is too short Drop the dipole and adjust both ends by an equal amount and repeat the above sequence until an optimum VSWR is obtained If a tunable transmitter is not available use a method of trial and error shortening or lengthening the dipole ends a little at a time until opti mum VSWR is obtained Remember to always adjust ...

Страница 171: ... 6 metres from the ground making it extremely easy to install With a packed length of only 2 1 metres the antenna can be easily transported by air The tuner has a memory system that stores tuning information for each chan nel after an initial tune sequence with unlimited capacity VVHPEO À WXUHV DUH VXSSOLHG WR DVVLVW LQ PRXQWLQJ WKH DQWHQQD WR DQ H LVWLQJ mast tower or pole Alternatively a range o...

Страница 172: ...ls for a 4050 Transceiver and 4017 Automatic Tun ing Horizontal Dipole Antenna _ 12 V DC 2 1 9 4 5 10 3 7 8 6 Barrett 4017 Automatic Tuning Horizontal Dipole Antenna Horizontal Dipoles and Mounting Assembly Microphone 6 metre power cable supplied with Transceiver Fuse in line with spare ...

Страница 173: ...tenna starts at the tuner The location of the bottom portion of the antenna is very important Horizontal wire antennas have maximum radiation broadside to the antenna when the frequency is less than wavelength Radiation is at a minimum at the end points of the antenna Inverted V installation of horizontal antennas minimises the directivity and is recommended for omni directional coverage High volt...

Страница 174: ...r the Barrett 911 tuner This will almost certainly be the case in well drained sandy soils or on rock In these cases a counterpoise must be used as a ground system This will also be the case in rooftop installations where no H LVWLQJ JURXQG SODWH VXFK DV PHWDO URRÀQJ H LVWV The number of radials required for an effective counterpoise depends on the soil quality dampness and other factors which aff...

Страница 175: ... front panel indica WLRQ RI WKH VKRXOG VKRZ D ORZ YDOXH UHÁHFWHG SRZHU FRQVLVWHQW ZLWK D VSWR of better than 2 1 Now select the lowest desired frequency on the Trans ceiver and repeat the above procedure The result should be the same except that the tune cycle may take somewhat longer If the above procedure does not give the results indicated check that the antenna length and connections are corre...

Страница 176: ...ANUAL Connection Details for a 4050 Transceiver and 911 Automatic QWHQQD 7XQHU LQ D DVH 6WDWLRQ RQÀJXUDWLRQ _ 12 V DC 1 6 4 5 10 7 8 9 2 3 7 Barrett 4011 automatic antenna tuner Antenna Microphone 6 metre power cable supplied with Transceiver Fuse in line with spare ...

Страница 177: ...tennas or whip antennas over a frequency range of 2 to 30 MHz Tuning is rapid typically less WKDQ RQH VHFRQG WKH ÀUVW WLPH 5 LV DSSOLHG HLWKHU ZKLOVW WKH RSHUDWRU LV WDONLQJ or when the Tune control is activated on the Transceiver 7KH WXQHU IHDWXUHV D PHPRU IDFLOLW WKDW VWRUHV WKH FRQÀJXUDWLRQ required to tune to a frequency On any subsequent use of that frequency the UHFRQÀJXUHV WR WKH VWRUHG VHW...

Страница 178: ...NUAL Connection Details for a 4050 Transceiver and 4011 Automatic QWHQQD 7XQHU LQ D DVH 6WDWLRQ RQÀJXUDWLRQ _ 12 V DC 1 6 4 5 10 7 7 8 9 2 3 Barrett 4011 automatic antenna tuner Antenna Microphone 6 metre power cable supplied with Transceiver Fuse in line with spare ...

Страница 179: ...RANSCEIVER OPERATING AND INSTALLATION MANUAL 4050 Transceiver Extension speaker supplied with Transceiver P N BCA40015 External GPS Receiver option P N BCA40009 Auxiliary connector Coaxial Control Cable Extension P N 4017 01 01 ...

Страница 180: ...on hump In place of the glove box Behind the seat Under the dash board if safe Where a remote controlled Transceiver is used only the control head need be mounted convenient to the operator The Trans ceiver may be mounted under a seat in the luggage com partment or any other out of the way place within the vehicle ZKLFK DOORZV IRU VXIÀFLHQW FRROLQJ All equipment should be positioned in such a way ...

Страница 181: ...black negative wires from the Transceiver power cable to the positive and negative terminal of the battery Do not connect to the ignition switch or internal fuse panels as vehicle wiring to these points is of LQVXIÀFLHQW FXUUHQW FDSDFLW FDXVLQJ YROWDJH GURS DQG SRVVLEOH QRLVH LQWHUIHU ence Route the power cable away from high tension ignition wiring Secure the power cable either to other wiring or...

Страница 182: ...o the main vehicle metallic structure Antenna Feed Cables Antenna feed cables should be run as far as possible away from other vehicle wiring and especially away from ignition high tension wiring Where passing through body panels or internal bulkheads grommets must be used to protect the cables Water proof connectors must be used when they are outside the vehicle Voltage Standing Wave Ratio VSWR A...

Страница 183: ...ng VFUHHQLQJ DQG WKH XVH RI ÀOWHUV W LV DOVR QHFHVVDU WR PDLQWDLQ DOO HOHFWULFDO equipment in good working order as worn brushes loose connections and the like will increase the amount of noise generated Before attempting to cure a noise problem the source or sources of noise PXVW EH LGHQWLÀHG GHDOO WKHUH VKRXOG EH QR GLIIHUHQFH EHWZHHQ EDFNJURXQG noise in the receiver with motor and accessories o...

Страница 184: ...d well bonded to the coil body Alternator Gen erator to Battery Wiring ORZ SDVV ÀOWHU VXFK DV WKDW VXSSOLHG LQ WKH LQWHUIHUHQFH VXSSUHVVLRQ NLW RU VLPLODU VKRXOG EH ÀWWHG WR WKH PDLQ EDW WHU OHDG DW WKH DOWHUQDWRU 7KH ÀOWHU PXVW EH UDWHG IRU WKH maximum current available from the charging system The HDUWK OXJ RI WKH ÀOWHU VKRXOG EH DWWDFKHG WR WKH DOWHUQDWRU body or the engine block Alternator to ...

Страница 185: ...rol engine ignition noise and contact breaker noise is a sharp staccato plop varying with engine speed It is only with this class of noise that the impulse noise limiter incorporated within some Transceivers is effective Noise from other sources generally has a more mushy sound That from the alternator generator may only be troublesome over a limited range RI HQJLQH VSHHG DQG FDQ DOVR EH LQÁXHQFHG...

Страница 186: ...urrounding objects on the vehicle as possible The antenna is supplied standard with two sections Barrett P N BCA201901 a tapered black spring Barrett P N BCA201903 an antenna installation guide and a pre terminated six metre control cable to suit the Barrett 2019 antenna to Transceiver A six metre Barrett P N BCA201904 or ten metre Barrett P N BCA201905 extension cable for the control cable is als...

Страница 187: ... 1 2 7 55 77 8720 7 781 1 02 17 11 87 0 62 72 17 51 5 5 1 1 85 PSRUWDQW Please note that the mounting of a 2019 antenna on the front of a vehicle may be considered illegal in some areas countries Please check with your local transport vehicle authority prior to installa tion on the front of your vehicle Considerations on the overall height of the 2019 antenna once ÀWWHG VKRXOG DOVR EH FRQVLGHUHG A...

Страница 188: ...of the 2019 antenna RQFH ÀWWHG VKRXOG DOVR EH considered ABSOLUTE MINIMUM CLEARANCE TOP VIEW ABSOLUTE MINIMUM CLEARANCE TOP VIEW BONNET REAR OF VEHICLE 160 mm 160 mm 160 mm BULL BAR Caution Whilst the 2019 automatic tuning mobile HF antenna is designed to with VWDQG YLEUDWLRQ WR PLOLWDU VSHFLÀFDWLRQV RQ W UHG YHKLFOHV VRPH PRXQWLQJ SRVLWLRQV on large prime movers particularly front mounted bull ba...

Страница 189: ...ed it may damage the spring base Mounting the Whip Sections To mount the whip section it is recom mended that only one section of the whip is screwed onto the antenna at a time The whip section should be hand tightened fully then a suitable tool i e a spanner can be used to tighten the section a further 10 to 20 degrees clockwise while holding the antenna body with a free hand ...

Страница 190: ...L To mount two whip sections together the unattached whip section should be hand tightened fully then a suitable tool i e a spanner can be used to tighten the section a further 10 to 20 degrees clockwise while holding the already screwed on whip section with a free hand ...

Страница 191: ...AL Connection Details for a 4050 Transceiver with Mobile Pack and 2019 Automatic Tuning Mobile HF Antenna _ 12 V DC 1 2 7 6 5 9 4 8 10 3 Barrett 2019 Automatic Tuning Mobile HF Antenna 4050 control head 6 m Control Cable P N SA 45100 Microphone Fuse in line with spare ...

Страница 192: ...quencies in between at approximately 2 MHz intervals If the tune passes at all times the Barrett 2019 antenna is working correctly The Barrett 2019 antenna tunes to maximise whip current not minimise VSWR but the displayed VSWR value should generally be between 1 0 1 and 2 0 1 How ever if the display shows Autotune Fail accompanied by low pitched beeps at DQ SRLQW WKH DUUHWW DQWHQQD KDV IDLOHG WR ...

Страница 193: ... spring is electrically bonded to the chassis of the vehicle via a very low resistance path i e clean all joints to bare metal and use braid earth straps if any non metal joints are encountered Use only good quality coaxial cable and water proof UHF connectors such as those supplied by Barrett Communications R QRW XVH 3 8 FRQQHFWRUV When running the coaxial cable from the antenna to the Transceive...

Страница 194: ...dy of a vehicle Either re site the antenna closer to the vehicle or remove any tuning rings which are already on the antenna If the highest frequency on the whip requires adjustment initially place the tuning ring here and slowly move upwards until a satisfactory SWR is obtained I WKH IDFWRU WXQLQJ ULQJ LV QRW ÀWWHG and the highest frequency on the whip requires adjustment initially place the tuni...

Страница 195: ...ll be manufactured with different frequency taps The 914 manual tapped whip antenna used in the example has the following frequencies Channel 1 4030 kHz Channel 2 4760 kHz The illustration shows a 10 frequency 914 manual tapped whip antenna with the highest frequency being selected Channel 3 5190 kHz Channel 4 5254 kHz Channel 5 7180 kHz Channel 6 8199 kHz Channel 7 9134 kHz Channel 8 9145 kHz Cha...

Страница 196: ...KH ULJKW IUHTXHQF WDS VHOHFWHG DV LQGLFDWHG DERYH DQG WKDW the jumper lead is wrapped tightly around the antenna between VRFNHWV Connection Details for a 4050 Transceiver with Mobile Pack and 914 Manual Tapped Mobile Antenna _ 12 V DC 1 2 7 6 5 9 4 8 10 3 Barrett 914 Manual tapped whip antenna 4050 control head 6 m control cable P N SA 45100 ...

Страница 197: ...with Transceiver 4050 Transceiver Extension speaker supplied with 4050 Transceiver P N BCA40015 6 metre control cable P N SA 45100 External GPS Receiver option P N BCA40009 2018 Mobile Magnetic Loop Antenna Connection Details for a 4050 Transceiver with Mobile Pack and a 2018 Mobile Magnetic Loop Antenna _ 12 V DC 1 2 3 4 5 6 7 8 9 10 ...

Страница 198: ...se in land base station and maritime HF services Primarily designed for operation with end fed unbalanced antennas such as whips and long wires the tuner is built in a waterproof impact resistant moulded ABS plastic enclosure Antenna Selection The 911 automatic antenna tuner will operate into almost any end fed antenna with a length exceeding 2 5 metres providing an effective ground earth is XVHG ...

Страница 199: ...at the rear of the Transceiver to connect the power and antenna cables The antenna tuner should be mounted as close to the antenna feed point as possible In metal vessels the length of the feeder from the antenna tuner to the feed through insulator inside the vessel should be kept less than 1 metre The antenna feed cable should be a suitable high voltage cable Care should be taken to avoid sharp p...

Страница 200: ...e situations are subject to corrosion and oxidation To minimise this all joints should be cleaned and have silicon grease applied before assembly Under severe conditions joints should be protected with self vulcanising rubber tape Electrical Checkout After mechanical installation is complete select the highest frequency to be used on the Transceiver A directional watt meter such as a Bird Model 43...

Страница 201: ...stallation To allow the 911 to learn its tuning information simply proceed from one channel to the next allowing the normal tune cycle to take place Each successful tune is memorised so that when that channel is re selected the tuner will almost instanta neously retune to that frequency Connection Details For a 4050 Transceiver and 911 Automatic Antenna Tuner in a Marine Installation _ 12 V DC 1 6...

Страница 202: ...uner Antenna Microphone 6 metre power cable supplied with Transceiver Fuse in line with spare 4050 Transceiver body Extension speaker supplied with Transceiver P N BCA40015 External GPS Receiver option P N BCA40009 Auxiliary Connector Coaxial Control Cable Extension P N BCA90055 Feed Through Insulator ...

Страница 203: ...s are generated by the Transceiver there are usually two components The ground wave which travels directly from the transmitting antenna to the receiving antenna following the contours of the earth The sky wave which travels upward and at an angle from the antenna until it reaches the ionosphere an ionised layer high above the earth s surface and is then refracted back down to earth to the receivi...

Страница 204: ...LPH RI GD DQG WKH height of the ionosphere above the ground Under each diagram there are recommended working frequencies listed Please note that these will vary according to time of year and other factors They are intended only as a guide and are subject to change D 1LJKW A B 20 km 800 km 2000 km EARTH IONOSPHERE C D A B 20 km 800 km 2000 km EARTH IONOSPHERE C D The sun is higher The ionosphere is...

Страница 205: ...ontacted If the call to the other station is successful a revertive tone from the station being called will be heard indicating the channel selected was suitable for the ionospheric condi tions prevailing If the revertive tone is not heard or is very weak another chan nel may be tried until a revertive tone of satisfactory signal strength is heard Refer to Beacon Calls on page 32 for more details ...

Страница 206: ...so extremely important An HF SSB Transceiver is generally installed using different rules to those used to install VHF or UHF Transceivers Failure to correctly install an HF SSB system will greatly affect the communications quality you will obtain RXU ORFDO DUUHWW UHSUHVHQWDWLYH ZLOO EH DEOH WR DVVLVW ZLWK RXU V VWHP FRQÀJX ration and or installation HF Communications Compared with VHF or UHF Shor...

Страница 207: ...ett 4000 Series Transceivers have been FWBMVBUFE and comply with the Federal Communications Commission FCC RF exposure limits for the General Population Uncontrolled exposure environment In addition the Transceivers comply with the following standards and guide lines FCC 96 326 Guidelines for Evaluating the Environmental Effects of Radio Frequency Radiation FCC OET Bulletin 65 Edition 01 01 2001 S...

Страница 208: ...hould be located at least metres from the operator and should not be co located or operating in conjunction with any other antenna or transmitter For IC and FCC compliance when the 4050 Transceiver is used LQ D YHKLFXODU HQYLURQPHQW at a power level of watts PEP ZLWK G L JDLQ DQWHQQD the antenna s used with this Trans ceiver should be located at least 1 metres from the operator and should not be c...

Страница 209: ...NNFOEFE TFQBSBUJPO EJTUBODF GSPN BOUFOOB JO B WFIJDVMBS FOWJSPONFOU PUF G UIF NJOJNVN TBGF EJTUBODF GPS PDDVQBOUT PG UIF WFIJDMF DBOOPU CF NBJOUBJOFE EVF UP UIF QIZTJDBM MPDBUJPO PG UIF BOUFOOBT JU JT SFDPNNFOEFE UIBU SFEVDFE USBOTNJU QPXFS 8 JT VTFE ...

Страница 210: ...y of the original shipment delivery date of the Barrett Product This warranty shall not cover any abuse accident improper installation connection adjustment or use other than in accordance with the instructions issued by the company In addition this warranty shall not cover the distance which transceiver products will operate over or quality of transmission or reception as a result of unfavourable...

Страница 211: ...the serial numbers of your equipment and Barrett Communications will then be able to contact you if needed to keep you informed of any developments relating to your equipment If you have access to the Internet you can use the warranty registration page in the tech support section of our website to register your warranty form Please go to www barrettcommunications com au Support html Barrett Commun...

Страница 212: ... the tech support web page DUUHWW RPPXQLFDWLRQV 3W WG HDG 2I FH PO Box 1214 Bibra Lake WA 6965 AUSTRALIA Toll Free Tel 1800 999 580 Within Australia Tel 618 9434 1700 Fax 618 9418 6757 email support barrettcommunications com au 7HOHSKRQH VXSSRUW IURP WKH XVWUDOLDQ VXSSRUW RIÀFH LV DYDLODEOH IURP DP to 4 30 pm local time Monday to Friday DUUHWW RPPXQLFDWLRQV XURSH Unit 9 Fulcrum 2 Victory Park Sole...

Страница 213: ...n Details 197 2019 Automatic Tuning Mobile Antenna 186 Assembly 189 Connection Details Mobile Pack 191 Mounting 186 4011 Automatic Antenna Tuner for Base Station 177 Connection Details 178 4017 Automatic Tuning Horizontal Dipole 171 Connection Details 172 Interference Suppression Kit 183 Noise Suppression 182 Socket 64 75 Type 98 ARINC Enable Disable 113 ATU Connector 151 Audio 86 Mute 137 Audio B...

Страница 214: ...wer 148 Contacts 45 66 Add 67 Delete Contact 72 Edit Contact 71 Search Contacts 67 Sort Contacts 66 Contacts screen 66 Control Head Connector 149 Control Head Rear Panel Connector 152 Cooling Fan 147 Connector 152 D Data Link Timeout 108 Date and Time 53 Digital Voice 138 Enable Disable 113 Display 22 115 Backlight Level 116 Backlight Timeout 116 Language 54 Timeout Behaviour 116 Dwell Time 73 E E...

Страница 215: ...uage 54 Last Number Redial 37 Line Audio 90 Line Follows Digital Voice 90 Line In Level 91 Line Out Level 91 Lock 85 Locking the Screen 21 LQA Averaging 105 LQA Decay Rate 105 LQA Exchange 104 LSU Mode 109 M Menu Map 50 Menus 49 Meter Mode Receive 117 Transmit 117 Microphone 24 Transmit Timeout 93 Tx Over Beep 53 Up Down Keys 53 Microphone Connector 151 Mobile Pack 156 Mode 63 134 Mode screen 63 M...

Страница 216: ...aud Rate 97 RS232 Out 96 5 RQÀJXUDWLRQ 88 Rx Preamp 92 S Scan 72 135 Rate 72 Selcall Scan 136 Signal Strength Scan 136 Voice Syllabic Scan 136 Scan Table 73 Add 74 Antenna Type 75 Channel List 75 Delete 76 Edit 74 76 Name 75 Save 76 Select 73 SDR Name 52 SDR Serial Number 114 Secure Call 44 Enable Disable 113 Hop Rate 58 Secure Call Codes 58 Secure Data Key 57 Secure Digital Voice Key 57 Security ...

Страница 217: ...111 System Status 111 T TC2 Programming Mode 58 Telcall 29 35 Receive 37 Send 35 Temperature Units 117 Threshold Test 106 Transceiver 15 Front Panel 15 Front Panel Rear View 16 Keypad 16 Rear Panel 17 Switching On Off 18 Transceiver Lock 85 Transceiver Name 52 Transceiver Options 113 Transmit Meter Mode 117 Tune 134 7 RQÀJXUDWLRQ 89 Tx Over Beep 93 Tx Power 63 Tx Power Level 94 Tx Power screen 63 ...

Страница 218: ......

Страница 219: ...Barrett Communications Pty Ltd 47 Discovery Drive Bibra Lake WA 6163 Australia Tel 61 8 9434 1700 Fax 61 8 9418 6757 Email information barrettcommunications com au www barrettcommunications com au ...

Отзывы: