
To avoid unauthorized use, Barracuda Networks recommends that you change the default root
password to a more secure password.
•
Go to
Config
>
System
.
• Within the
Root
Password
section, enter the old (ngf1r3wall) and afterwards the new root
password with at least 5 characters.
•
Click
Send Changes
followed by
Activate
.
Note:
Even if the root password is changed as described here, if the appliance does not have
a valid license, the default root password will still be valid for root login. Please see
instructions below for how to install a valid license
.
Appliance models
F10
to
F30x
use
PORT4
for the ISP by default.
If your ISP assigns the WAN IP address through the DHCP protocol, simply connect the modem to
PORT4
. This port is pre configured to be used with an ISP using DHCP.
For all other models the network port can be chosen individually and the settings for ISP
configuration must be done manually:
• Navigate to:
Config
>
Network
>
xDSL/ISDN/DHCP
.
• Enable one of the available WAN connection types and configure it according to the settings
provided by your Internet Service Provider.
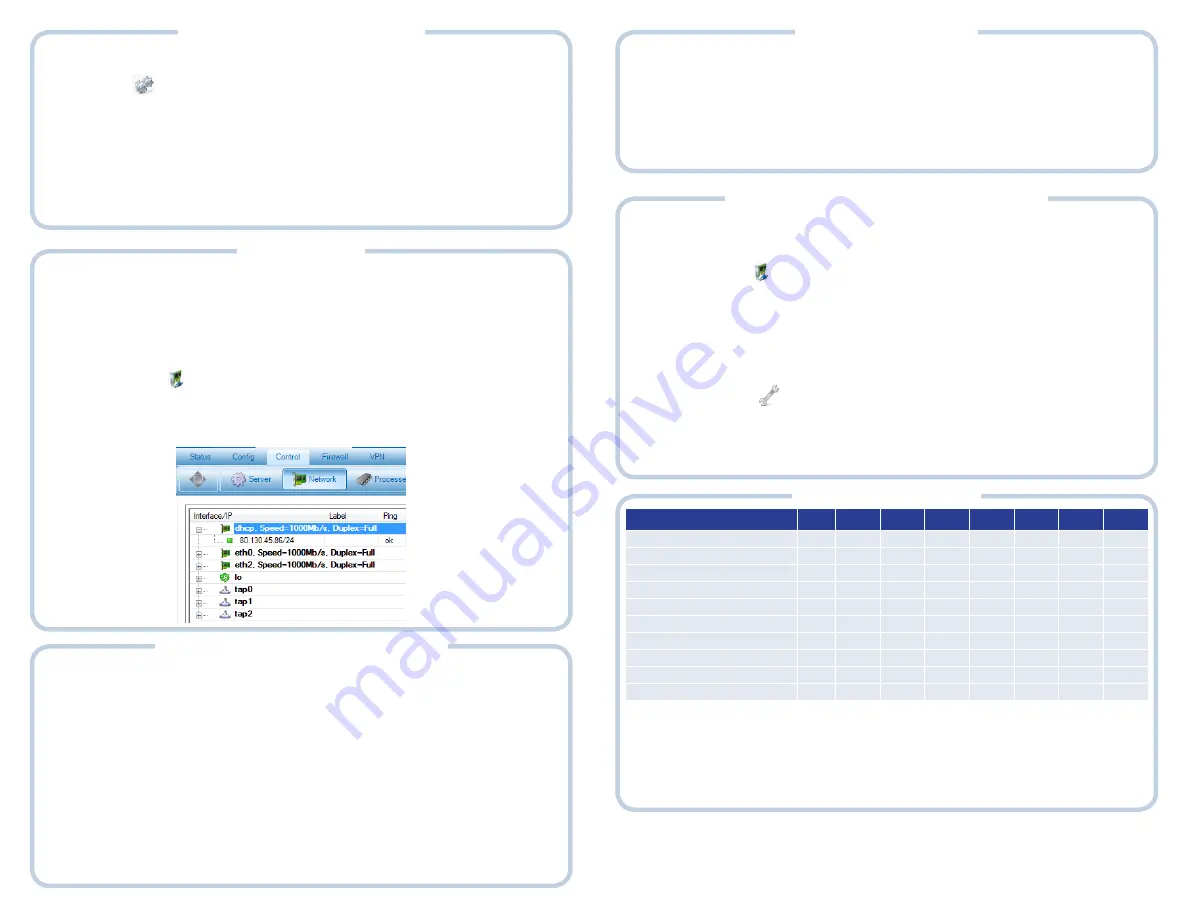
• To check if the WAN IP address assignment was successful, navigate to
Control
>
Network
.
The Barracuda NG Admin application automatically obtains and installs your licenses from
Barracuda Networks. For this procedure, the Barracuda NG Admin application needs to have a
connection to the internet.
This process automatically starts, as soon as you login to your Barracuda NG Firewall.
You will be guided through the activation process and need to fill out a customer information form.
The current license and activation state is displayed on the
Status
page.
7. Firewall Rule Set Configuration
By default the Barracuda NG Firewall blocks all connections from and to the Internet.
To enable Internet access for the trusted LAN, the default firewall rules need to be enabled and
reordered properly.
• Navigate to
Config
> (
Simple Config
) >
Ruleset
• Use drag&drop and move the
BLOCKALL
rule to the bottom of the list.
• Double click the
LAN-2-Internet
rule and un-check the
Deactivate Rule
checkbox.
•
Click
Send Changes
followed by
Activate
.
5. Change Default Password
6. Connect ISP
8. Product Activation
9. Change Management IP & Network
After the initial configuration, it may be necessary to change to management IP address and the
management network of your Barracuda NG Firewall, to be integrated into an existing network
environment.
• Navigate to:
Config
>
Network
>
Networks
.
• Change the
Management IP (MIP)
to the desired IP address within the existing network.
•
Set the
Associated Netmask
.
•
Click
Send Changes
followed by
Activate
.
Changing network settings, require an explicit activation within the network subsystem.
• Navigate to:
Control
>
Box
>
Network
.
•
Click
Activate new network configuration
and select
Force
as activation mode.
After a few moments you will be able to connect to the new management IP address. Do not forget
to change the network configuration of your personal computer.
10. Package Contents
Contents
F10 F10x F20x F30x F400 F600 F800 F900
Security Appliance
ü
ü
ü
ü
ü
ü
ü
ü
Power Cord
ü
ü
ü
ü
ü
ü
ü
ü
External Power Supply
ü
ü
ü
-
-
-
-
-
Ethernet Crossover Cable (red)
ü
ü
ü
ü
ü
ü
ü
ü
Ethernet Standard Cable (grey)
ü
ü
ü
ü
ü
ü
ü
ü
Serial Cable (console)
ü
ü
ü
ü
ü
ü
ü
ü
USB Thumb Drive
ü
ü
ü
ü
ü
ü
ü
ü
WiFi Antenna
-
ü
*
ü
*
ü
*
-
-
-
-
Rack Mount Brackets
-
-
-
ü
ü
ü
ü
ü
Rack Mount Rail Kit
-
-
-
-
ü
ü
ü
ü
*
F101/F201 and F301 only
Contact and Copyright Information
Barracuda Networks, Inc. 3175 S. Winchester Blvd, Campbell, CA 95008 USA • phone: 408.342.5400 • fax: 408.342.1061 •
www.barracuda.com Copyright 2004-2011© Barracuda Networks, Inc. All rights reserved. Use of this product and this manual is
subject to license. Information in this document is subject to change without notice. Barracuda NG Firewall is a trademark of Barracuda
Networks, Inc. All other brand and product names mentioned in this document are registered trademarks or trademarks of their
respective holders. v5.2.0-260411-02-250711
• For additional information and product documentation, visit:


