background image

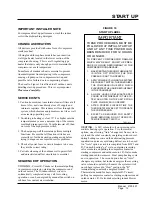
Manual   2100-357
Page    19

CHECKING TEMPERATURE SENSOR
OUTSIDE UNIT CIRCUIT

1. Disconnect temperature sensor from board and from

outdoor coil.

2. Use an ohmmeter and measure the resistance of the

sensor.  Also use ohmmeter to check for short or
open.

3. Check resistance reading to chart of resistance.  Use

sensor ambient temperature.  (Tolerance of part is
± 10%.)

4. If sensor resistance reads very low, then sensor is

shorted and will not allow proper operation of the
heat pump control.

5. If sensor is out of tolerance, shorted, open or reads

very low ohms then it should be replaced.

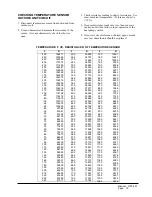
TEMPERATURE  F  VS.  RESISTANCE  R  OF TEMPERATURE SENSOR

     F

        R

     F

        R

     F

             R

-25.0
-24.0
-23.0
-22.0
-21.0
-20.0
-19.0
-18.0
-17.0
-16.0
-15.0
-14.0
-13.0
-12.0
-11.0
-10.0

-9.0
-8.0
-7.0
-6.0
-5.0
-4.0
-3.0
-2.0
-1.0

0.0
1.0
2.0
3.0
4.0
5.0
6.0
7.0
8.0
9.0

10.0
11.0
12.0
13.0
14.0
15.0
16.0
17.0
18.0
19.0
20.0
21.0
22.0
23.0
24.0

196871
190099
183585
177318
171289
165487
159904
154529
149355
144374
139576
134956
130506
126219
122089
118108
114272
110575
107010
103574
100260

97064
93981
91008
88139
85371
82699
80121
77632
75230
72910
70670
68507
66418
64399
62449
60565
58745
56985
55284
53640
52051
50514
49028
47590
46200
44855
43554
42295
41077

25.0
26.0
27.0
28.0
29.0
30.0
31.0
32.0
33.0
34.0
35.0
36.0
37.0
38.0
39.0
40.0
41.0
42.0
43.0
44.0
45.0
46.0
47.0
48.0
49.0
50.0
51.0
52.0
53.0
54.0
55.0
56.0
57.0
58.0
59.0
60.0
61.0
62.0
63.0
64.0
65.0
66.0
67.0
68.0
69.0
70.0
71.0
72.0
73.0
74.0

39898
38757
37652
36583
35548
34545
33574
32634
31723
30840
29986
29157
28355
27577
26823
26092
25383
24696
24030
23384
22758
22150
21561
20989
20435
19896
19374
18867
18375
17898
17434
16984
16547
16122
15710
15310
14921
14544
14177
13820
13474
13137
12810
12492
12183
11883
11591
11307
11031
10762

75.0
76.0
77.0
78.0
79.0
80.0
81.0
82.0
83.0
84.0
85.0
86.0
87.0
88.0
89.0
90.0
91.0
92.0
93.0
94.0
95.0
96.0
97.0
98.0
99.0

100.0
101.0
102.0
103.0
104.0
105.0
106.0
107.0
108.0
109.0
110.0
111.0
112.0
113.0
114.0
115.0
116.0
117.0
118.0
119.0
120.0
121.0
122.0
123.0
124.0

10501
10247
10000

9760
9526
9299
9077
8862
8653
8449
8250
8057
7869
7686
7507
7334
7165
7000
6840
6683
6531
6383
6239
6098
5961
5827
5697
5570
5446
5326
5208
5094
4982
4873
4767
4663
4562
4464
4367
4274
4182
4093
4006
3921
3838
3757
3678
3601
3526
3452

Содержание WH301D

Страница 1: ... PUMPS Models WH301D WH361D INSTALLATION INSTRUCTIONS Copyright 2003 Manual 2100 357D Supersedes 2100 357C File Volume III Tab 17 Date 09 01 03 Bard Manufacturing Company Bryan Ohio 43506 Since 1914 Moving ahead just as planned ...

Страница 2: ...20 Refrigerant Charge 20 Pressure Tables 21 22 Optional Accessories 22 Figures Figure 1 Unit Dimensions 3 Figure 2 Blower Damper Assembly 6 Figure 3 Mounting Instructions 8 Figure 4 Electric Heat Clearance 8 Figure 5 Wall Mounting Instructions 9 Figure 6 Wall Mounting Instructions 9 Figure 7 Common Wall Mounting Instructions 10 Figure 8 Hot Gas Reheat During Dehumidification with CS200 12 Figure 9...

Страница 3: ...lanta GA 30329 2305 Telephone 404 636 8400 Fax 404 321 5478 NFPA National Fire Protection Association Batterymarch Park P O Box 9101 Quincy MA 02269 9901 Telephone 800 344 3555 Fax 617 984 7057 These publications can help you install the air conditioner or heat pump You can usually find these at your local library or purchase them directly from the publisher Be sure to consult current edition of e...

Страница 4: ...CONTROL MODULES See Chart Below NOTE For 0 KW and circuit breakers 230 208 V or pull disconnects 460 V applications insert 0Z in the KW field of model number MODEL NUMBER CAPACITY 30 2 1 2 Ton 36 3 Ton REVISION COIL OPTIONS X Standard 1 Phenolic Coated Evaporator 2 Phenolic Coated Condenser 3 Phenolic Coated Evaporator and Condenser OUTLET OPTIONS X Front Standard T Top COLOR OPTIONS X Beige Stand...

Страница 5: ...Manual 2100 357 Page 3 FIGURE 1 UNITDIMENSIONS MIS 484 ...

Страница 6: ...A N A N A N A N A N A N A N A N A N A N A N A N Z 0 A 0 0 A D 1 6 3 H W 5 0 A l 0 1 A 1 8 0 2 0 3 2 1 2 r o 1 2 r o 1 7 2 3 5 9 7 0 4 0 6 0 8 0 1 6 4 0 1 0 1 8 A N A N 3 5 A N A N 6 2 A N A N 0 6 A N A N 0 3 A N A N 6 A N A N 0 1 A N A N 0 1 A N A N 0 1 Z 0 B 0 0 B D 1 6 3 H W n 6 0 B l 9 0 B 3 8 0 2 0 3 2 1 1 1 0 2 8 3 7 4 5 2 0 4 0 5 0 1 8 8 0 1 0 1 0 1 A N A N A N A N A N A N A N A N A N A N A ...

Страница 7: ...s of America ACCA is an excellent guide to proper sizing All duct work or portions thereof not in the conditioned space should be properly insulated in order to both conserve energy and prevent condensation or moisture damage Refer to Table 10 for maximum static pressure available for duct design Design the duct work according to methods given by the Air Conditioning Contractors of America ACCA Wh...

Страница 8: ...nt of Energy Energyguide Fact Sheets is based upon the fresh air blank off plate in place and is recommended for maximum energy efficiency The blank off plate is available upon request from the factory and is installed in place of the fresh air damper shipped with each unit CONDENSATE DRAIN A plastic drain hose extends from the drain pan at the top of the unit down to the unit base There are openi...

Страница 9: ...uld then be 30 x 10 See Figures 3 4 and 6 for details WARNING Fire hazard can result if 1 4 inch clearance to combustible materials for supply air duct is not maintained See Figure 3 3 Locate and mark lag bolt locations and bottom mounting bracket location if desired See Figure 5 4 Mount bottom mounting bracket if used 5 Hook top rain flashing under back bend of top Top rain flashing is shipped se...

Страница 10: ...one caulking be placed behind the side mounting flanges and under the top flashing at the time of installation WARNING A minimum of 1 4 inch clearance must be maintained between the supply air duct and combustible materials This is required for the first 3 feet of ducting It is important to insure that the 1 4 inch minimum spacing is maintained at all points Failure to do this could result in over...

Страница 11: ...57 Page 9 FIGURE 5 WALL MOUNTINGINSTRUCTIONS FIGURE 6 WALL MOUNTINGINSTRUCTIONS MIS 548 MIS 549 SEE FIGURE 3 MOUNTING INSTRUCTIONS SEE UNIT DIMENSIONS FIGURE 1 FOR ACTUAL DIMENSIONS SEE FIGURE 1 FOR DUCT DIMENSIONS ...

Страница 12: ...Manual 2100 357 Page 10 FIGURE 7 COMMONWALL MOUNTINGINSTALLATIONS MIS 550 ...

Страница 13: ...onnect from 240V to 208V tap The acceptable operating voltage range for the 240 and 208V taps are LOW VOLTAGE CONNECTIONS These units use a grounded 24 volt AC low voltage circuit The R terminal is the hot terminal and the C terminal is grounded G terminal is the fan input Y terminal is the compressor input for cooling B terminal is the reversing valve input The reversing valve must be energized f...

Страница 14: ...n and application of these parts FIGURE 8 WHxxxDx HOT GAS REHEAT DURING DEHUMIDIFICATION WITH CS2000 ENERGY MONITOR FULL TIME DEHUMIDIFICATION H600A MIS 1561 8403 032 BARD CS2000 8403 038 HONEYWELL H600A HUMIDITY CONTROLLER OR 8403 047 DEHUMIDISTAT VICONICS H200 10 21 10 8403 042 HONEYWELL T8511G1070 THERMOSTAT UNIT LOW VOLTAGE TERMINAL BLOCK AREA OCCUPIED HVAC 6 5 4 3 FACTORY JUMPER C G R Y1 B W1...

Страница 15: ...AMMABLETHERMOSTATFULLTIMEDEHUMIDIFICATION IMPORTANT NOTE Only the thermostat and subbase combinations as shown in Table 4 will work with this equipment The thermostat and subbase must be matched and the correct operation can be assured only be proper selection and application of these parts ...

Страница 16: ...etc that will prevent compressor from operation will cause red lamp to activate This is a signal to the operator of the equipment to place system in emergency heat position TABLE 3 THERMOSTATWIRESIZE r e m r o f s n a r T A V A L F e g u a G e r i W m u m i x a M e c n a t s i D t e e F n I 5 5 3 2 e g u a g 0 2 e g u a g 8 1 e g u a g 6 1 e g u a g 4 1 e g u a g 2 1 5 4 0 6 0 0 1 0 6 1 0 5 2 TABL...

Страница 17: ...eck all power fuses or circuit breakers to be sure they are the correct rating 5 Periodic cleaning of the outdoor coil to permit full and unrestricted airflow circulation is essential FIGURE 10 START UP LABEL HEATING A 24V solenoid coil on reversing valve controls heating cycle operation Two thermostat options one allowing Auto changeover from cycle to cycle and the other constantly energizing sol...

Страница 18: ...e de energized until the coil temperature rises above 57 degrees PRESSURE SERVICE PORTS High and low pressure service ports are installed on all units so that the system operating pressures can be observed Pressure tables can be found later in the manual covering all models on both cooling and heating cycles It is imperative to match the correct pressure curve to the unit by model number DEFROST C...

Страница 19: ...g for the outdoor ambient to fall into the defrost region By placing a jumper across the SEN JMP terminals a 1 4 inch QC terminal works best the defrost sensor mounted on the outdoor coil is shunted out and will activate the timing circuit This permits the defrost cycle to be checked out in warmer weather conditions without the outdoor temperature having to fall into the defrost region In order to...

Страница 20: ... a l p e R t o n g n i s a h p r e w o P t c e r r o c e s a h p n o D E L d e r r o f k c e h C y l n o s t i n u e s a h p 3 r o t i n o m t i n u e h t o t s d a e l r e w o p o w t h c t i w S r o t o m r o o d t u o n a F n u r t o n s e o d g n i t a e h r o g n i l o o c g n i r u d t p e c x e t s o r f e d e v i t c e f e d r o t o M d e t r o h s r o n e p o r o f k c e h C g n i d n i w...

Страница 21: ...9 85371 82699 80121 77632 75230 72910 70670 68507 66418 64399 62449 60565 58745 56985 55284 53640 52051 50514 49028 47590 46200 44855 43554 42295 41077 25 0 26 0 27 0 28 0 29 0 30 0 31 0 32 0 33 0 34 0 35 0 36 0 37 0 38 0 39 0 40 0 41 0 42 0 43 0 44 0 45 0 46 0 47 0 48 0 49 0 50 0 51 0 52 0 53 0 54 0 55 0 56 0 57 0 58 0 59 0 60 0 61 0 62 0 63 0 64 0 65 0 66 0 67 0 68 0 69 0 70 0 71 0 72 0 73 0 74 ...

Страница 22: ...re 6 inches from compressor as shown in the Table 7 TABLE 9 INDOORBLOWERPERFORMANCE CFM 230V P S E H n I 2 O D 1 6 3 H W D 1 0 3 H W V 0 3 2 w o L V 0 3 2 h g i H l i o C y r D l i o C t e W l i o C y r D l i o C t e W 0 1 2 3 0 5 9 0 3 9 0 1 9 5 5 8 5 3 9 5 1 9 5 8 8 3 8 0 5 9 3 1 0 4 3 1 5 8 2 1 5 0 2 1 5 1 3 1 0 7 2 1 0 9 1 1 0 0 1 1 4 5 6 0 0 8 5 5 7 0 1 1 1 5 0 0 1 0 0 0 1 0 7 8 TABLE 6 FANBL...

Страница 23: ... M r i A n r u t e R e r u t a r e p m e T e r u s s e r P 5 7 0 8 5 8 0 9 5 9 0 0 1 5 0 1 0 1 1 5 1 1 D 1 0 3 H W B D g e d 5 7 B W g e d 2 6 e d i S w o L e d i S h g i H 6 7 5 3 2 8 7 9 4 2 0 8 3 6 2 1 8 7 7 2 3 8 1 9 2 4 8 5 0 3 5 8 9 1 3 7 8 3 3 3 8 8 7 4 3 B D g e d 0 8 B W g e d 7 6 e d i S w o L e d i S h g i H 1 8 1 4 2 3 8 5 5 2 5 8 9 6 2 7 8 4 8 2 8 8 8 9 2 0 9 2 1 3 1 9 7 2 3 3 9 1 4 3...

Страница 24: ... 5 0 A 6 3 H W H E 0 1 A 6 3 H W H E 5 1 A 6 3 H W H E s e g a k c a P r e t a e H s e g a k c a P r e t a e H s e g a k c a P r e t a e H X X X 6 0 B 3 0 H W H E 9 0 B 3 0 H W H E 5 1 B 3 0 H W H E s e g a k c a P r e t a e H s e g a k c a P r e t a e H s e g a k c a P r e t a e H X X X X X 6 0 C 3 0 H W H E 9 0 C 3 0 H W H E 5 1 C 3 0 H W H E s e g a k c a P r e t a e H s e g a k c a P r e t a e...

Отзывы: