


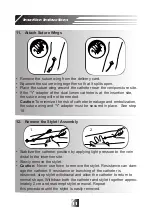


Insertion Instructions
• With a straight motion, slide the oversleeve portion of the connector
and the winged portion of the connector together, aligning the
grooves on the oversleeve portion of the connector with the barbs on
the winged portion of the connector. Do not twist.
Note: Connector portions must be gripped on plastic areas for prop-
er assembly. Do not grip on distal (blue) portion of oversleeve.
• Advance completely until the connector barbs are fully attached. A
tactile, locking sensation will confirm that the two pieces are properly
engaged. (There may be a small gap between the oversleeve and
the winged portion of the connector.)
16. Aspirate and Flush
• Attach primed extension set and/or saline-filled syringe.
• Aspirate for adequate blood return and flush each lumen of the
catheter with 10ml normal saline to ensure patency.
• Note: When infusion volume is a concern in small or pediatric
patients, flush with 3ml per lumen.
• Note: If the single-lumen catheter will not aspirate and infuse imme-
diately after insertion and connector assembly, the catheter may be
kinked within the connector assembly. If this is the case, trim the
catheter just distal to the connector oversleeve (blue) and attach a
new connector following step 15 for proper assembly. If this situation
persists, verify radiographically that the catheter is not kinked inside
the vessel.
• Caution: To reduce potential for blood backflow into the catheter tip,
always remove needles or needleless caps slowly while injecting the
last 0.5 ml. of saline.
Tape hub/injection cap connection (per agency protocol).
13
Содержание Groshong PICC
Страница 1: ...B a r d A c c e s s S y s t e m s Groshong PICC and Catheters Instructions For Use...
Страница 18: ......
Страница 19: ......