


3. Connections
2
1
3
PUSH
2
1
3
PUSH
COLOR
CONTRAST
PHASE
SHARPN TINT
BRIGHTN
STANDBY
ENTER
TEXT
EXIT
PAUSE
2
1
4
3
5
6
8
0
9
7
OK
IR
GREEN : OPERATIONAL
RED : STAND-BY
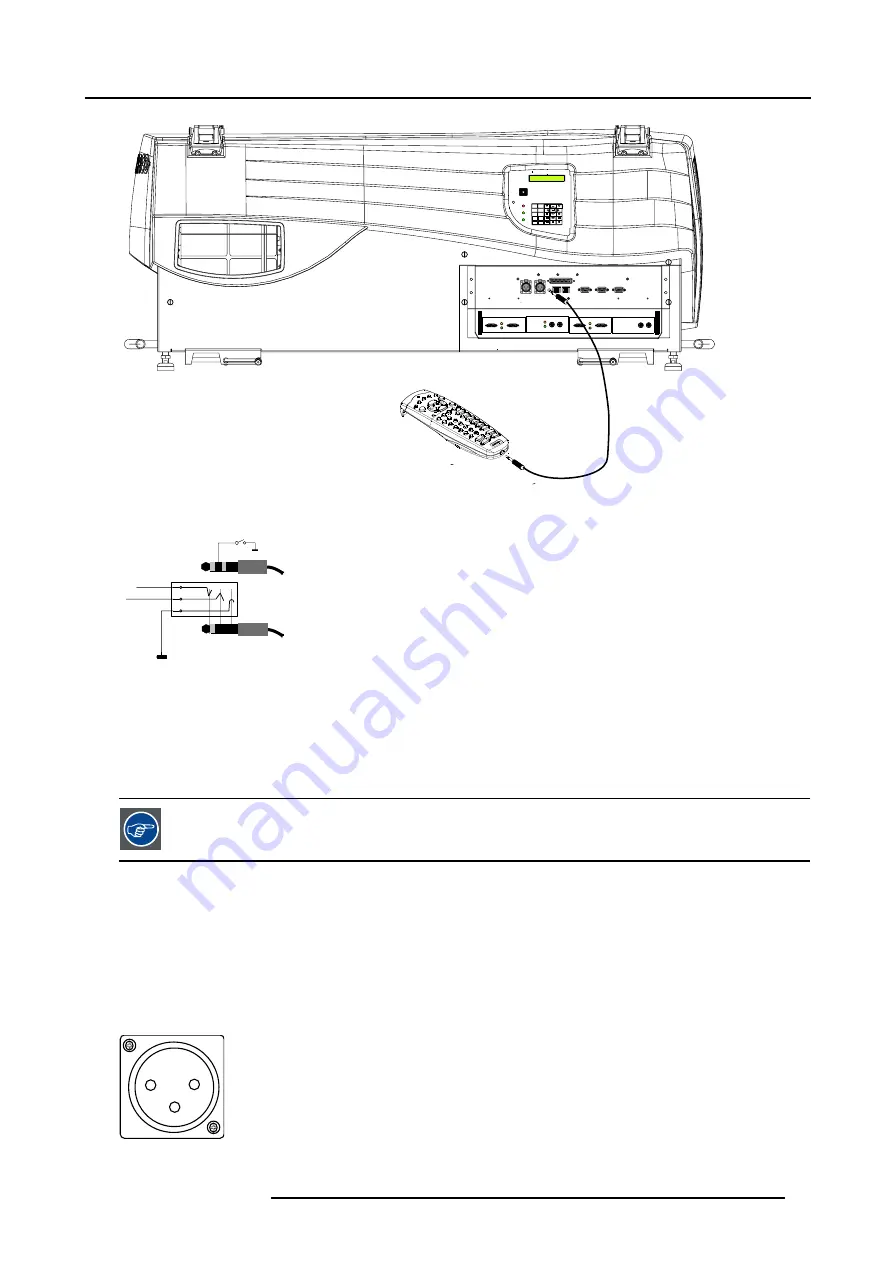
Image 3-21
Hardwired RCU
1
2
A B C
D
2
3
1
Image 3-22
Stereo jack pin configuration
A
tip : left channel
B
ring : right channel
C screen : common (GND)
D external switch
1
Stereo jack
2
Mono jack
The Remote connection uses a standard two wire cable terminated on each end with a 3.5 mm male
(mono/stereo) phone jack.
This cable is not delivered but is available in most electronic or audio shops.
3.4.4
Bi-directional communication port, CTRL 3
What can be connected
The rugged remote control can be connected to the Bi-directional communication port CTRL 3.
With this rugged remote control all control functions can be taken over. The LCD panel on this rugged remote displays the same
information as the panel on the projector itself.
Pin assignment two way connector
1
2
3
Image 3-23
R5976690 XLM H25 03/09/2004
33
Содержание XLM H25
Страница 1: ...XLM H25 Owner s manual R9010100 R5976690 02 03 09 2004 ...
Страница 4: ......
Страница 8: ...Table of contents 4 R5976690 XLM H25 03 09 2004 ...
Страница 11: ...1 Packaging and Dimensions Top view 27 5 468 27 5 1130 Image 1 3 Top view R5976690 XLM H25 03 09 2004 7 ...
Страница 12: ...1 Packaging and Dimensions 8 R5976690 XLM H25 03 09 2004 ...
Страница 26: ...2 Installation Guidelines 22 R5976690 XLM H25 03 09 2004 ...
Страница 40: ...3 Connections 36 R5976690 XLM H25 03 09 2004 ...
Страница 50: ...4 Getting Started 46 R5976690 XLM H25 03 09 2004 ...
Страница 96: ...9 Programmable Function Keys 92 R5976690 XLM H25 03 09 2004 ...
Страница 102: ...B Standard Source Set up files 98 R5976690 XLM H25 03 09 2004 ...
Страница 108: ...Glossary 104 R5976690 XLM H25 03 09 2004 ...


