R5906788-03
Thor series
117
11
21
11
Image 11-11
5.
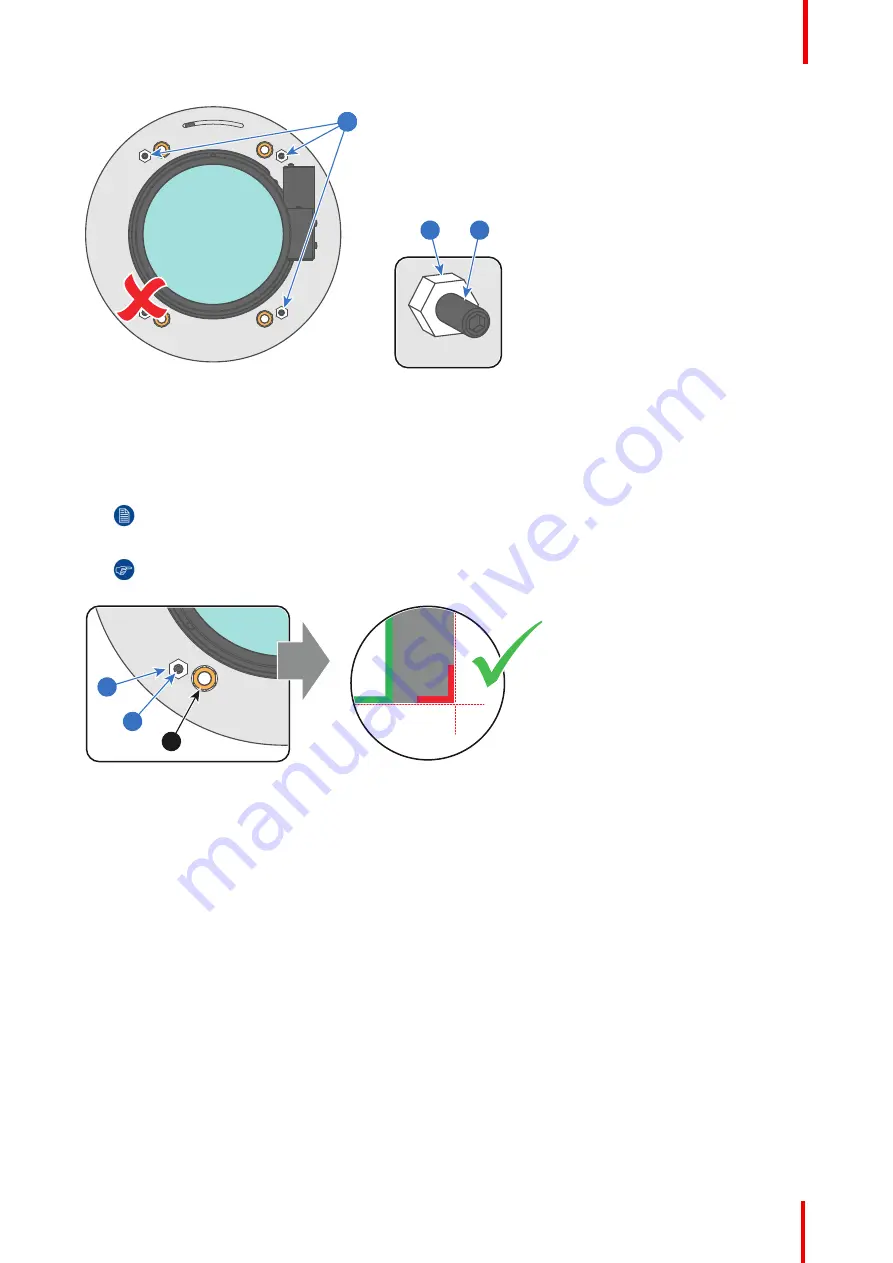
Gently turn (by hand) the Scheimpflug adjustment nut at the lower left of the Lens Holder (reference 4
Image 11-12) against the Lens Holder front plate without disturbing the projected image.
6.
Turn in the set screw at the lower left of the Lens Holder (reference 14 Image 11-12) without disturbing the
projected image. Use a 3 mm Allen wrench.
Note:
Ensure that the edges of the projected test pattern remain in place on the screen. Any
movement of the image will affect the Scheimpflug adjustment.
Tip:
Fasten the set screw and the Scheimpflug nut alternately, without disturbing the projected image,
until the Scheimpflug nut and set screw are completely tightened.
14
24
4
Image 11-12
7.
Fasten the lock nut at the lower left of the Lens Holder. Use a 10 mm nut driver.
11.4 Back Focal Length adjustment
When to adjust the Back Focal Length?
If a lens is used with a throw ratio suited for the application, (lens selection depends on projection distance
and screen size) typically one would NEVER need to adjust the Back Focal Length of the projector.
A Back Focal Length adjustment is only required in case the Focus range of the installed lens does not
capture the projection screen either for FLAT and/or for SCOPE. In other words, when it is impossible to focus
the image on the screen for FLAT and/or for SCOPE. Note that the lenses for the Thor series series projector
are varifocal. So, switching between FLAT and SCOPE (zoom action) requires a readjustment of the focus.
What is Back Focal Length adjustment?
Back Focal Length adjustment means moving the lens plane (Lp), thus the Lens Holder front plate, closer to or
further from the DMD plane. The closer the lens plane to the DMD plane the further the focus range (Fr) of the
lens will be.
Содержание Thor Series
Страница 1: ...ENABLING BRIGHT OUTCOMES Installation manual Thor series...
Страница 2: ...Barco NV President Kennedypark 35 8500 Kortrijk Belgium www barco com en support www barco com...
Страница 8: ...R5906788 03 Thor series 8...
Страница 24: ...R5906788 03 Thor series 24 Safety Information...
Страница 26: ...R5906788 03 Thor series 26 Commander Web Commander System overview...
Страница 44: ...R5906788 03 Thor series 44 Installation process...
Страница 68: ...R5906788 03 Thor series 68 Lenses Lens selection...
Страница 78: ...R5906788 03 Thor series 78 Installing a HDD into the ICMP ICMP...
Страница 110: ...R5906788 03 Thor series 110 Starting up...
Страница 122: ...R5906788 03 Thor series 122 Scheimpflug...
Страница 130: ...R5906788 03 Thor series 130 Convergence...
Страница 142: ...R5906788 03 Thor series 142 Preventative maintenance actions...
Страница 160: ...R5906788 03 Thor series 160 Specifications...
Страница 168: ...R5906788 03 Thor series 168 Pin configurations...
Страница 172: ...R5906788 03 Thor series 172 Environmental information...
Страница 176: ...Glossary R5906788 03 Thor series 176...
Страница 181: ...R5906788 03 Thor series 181...
Страница 182: ...Barco NV President Kennedypark 35 8500 Kortrijk Belgium www barco com R5906788 03 07 09 2018...


