


Layer Functions Section
Source
Crop
Top
Left
Bottom
Right
Reset
Fine
Adjust
ADJUSTMENT PANEL
LIGHT
WIPE
MIX
TRANSITIONS
CUT
AUTO
TRANS
BG
A
BG
B
DSK
LOGO
Split
LAYER
A
LAYER
B
Program
Clear
Layer
PIP
KEY
Full
Screen
Clone
Swap
Z-Order
Move
Setup
Move
Mix
Source
Swap
Toggle Freeze
LAYER FUNCTIONS
Change
active layer
to a PIP
Take active
layer to full
screen
Copy layer to
opposite screen
(widescreen only)
Set up a
“Move” on
active layer
Co-locate
both PIPs
(
Split
is Off)
Toggle
sources with
each transition
Change
active layer
to a Key
Change visual
layer priority
(
Split
mode only)
Pend “Move”
on the
active layer
Independently
locate PIPs
(
Split
is Off)
Freeze the
active layer
on Pgm, Pvw
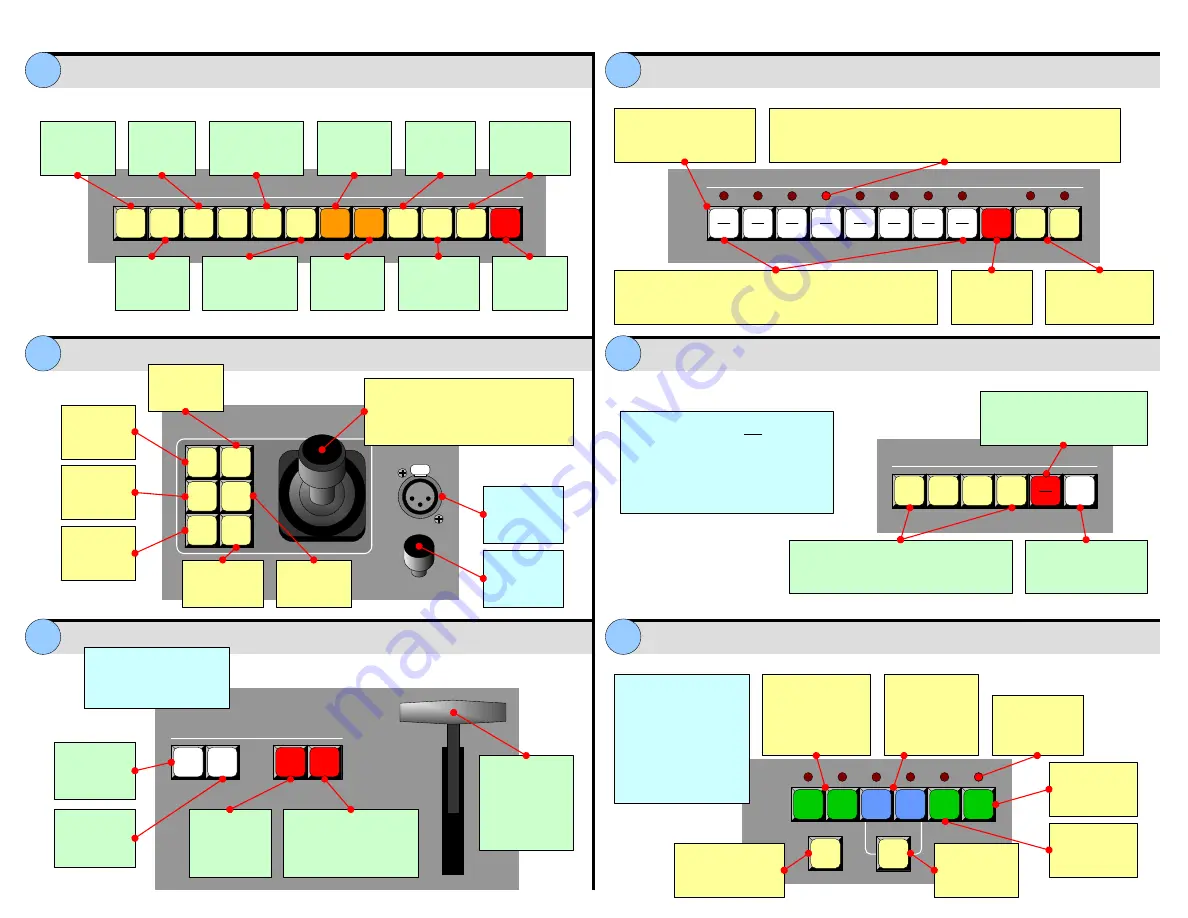
Source Selection Bus
Joystick Section
Destination / Aux Bus
Transition Section
Layer Control Section
1
9
2
10
3
11
4
12
5
13
6
14
7
15
8
16
SHIFT
SDI
1
SDI
2
SOURCE SELECTION
Program
1
2
3
4
DEST
AUX
DESTINATIONS / AUX
ALL
Red LEDs
Solid
: Source is on Program, associated destination is enabled
Blinking
:
Split
is Off. Layer is on Program, opposite Layer on Preview
Source Selection Bus
Blinking
: Source on Preview, blinking layer active for modification
Solid
: Source on Preview, layer not active for modification
Each button is an input that
can be assigned to a PIP,
Key or Aux destination
Press to
access
sources 9-16
SDI buttons only
active when internal
routing enabled
Connect to
low voltage
“script” light.
Control
“script” light
brightness.
Adjust the selected PIP or Key.
X-Axis
(left/right),
Y-Axis
(up/down),
Z-Axis
(size).
Z-Axis
also adjusts value of
highlighted parameter on Touch Screen.
Crop bottom
and right
edges
Crop
boundaries
of PIP or Key
Adjust
source within
PIP or Key
Crop top and
left edges
Reset the
current effect
to default
Increase
precision of
Joystick range
Press to select all
destinations. Double-
punch to turn all off.
Switch between standard and
Aux destinations. When lit, Aux
destinations can be selected.
Press 1-4 to enable one destination, press
two (or more) simultaneously to enable a
group. All selections mutually exclusive.
• Destination/Aux bus is one bus — not
two separate and independent buses.
• Source selections apply to all
enabled buses only
• Transitions will only be performed if the
desired destinations are enabled
T-Bar
Manually
transition sources
to/from Program,
based on current
transition type.
Select wipe as
the current
transition type
Select mix as
the current
transition type
Instantly cut
images from
Preview to
Program
Transition automatically
from Preview to Program.
Use
Effects Menu
to set
transition parameters.
Red LEDs
Indicate layers
on Program
Select unscaled
background
A
or
B
on Preview.
BG B
and
DSK
are
mutually exclusive.
Select scaled
layer
A
or
B
on
Preview, to
assign as
PIP or Key
Select unscaled
DSK
on
Preview
Select unscaled
LOGO
on
Preview
Change
between
Split
and
Mix
modes
Select any combination of
layers on Preview:
•
Blinking
: Layer is
selected and active
for adjustment
•
Solid
: Layer is
selected on Preview,
but is not active for
adjustment
Press to remove
active (blinking)
layer from Preview
3
4
5
6
7
8
WIPE and MIX effects can
be assigned on a per
destination basis, and
performed simultaneously.


