

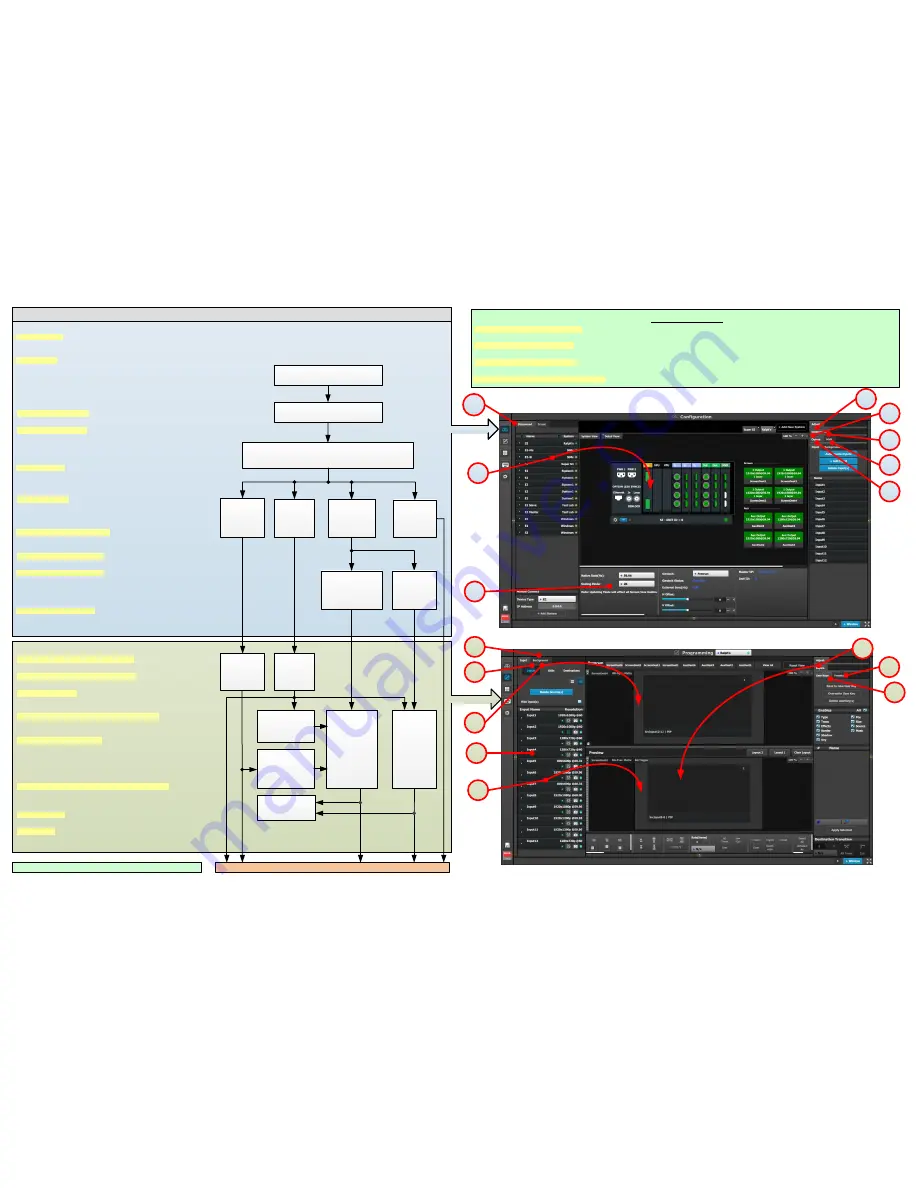
C3: System Parameters
(Native Rate
– Layer Mode – Genlock Mode)
C8:Add Screen
Destinations
Add Layers to
Destinations
C9:Add Aux
Destinations
C6: Add
Outputs
(Turn On Test
Patterns)
C4: Add
Backgrounds
C5: Add
Inputs
P3: Create
Sources from
Inputs
P6: Drop
Inputs/
Backgrounds
into Aux
Destinations
Multiviewer Menu
(next page)
P2: Select
thumbnails
for Inputs
P1: Select
thumbnails
for
Backgrounds
C7: Add MVR
Outputs
P5: Drop Layers
into Screen
Destinations
&
Sources into
Layers
P4: Drop
Backgrounds into
Screen
Destinations
P7: Create User
Keys
P8: Create Presets
P/N 26-1401004-00 Rev 01
Refer to the User’s Guide for a detailed description of each step
Event Master Control Software Flowchart
C1: Discover
C2: Connect
CONFIGURATION MENU
C1: Discovery - When the Event Master control software loads, it
automatically discovers the devices connected to the network. These
devices are listed on the left hand side of the configuration screen.
C2: Connect - Click on the device you want to connect and drag it in
the middle area. The software should automatically establish
communication with the unit. If connection between the PC and the
S3-4K is not achieved, re-check the wire connection. On the
Configuration Menu, ensure that the IP settings match with the S3-4K
settings that are available from the front panel. You can also connect
to the S3-4K by typing the IP address manually.
C3: System Parameters - Select the desired Native Rate, Layer and
Genlock modes
C4: Add Backgrounds - Select and define input connectors as a
background. Select the Adjust tab and perform any additional
adjustments. Repeat for all Backgrounds and save. Max of 4
connectors of the same type can be assigned per background
(Except for DVI & HDMI).
C5: Add Inputs - Select and define input connectors as Inputs. Select
the Adjust tab and perform any additional adjustments. Repeat for all
Inputs and save. Max. of 4 connectors of the same type can be
assigned per input. (Except for DVI & HDMI)
C6: Add Outputs - Select and define output connectors as Outputs.
Select the Adjust tab and perform any necessary adjustments.
Repeat for all Outputs and save. Max. of 4 connectors of the same
type can be assigned per output.
Output Test Patterns (Optional) - Under the Adjust and Output tabs
select the test patterns on one or more outputs, to assist with
external device setup
C7: Add Multiviewer Outputs - Select connectors from the MVR slot
and define them as a MVR Output. Repeat for all Outputs and save.
C8: Add Screen Destinations - Select the corresponding output
connector(s) from the same card and add them to Screen
Destinations via drag and drop. From the Adjust tab, add the number
of desired layers and perform any necessary adjustments. Repeat for
all Screen Destinations and save.
C9: Add Aux Destinations - Select the corresponding output
connector(s) from the same card and add them to Aux Destinations.
Select the Adjust tab and perform any necessary adjustments. Repeat
add all Aux Screen Destinations and save.
C1
C2
C3
C8,9
C6
C7
C4
C5
P1
P7
P6
P2
P3
P4
P5
System Initialization
Return to Factory Default (Optional) - For a new event, back up your system if desired, then perform a complete factory reset. For a continuing (or
multi-day) event, this step is not required.
Restoring the System (Optional) - Insert a USB drive with a previous backup file into the USB Port. On the Backup and Restore Menu, press
{Restore System} and follow the prompts.
Backing up the System (Optional) - Insert a USB drive into the USB Port. On the Backup and Restore Menu, press {Backup System} to back up the
system setup and all memory registers.
Factory Reset, System Backup and Restore - operations can be performed from the Events Master Control software or from the front panel.
PROGRAMMING MENU
P1: Select thumbnails for Backgrounds - Select the thumbnails to
represent the Backgrounds.
P2: Select thumbnails for Inputs & Stills - Select the thumbnails to
represent Inputs and Stills
P3: Create Sources - Under the Input tab create any additional
sources (optional). Select the Adjust tab and perform any additional
adjustments. Repeat for all Inputs/Sources and save.
P4: Drop Backgrounds into Screen Destinations - Under the
Background tab select a Background and drop it to a Screen
Destinations. Repeat for all Backgrounds and save.
P5: Drop Layers & Sources - Under the Layer tab select a layer and
drop it to a Screen Destination. Select a Source under the Input tab
and drop it into the layer. Alternatively, select a source and drag it to
the destination to automatically show the layer with the selected
source. Select the Adjust tab and perform any additional adjustments.
Repeat for all layers and sources and save.
P6: Drop Inputs \ Backgrounds to Aux Destinations - Under the Input
or Background tabs select a Input \ Background and drop it to the
Aux Destinations. Select the Adjust tab and perform any additional
adjustments. Repeat for all Backgrounds and save.
P7: User Keys - Select a layer and under Adjust and User Keys tabs
click on the Enables to save. Repeat for all Layers and save.
P8: Presets - Select Screen(s) and under Adjust and Preset tabs
create a new preset or manage existing ones. Repeat to create
multiple Presets.
P8


