

IR Address
Eco Network Power
Network
Menu Position
Start Up Logo
Start Up Chime
Button 1
Button 2
Button 3
Button 4
Button 5
Trigger 1
Trigger 2
Auto Source
Language
200mA
Switch on
the projector
Switch off
the projector. Press for 2 sec
Source selection
hot key. Define Hot Keys in the
control menu
Navigation
key.
Enter
key for confirmation
Aspect ratio
switch
Activate menu
or
return
key
Settings
Pause:
picture mute (shutter close)
Text:
deactivate or activate the On Screen Text
Auto image:
activate the auto image adjustment
Contrast:
high lights adjust
Brightness:
low lights adjust
Sharpness:
increase edge detail
Phase:
adjust phase (analog signals only)
Color:
color saturation
Tint:
tint adjust (NTSC only)
PIP:
activate selected Picture-in-Picture
SWAP:
swap PiP and main image
Address:
change the remote control address to 1 or 2.
Press address and enter for 5 sec.
1
2
3
4
5
6
7
1
3
2
4
1
5
INPUT
ASPECT
RATIO
AUTO IMAGE
PAUSE
TEXT
MENU
SHARPN
PHASE
COLOR
TINT
ADDRESS
SWAP
PIP
1
3
4
6
7
2
5
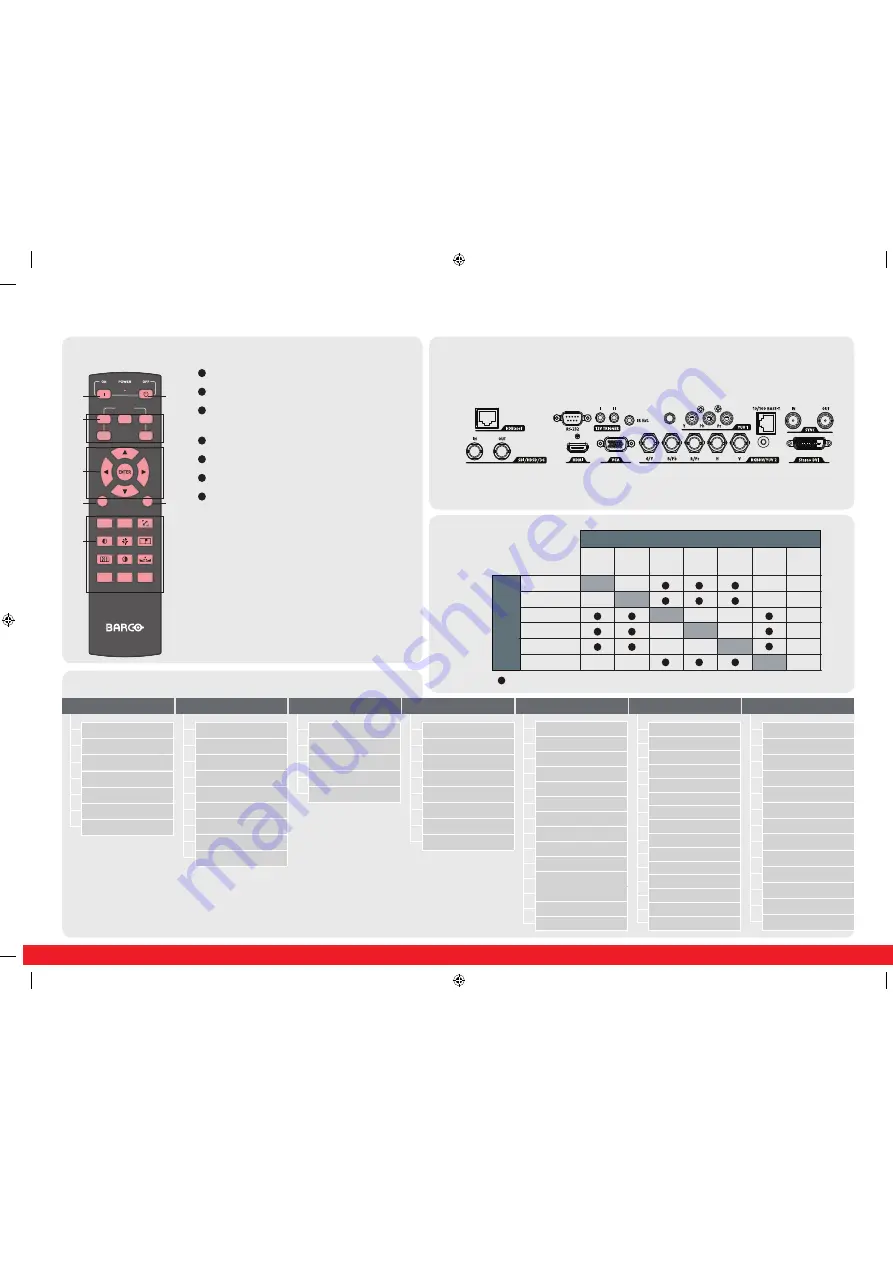
Menu structure
Using the remote control
PiP/main source
availability
Input Selection
Input Configuration
Input Locking
Contrast
Brightness
Sharpness
Noise Reduction
Color Temperature
Input Balance
Aspect Ratio
Timings
Auto Image
Zoom
Main Select
PIP Select
PIP Position
PIP
Mode
Lamps
High Altitude Mode
Power
Lamp1 Status
Lamp2 Status
Lamp1 Run Time
Lamp2 Run Time
Rear Projection
Ceiling Mode
Lens Control
Lens To Midposition
Lens Memory
Lens Calibration
Dynamic Contrast
Gamma
Internal Patterns
Color Space
Model
Serial Number
Software Version
Active/ PIP Source
Pixel Clock
Signal Format
H/V Refresh Rate
Auto Power Off
Auto Power On
No Signal
Auto Image Adjust
Custom Color Space
Blanking
Warp
ScenergiX
Lamp1 Run Time
Lamp2 Run Time
Lamp Hour Reset
Projector Run Time
Blue Only
Factory Reset
RLM W14
Quick start guide
INPUT
IMAGE
LAYOUT
LAMPS
ALIGNMENT
CONTROL
SERVICE
RLM W14 Quickstart guide dec09outl.indd 2
04/08/14 15:30
Connector panel
External control
over IP for e.g.
Projector Toolset
or web browser
Use SDI/HDSDI/3G for
professional equipment
Support Full HD
uncompressed video
Use HDMI for
e.g. PC or
Blu-ray player
Use D15 input
for PC
Dual DVI input
for 3D source
Use BNC inputs for RGBHV and
component signals
External RS232
comm.
Trigger voltage can control
e.g. a screen or curtains
Use RCA inputs for
component signals
Input/Output
connectionfor
3D Sync singal
Main select
Source availabe
-
source not availabe
PiP select
HDBaseT
HDMI
YUV1
SDI/HDSDI/3G
RGBHV/YUV2
VGA
HDMI
-
HDBaseT
-
RGBHV/
YUV2
-
-
VGA
-
-
-
-
-
YUV1
-
SDI/
HDSDI/
3G
3D-DVI
-
-
-
-
-
-
-
-
All manuals and user guides at all-guides.com


