14. Installation menu
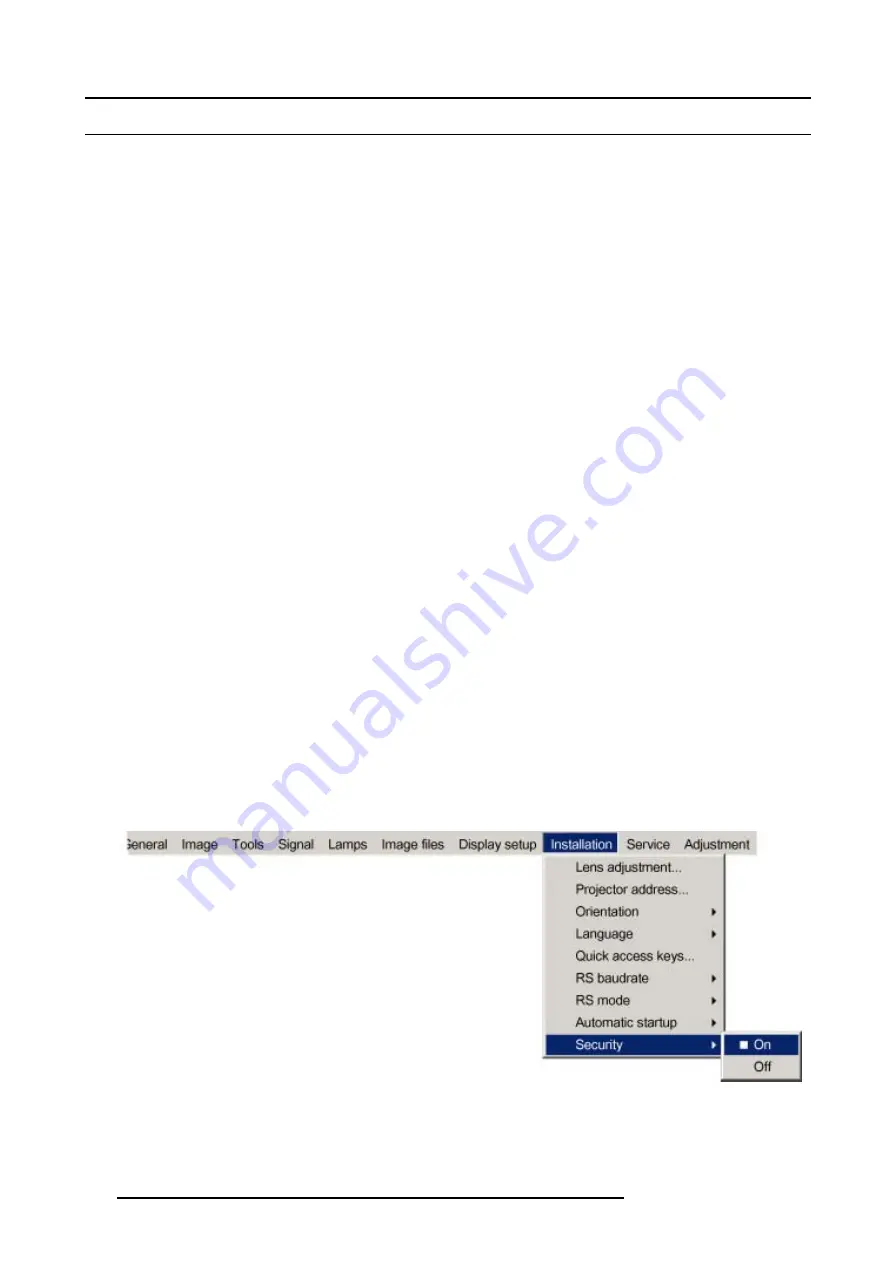
14.9 Security
What can be done ?
A security function is implemented in the projector that allows a protection against theft.
A PIN code allows the user to lock the projector in case of wrong code entry.
The PIN code must be entered at each start up (Power ON), entering three times a wrong number triggers a wait cycle of 15 minutes,
the second 3 wrong codes a wait cycle of 30 minutes, 1 hour, ...
The security mode can be enabled or disabled.
How to activate the security mode ?
1. Press
MENU
to activate the menu bar.
2. Press
→
to select the
installation
item. (image 14-17)
3. Press
↓
to pull down the menu.
4. Use
↑
or
↓
to select
Security
.
5. Press
→
to open the menu.
6. Use
↑
or
↓
to select
ON
.
On
Security function enabled
Start up screen will contain the name of the owner of the projector.
PIN code will be necessary every time the projector lost power.
Off
Security function disabled
7. Press
ENTER
.
A dialog box is displayed. (image 14-18)
8. Use the arrow keys to select
YES
and press
ENTER
to confirm.
A dialog box is displayed. (image 14-19)
The following things must be entered:
- Your name
- Company name
- Address or location
For more info about how to enter characters with the remote control, see "Using the Dialog boxes", page 48.
9. Press
ACCEPT
.
A dialog box is displayed.
Enter the PIN code, and confirm the newly entered PIN code. (image 14-20)
An informative text box is then displayed. Press
ENTER
or
BACK
to escape. (image 14-21)
Image 14-17
140
R5976817 RLM H5 17/01/2005
Содержание R9010300
Страница 1: ...RLM H5 Owners manual R9010300 R5976817 00 17 01 2005...
Страница 4: ......
Страница 8: ...Table of contents 4 R5976817 RLM H5 17 01 2005...
Страница 14: ...1 Packaging and Dimensions 10 R5976817 RLM H5 17 01 2005...
Страница 54: ...5 Getting used with the menu structure 50 R5976817 RLM H5 17 01 2005...
Страница 60: ...6 Source selection 56 R5976817 RLM H5 17 01 2005...
Страница 64: ...7 General Menu Image 7 7 60 R5976817 RLM H5 17 01 2005...
Страница 91: ...8 Image Menu Image 8 46 R5976817 RLM H5 17 01 2005 87...
Страница 92: ...8 Image Menu 88 R5976817 RLM H5 17 01 2005...
Страница 102: ...9 Tools Menu 98 R5976817 RLM H5 17 01 2005...
Страница 122: ...12 Image Files Menu 118 R5976817 RLM H5 17 01 2005...
Страница 136: ...13 Display Setup 132 R5976817 RLM H5 17 01 2005...
Страница 146: ...14 Installation menu 142 R5976817 RLM H5 17 01 2005...
Страница 158: ...A Standard Image Files 154 R5976817 RLM H5 17 01 2005...


