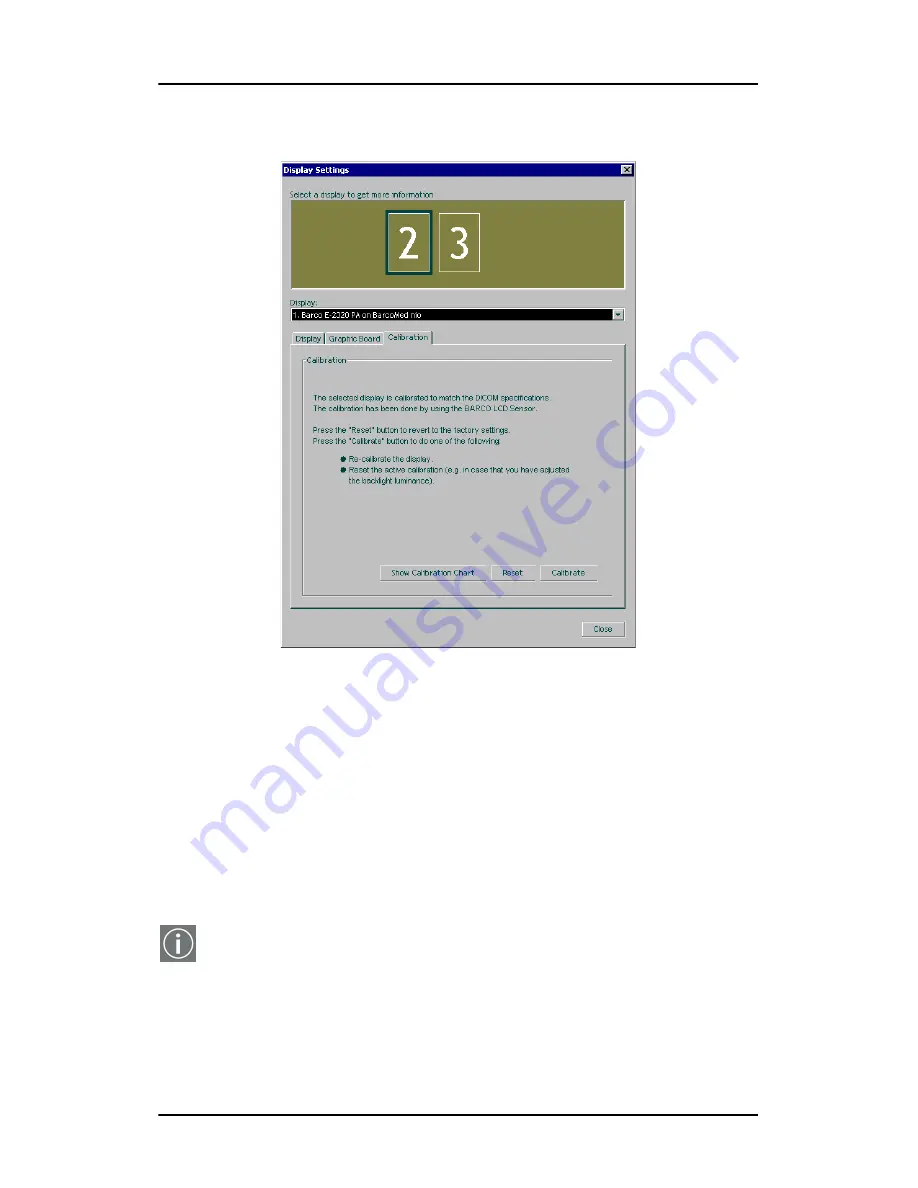
background image

Display settings

88

Calibration tab

Figure 45: Calibration tab

Here you can calibrate display(s), revert to the latest calibration, 
revert to default factory settings and view the result of the latest 
calibration. The possible options are explained below.

To calibrate the display using the Barco LCD sensor:

1. If you have multiple displays of the same type connected 

(multi-head system), consider if you wish to 

equalize

 the 

display you calibrate to a reference display.

Equalization

 means the luminance of the display you are 

calibrating will be matched to the luminance of the reference 
display.

If you wish to equalize the display, you must close the 
Display Settings dialog and make sure the 

Equalization


Содержание Nio medical display systems

Страница 1: ...Installation User Manual Nio medical display systems Supported displays E 2620 E 3620 E 5620 E 2621 E 3621...

Страница 2: ...This page intentionally left blank 2...

Страница 3: ...eserved Nor this document nor any part of it may be reproduced or copied in any form or by any means graphical electronic or mechanical including photocopying taping or information storage and retriev...

Страница 4: ...Copyright notice 4 This page intentionally left blank...

Страница 5: ...ions 29 Display controller installation 30 Display installation 34 After unpacking the display 34 Power connection 37 Video connection 38 USB connection 39 Cable routing 39 Attaching the display to an...

Страница 6: ...ttings 84 General 84 Display tab 85 Graphic Board tab 87 Calibration tab 88 Test patterns 93 Application settings 94 Calibration tab 94 MediCal Administrator tab 95 Update NioWatch 97 Display operatio...

Страница 7: ...re installation updates or removal 120 Reinstalling or updating your BarcoMed Nio driver 120 Uninstalling the BarcoMed Nio driver or Barco NioWatch software 121 Technical Information 125 Technical sp...

Страница 8: ...Table of Contents This page intentionally left blank 8...

Страница 9: ...9 Preface...

Страница 10: ...Preface This page intentionally left blank 10 This page intentionally left blank...

Страница 11: ...e specifications of BarcoView products are subject to change without notice Trademarks All trademarks and registered trademarks are property of their respective owners FCC notice This equipment has be...

Страница 12: ...with Canadian ICES 003 Cet appareil num rique de la Classe A est conforme la norme NMB 003 du Canada Disposal Information The lamps inside the display contain mercury Do not throw the display in the...

Страница 13: ...nual Follow all instructions for operation and use Electrical shock Type of protection electrical Class I equipment Degree of safety flammable anesthetic mixture Equipment not suitable for use in the...

Страница 14: ...aced upon or against them paying particular attention to cords at plugs and receptacles Water and moisture Never expose the display to rain or moisture Never use the display near water e g near a bath...

Страница 15: ...g on the display DPMS may decrease the risk of image sticking image retention This apparatus conforms to CE LVD 73 23 EEC IEC 60950 1 UL 60950 1 CAN CSA C22 2 No 60950 1 c UL EN 60950 1 DEMKO CCC GB49...

Страница 16: ...rding to the CE regulations or Indicates the display is approved according to the UL regulations or Indicates the display is approved according to the c UL regulations Indicates the display is approve...

Страница 17: ...17 Overview...

Страница 18: ...Overview This page intentionally left blank 18 This page intentionally left blank...

Страница 19: ...1200 The E 2621 is a 21 3 inch grayscale LCD display with a native resolution of 1600 x 1200 The E 3620 is a 20 8 inch grayscale LCD display with a native resolution of 2048 x 1536 The E 3621 is a 21...

Страница 20: ...tem When left idle for a certain time the computer connected to the display will power down the display The power saving system can be switched on or off using the on screen menus Tilt swivel base The...

Страница 21: ...no obstructions PCI 2 1 and or 2 2 Compliant Windows XP Professional Service Pack 1or Windows 2000 Professional Service Pack 4 Features of the BarcoMed Nio display controller Dual Head Configuration 8...

Страница 22: ...ng resolution is also available when the OS is booted in VGA mode 640x480 Default Refresh Rate 16 colors System Configuration Guidelines Because of the low power consumption and low heat generation of...

Страница 23: ...nd documentation Display box Each display box includes one display and a display accessory box containing the following items Plastic cover of the tilt swivel foot Power supply Digital video DVI cable...

Страница 24: ...een display OSD The LED is green when the display is on when enabled in the on screen menus The LED is orange when the display is in Stand by power saving mode 2 USB downstream port See also item 7 on...

Страница 25: ...e box when the display is shipped to the customer 3 Tilt swivel foot 4 Slot for security cable e g Kensington lock 5 DVI digital video input 6 USB upstream port Connect this connector to the PC USB bu...

Страница 26: ...this connector 9 Tilt swivel foot clip The display is shipped with this clip in the foot to protect the tilt swivel mechanism during transport After unpacking you should remove this clip Do not throw...

Страница 27: ...27 Installation...

Страница 28: ...Installation This page intentionally left blank 28 This page intentionally left blank...

Страница 29: ...is the ideal protection during transport Avoid reflections in the flat panel to reduce eye strain Place the display on a strong and stable table or desk Keep the display away from heat sources and pro...

Страница 30: ...C please take a few minutes to familiarize yourself with both the display controller s and the PCI slots in your computer Figure 3 The BarcoMed Nio display controller Using the VGA capabilities of the...

Страница 31: ...VGA enabled you should enable VGA on only ONE of the BarcoMed Nio display controllers and disable VGA on ALL the other BarcoMed Nio display controllers Examples of PCI slots Although the BarcoMed Nio...

Страница 32: ...3 If you have decided to use the on board VGA capabilities of the BarcoMed Nio see Using the VGA capabilities of the BarcoMed Nio display controller on page 30 you must now remove any VGA display con...

Страница 33: ...ct the power cord turn on the power and boot the system as usual Running multiple BarcoMed Nio Display Controllers in a single host The physical order of the displays may vary when you are running mul...

Страница 34: ...play foot is blocked with a red clip to prevent damage during transportation Before installing the display you must remove this clip Figure 7 To remove the clip 1 Position the display with its rear si...

Страница 35: ...connecting the cables To change the panel orientation 1 Stand at the front side of the panel and take the panel at both sides 2 Very important Tilt the panel before changing the orientation Should yo...

Страница 36: ...urn the panel counterclockwise Figure 11 To rotate the panel from portrait to landscape 4 To change from landscape to portrait turn clockwise Notice If after installing the display or the system you c...

Страница 37: ...ntroller board the image orientation will not change with the panel orientation To change the orientation of the image you will have to change the resolution in the Windows Display control panel if po...

Страница 38: ...ng DVI cables One display Figure 14 1 Connect one end of the DVI cable to the DVI input of the display 2 Connect the other end of the DVI cable to the DVI connector of the display controller board If...

Страница 39: ...B upstream connector by means of a USB cable 2 Connect any USB device to one of the display s USB downstream connectors Cable routing Routing the signal cables Bind the cables in the connector compart...

Страница 40: ...At last put the foot cover back in place To put the foot cover in place Figure 16 1 Push the upper side of the cover onto the foot so that the hooks inside the cover are positioned right under the bu...

Страница 41: ...pproved by VESA according to the VESA 100 mm standard Use an arm that can support a weight of at least 13 kg 28 66 lbs To attach the display to an arm stand 1 Put the display face down on a clean surf...

Страница 42: ...taching the display to an arm stand 42 6 Remove the four screws fixing the foot while supporting the foot 7 Attach the arm stand firmly to the panel using 4 screws M4 x 8 mm Figure 18 4 screws M4 x 8m...

Страница 43: ...see Step 7 on page 48 for a description of DualView 5 Decide which Palette Mode you wish to use with the BarcoMed Nio display controller If you are uncertain use the default setting as this setting c...

Страница 44: ...and Play device drivers to see if it has a driver for your BarcoMed Nio controller 3 If Windows advises you that it has finished installing all the new devices in your system and that you must reboot...

Страница 45: ...arcoMed Product Installation Wizard will advise you when it has successfully installed the new version of the Microsoft Installer Click OK The Wizard may prompt you to restart your system If it does c...

Страница 46: ...oftware CD will be selected For the initial installation we recommend that you install all of the software If you do not want to install a particular BarcoMed Software product at this time deselect it...

Страница 47: ...e device shown in your system may be different Caution You can install the driver for only one type of BarcoMed device at a time If you have multiple types of BarcoMed devices installed in your comput...

Страница 48: ...ows a dual head display controller to display two separate desktops one for each display instead of a single virtual desktop that spans across both displays Figure 24 The difference between running wi...

Страница 49: ...ined heads of the BarcoMed Controller Figure 26 DualView Enabled Rectangles 2 3 represents the individual heads of the BarcoMed Controller Special Note If you installed the drivers with DualView disab...

Страница 50: ...turn to the Device Selection Screen Click Next to begin installing the driver Click Cancel to abort the driver installation Caution Once you click Next you cannot cancel the driver installation Prior...

Страница 51: ...figure 29 below appears select the palette mode which is the correct one for your viewing application If you are uncertain use the default settings You can change the palette mode later See Palette M...

Страница 52: ...the products you selected at the beginning is complete click Finish to exit the BarcoMed Product Install Wizard or click Back to return to the Welcome Screen of the BarcoMed Product Install Wizard to...

Страница 53: ...ry reinstalling the driver following the steps above or using the steps outlined in the section Reinstalling or updating your BarcoMed 2MP2CP driver on page 107 BarcoMed NioWatch installation 1 Click...

Страница 54: ...install process If the installation of the products you selected at the beginning is complete click Finish to exit the BarcoMed Product Install Wizard or click Back to return to the Welcome Screen of...

Страница 55: ...splays of your BarcoMed Nio System It may be necessary to reboot the system a second time if the window on the Barco display is not running in the same orientation as the display For example the displ...

Страница 56: ...for some reason Windows failed to correctly set the resolution of your displays please turn to the section Setting the resolution of your BARCOMED NIO display on page 117 of the Troubleshooting Sectio...

Страница 57: ...estination Location screen to install the NioWatch software in the default location Or click Browse to install the software in a different location Figure 33 4 Click Next on the Select Program Folder...

Страница 58: ...de 1 Open the command prompt DOS window in Windows 2 Using DOS commands navigate to the folder containing the NioWatch setup exe file on the CD ROM 3 Type setup exe_ s_ v qn where _ represents a space...

Страница 59: ...59 Display Controller settings...

Страница 60: ...Display Controller settings This page intentionally left blank 60 This page intentionally left blank...

Страница 61: ...ng 1 Open the Display Properties Control Panel by right clicking on the desktop then select Properties 2 Under Windows 2000 and Windows XP click on the Settings tab Double click on the rectangle that...

Страница 62: ...l pop up a window with information that identifies the display Properties You may access the Properties page of the currently selected display which is represented by the monitor icon above with the b...

Страница 63: ...is the runtime firmware that is loaded in the display This information may be helpful when there is a problem Internal Temperature This is the temperature inside the display It starts out at about th...

Страница 64: ...the Regional Settings Control Panel in your machine s Start Settings Control Panel Using the BarcoMed Driver Tab Please note that you must have logged on to Windows using an account with administrato...

Страница 65: ...XP Status The Status section displays information about the current BarcoMed display controller driver and the currently selected display resolution Graphics Board This displays the current BarcoMed...

Страница 66: ...des All applications that are designed to work correctly with 8 bit 256 color modes should continue to work normally Please note that dithering is not used while in this mode The Enable Dithering chec...

Страница 67: ...ted in the background application As shown in figure 38 the 20 standard system colors are converted from RGB to gray values The rest of the 236 entries from index 10 to 245 contain the missing gray va...

Страница 68: ...due to the fact that some applications assume that the first and last 10 entries of the palette are the standard system colors In this palette mode these entries are made up from entries in the botto...

Страница 69: ...ailable for the model controller with which you are working Under Windows 2000 and Windows XP you can enable or disable DualView through the drop down menu In SingleView mode the Monitor Configuration...

Страница 70: ...to 256 colors 8 bits per pixel The palette mode for the your high resolution grayscale displays should be set to Static Gray palette with NO system colors This guarantees that the all of the 256 gray...

Страница 71: ...owing options maybe set individually on each Barco display even if they are connected to the same BarcoMed controller Palette Mode Drawing Mode Note If the second display connected to any given BarcoM...

Страница 72: ...he Firmware installed on the board Table 1 AURA Controllers Non AURA Controllers BarcoMed Hardware Tab Support BarcoMed Nio PCI and Firmware Information BarcoMed Coronis PCI and Firmware Information B...

Страница 73: ...d 3MP2FH PCI and Firmware Information BarcoMed 5MP1H PCI Information Only BarcoMed 5MP1HM PCI and Firmware Information BarcoMed 5MP2 PCI Information Only BarcoMed 5MP2 AURA PCI and Firmware Informatio...

Страница 74: ...ab under Windows 2000 or Windows XP Device Displays the current BarcoMed display controller driver and the currently selected display resolution Identify Device This button is for BarcoView Medical Im...

Страница 75: ...lected PCI slot VGA Bios Version Displays the VGA Bios version for the BarcoMed display controller installed in the selected PCI slot Firmware Version Displays the firmware version for the BarcoMed di...

Страница 76: ...se all applications before starting the wizard The screens that follow guide the user through gathering pertinent diagnostic data that will help in determining the root of the problem Customer Informa...

Страница 77: ...poses check the summary report checkbox If this box is checked an additional report will be saved on the desktop called BarcoExamSummary txt Please let the wizard gather all of the data the NEXT butto...

Страница 78: ...hand column click on Contact us 3 Then click on Support in the drop down menu 4 Find the appropriate ImageCare Center for your country and click on the email link 5 Enter a subject and a brief messag...

Страница 79: ...e Button Clicking this button will launch the BarcoMed Hardware Configuration utility This program allows the user to flash update the firmware stored in the ROM of the currently selected BarcoMed dis...

Страница 80: ...ented in a Wizard format which guides the user through the flash update procedure The user will be prompted to select a firmware update file to use for the update process This file will be provided by...

Страница 81: ...81 NioWatch operation...

Страница 82: ...NioWatch operation This page intentionally left blank 82 This page intentionally left blank...

Страница 83: ...the NioWatch console see below appears allowing you to execute the NioWatch functions Figure 42 Display settings Allows to view information about your dis play s and display controller Also allows to...

Страница 84: ...ialog represent the display controller heads supported by NioWatch The display controller heads are also listed in the Display drop down box If you wish to control a display in a multi head system you...

Страница 85: ...n Display tab In the Display Info section you can view the name and serial number of the selected display For Nio E XX20 displays you can also view To select another display function select an item fr...

Страница 86: ...s positioned above the CAL mark the luminance is in calibrated position as determined during the latest calibration If the slider is not above the CAL mark the luminance is not in calibrated position...

Страница 87: ...Display settings 87 Graphic Board tab Figure 44 Graphic Board tab Here you can see information about the installed display controller Name serial number driver version and firmware version...

Страница 88: ...w To calibrate the display using the Barco LCD sensor 1 If you have multiple displays of the same type connected multi head system consider if you wish to equalize the display you calibrate to a refer...

Страница 89: ...alibrate button 4 A message appears showing the different calibration options Figure 46 Calibration choices 5 Select Using the BARCO LCD sensor and click OK This option is grayed in case NioWatch does...

Страница 90: ...isplay number that appears in this option refers to the reference display Manual calibration 1 Follow step 2 and 3 of the calibration with Barco LCD sensor see page 88 2 In the Calibration dialog see...

Страница 91: ...ge 4 When done click button Set point 1 of 20 5 Repeat this procedure until the button is grayed This indicates the last point is set 6 Click OK to finish To reset to the latest calibration 1 Follow s...

Страница 92: ...e To view a graph showing the result of the latest calibration 1 In the Calibration tab dialog click on Show calibration chart This button is available only if the display has been calibrated with a s...

Страница 93: ...by clicking on the corresponding thumbnail or selecting a pattern by name from the Test pattern drop down box 2 Click Show to display the pattern If you have selected Custom Image you can select a bit...

Страница 94: ...system containing 2 displays of the same type and you wish display 2 to have the same output luminance as display 1 Therefore first calibrate display 1 Next calibrate display 2 while the Equalization...

Страница 95: ...nd calibrate display 2 The display will be calibrated and additionally the display luminance will be matched to the luminance of the reference display 1 MediCal Administrator tab Figure 52 MediCal Adm...

Страница 96: ...endly web interface accessible from any client users have access to all the information of the installed display base For more information about MediCal Administrator please contact Barco Medical Imag...

Страница 97: ...oWatch application is installed during installation of NioWatch To update NioWatch Select Update NioWatch from the Start Programs Barco NioWatch menu The application will search via the Internet if Ni...

Страница 98: ...Update NioWatch This page intentionally left blank 98...

Страница 99: ...99 Display operation...

Страница 100: ...Display operation This page intentionally left blank 100 This page intentionally left blank...

Страница 101: ...age content is not recommended Switching on the display DPMS may decrease the risk of image sticking image retention Stand by switching When the display is on and no on screen display is visible push...

Страница 102: ...the OSD is not on the screen rotate the control wheel to display the OSD The main menu appears 2 To enter into a menu First rotate the control wheel to select the desired menu Next press the wheel sh...

Страница 103: ...ue from a predefined list e g in Settings rotate the control wheel to select the setting and press the control wheel until the desired value appears Locking and unlocking user controls The User Contro...

Страница 104: ...Press the control wheel 2 times 4 Rotate the control wheel 1 step counterclockwise The on screen display appears Note Steps 2 to 4 must be performed in maximum 3 seconds 5 Rotate the control wheel to...

Страница 105: ...fect the grayscales of the image on the screen Name Description Luminance Adjust the target luminance to which the dis play will be stabilized Settings Change settings for DPMS Power LED and User Cont...

Страница 106: ...the LED will turn orange even if it was switched off by this setting User Controls Disable the control wheel functions Name Description Product The display type Serial No Indicates the display serial...

Страница 107: ...107 Cleaning...

Страница 108: ...Cleaning This page intentionally left blank 108 This page intentionally left blank...

Страница 109: ...ith abrasives Steel wool Sponge with abrasives Cloth with thread made of steel Other coarse tools Lye is a strong caustic alkaline solution of potassium salts Panel Important We recommend to let this...

Страница 110: ...tly moisten the cloth with a solution of 25 Isopropyl Alcohol IPA and 75 de ionized or distilled water E g Cleareen a product of Certified Laboratories 3 Gently clean the panel with the moist cloth 4...

Страница 111: ...111 Troubleshooting...

Страница 112: ...Troubleshooting This page intentionally left blank 112 This page intentionally left blank...

Страница 113: ...General tips If one display from a multi head system exhibits problems try to eliminate the problem by switching video cables or power supplies In that way you can find out if the problem resides in...

Страница 114: ...oise or interference The video cable may be of poor quality DVI video cable may not be firmly connected to the PC or to the display Image contains missing pixels A number of missing pixels may be norm...

Страница 115: ...splay Properties control panel The previous image remains slightly visible on the screen This phenomenon called image sticking is normal if the same image has been on the screen for a long time The gh...

Страница 116: ...h e g 32 bits per pixel true color supported by the color display s controller The colors setting for your high resolution grayscale displays should default to 256 colors 8 bits per pixel The palette...

Страница 117: ...d my Windows desktop onto this monitor checkbox but do NOT click the Apply button at this time If you installed your BarcoMed Nio drivers in SingleView mode default for Windows 2000 there will be one...

Страница 118: ...View or the Second View attached to the display controller Please make a note of this so that you can arrange the displays in the correct order later if necessary 6 Click OK on the bottom of the Adap...

Страница 119: ...tions in a Quad Head Configuration you may need to drag the heads into the proper position in the window on the Settings tab so that the arrangement in the window on the Settings tab matches the physi...

Страница 120: ...nstall or update only the BarcoMed Nio driver follow the steps described in the section Using the BarcoMed Product Installation Wizard with the following changes 1 Boot your system and log in using an...

Страница 121: ...s finished installing click Finish Then click Finish again Reboot the system when prompted and then reset the resolution of your displays if necessary Uninstalling the BarcoMed Nio driver or Barco Nio...

Страница 122: ...he wizard 2 The BarcoMed Product Installation Wizard will display its welcome screen 3 Make certain that the checkbox next to the driver is checked and that all other checkboxes are unchecked figure 6...

Страница 123: ...ocess Click Finish again to exit the wizard Click Yes if Windows tells you that you must restart your computer before the new setting will take effect 8 If you have installed your driver in DualView m...

Страница 124: ...nish uninstalling the driver by clicking Next three times Then click Reboot Finish and Yes If the BarcoMed Product Installation Wizard doesn t automatically restart finish uninstalling the driver by r...

Страница 125: ...125 Technical Information...

Страница 126: ...Technical Information This page intentionally left blank 126 This page intentionally left blank...

Страница 127: ...H x 0 249 mm V Native color resolution 8 bits sub pixel Luminance 500 cd m calibrated Contrast ratio 850 1 on off in dark environment Response time 20 ms typical 25 C after 30 min warm up Controls Pus...

Страница 128: ...VAC maximum backlight USB load Dimensions W x H x D In perpendicular vertical position high est position tilt 0 swivel 0 385 x 585 x 250 mm Net weight 14 kg Operating Temperature Operation 0 C to 40 C...

Страница 129: ...Vertical 170 Horizontal 170 Pixel Pitch 0 255 mm H x 0 255 mm V Native color resolution 8 bits sub pixel Luminance 400 cd m calibrated Contrast ratio 1000 1 on off in dark environment Response time 1...

Страница 130: ...ower supply unit 90 264 VAC Input for display 12 VDC The supplied 12VDC power supply must be used Power consumption 66 watts max at 90 VAC maximum backlight USB load Dimensions W x H x D In perpendicu...

Страница 131: ...Native color resolution 8 bits sub pixel Luminance 500 cd m calibrated Contrast ratio 700 1 on off in dark environment Response time 17 5 ms typical 25 C after 30 min warm up Controls Push turn contro...

Страница 132: ...VAC maximum backlight USB load Dimensions W x H x D In perpendicular vertical position high est position tilt 0 swivel 0 385 x 585 x 250 mm Net weight 14 kg Operating Temperature Operation 0 C to 40 C...

Страница 133: ...io 900 1 on off in dark environment Response time 25 ms typical 25 C after 30 min warm up Controls Push turn control wheel for stand by switching and OSD controls Input connectors DVI dual channel Sig...

Страница 134: ...tical position highest position tilt 0 swivel 0 385 x 585 x 250 mm Net weight 13 kg Operating Temperature 0 C to 40 C 15 C to 35 C within specs Storage Temperature 20 C to 60 C Humidity 8 80 non conde...

Страница 135: ...tio 700 1 on off in dark environment Response time 17 5 ms typical 25 C after 30 min warm up Controls Push turn control wheel for stand by switching and OSD controls Input connectors DVI dual channel...

Страница 136: ...storage Item Specification Picture panel 20 1 inch Advanded SFT Resolution Native 2560 x 2048 Display area H x V 399 36 x 319 49 mm Viewing angle 10 1 contrast Vertical 85 Horizontal 85 Pixel Pitch 0...

Страница 137: ...or display 12 VDC The supplied 12VDC power supply must be used Power consumption 80 watts max at 90 VAC maximum backlight USB load Dimensions W x H x D In perpendicular vertical position high est posi...

Страница 138: ...yout Pin no Signal Pin no Signal 1 TMDS DATA 2 14 5V POWER 2 TMDS DATA 2 15 GND 3 GND 16 HOT PLUG DETECT 4 NC 17 TMDS DATA 0 5 NC 18 TMDS DATA 0 6 DDC CLOCK 19 GND 7 DDC DATA 20 NC 8 NC 21 NC 9 TMDS D...

Страница 139: ...e high end boards like some of the BarcoMed boards contain two sets of video and sync outputs This is called a dual head display controller It is like two complete display controllers implemented on o...

Страница 140: ...Glossary This page intentionally left blank 140...

Страница 141: ...141 Warranty Statement...

Страница 142: ...Warranty Statement This page intentionally left blank 142 This page intentionally left blank...

Страница 143: ...nd shall advise the Customer on how to proceed Customer Support may ask to return the faulty equipment or faulty subassemblies to the BarcoView Customer Support Center or an authorized service center...

Страница 144: ...ment 2 4 Normal wear and tear use under circumstances exceeding specifications abuse unauthorized repair or alternation lack of proper maintenance 2 5 Any failures resulting from an accident negligenc...

Страница 145: ...in this respect may be invoiced to the Customer at normal pricing ARTICLE 4 MODIFICATIONS OR CHANGES TO THE EQUIPMENT Customer may make additions to the equipment only with explicit written consent of...

Страница 146: ...zation requisition embargo currency transfer prohibitions insurrection lack of means of transport restrictions of the use of energy and generally any circumstances which are beyond the control of the...

Страница 147: ...www barco com B4100454 00 March 2005...

Отзывы: