background image

9. Image

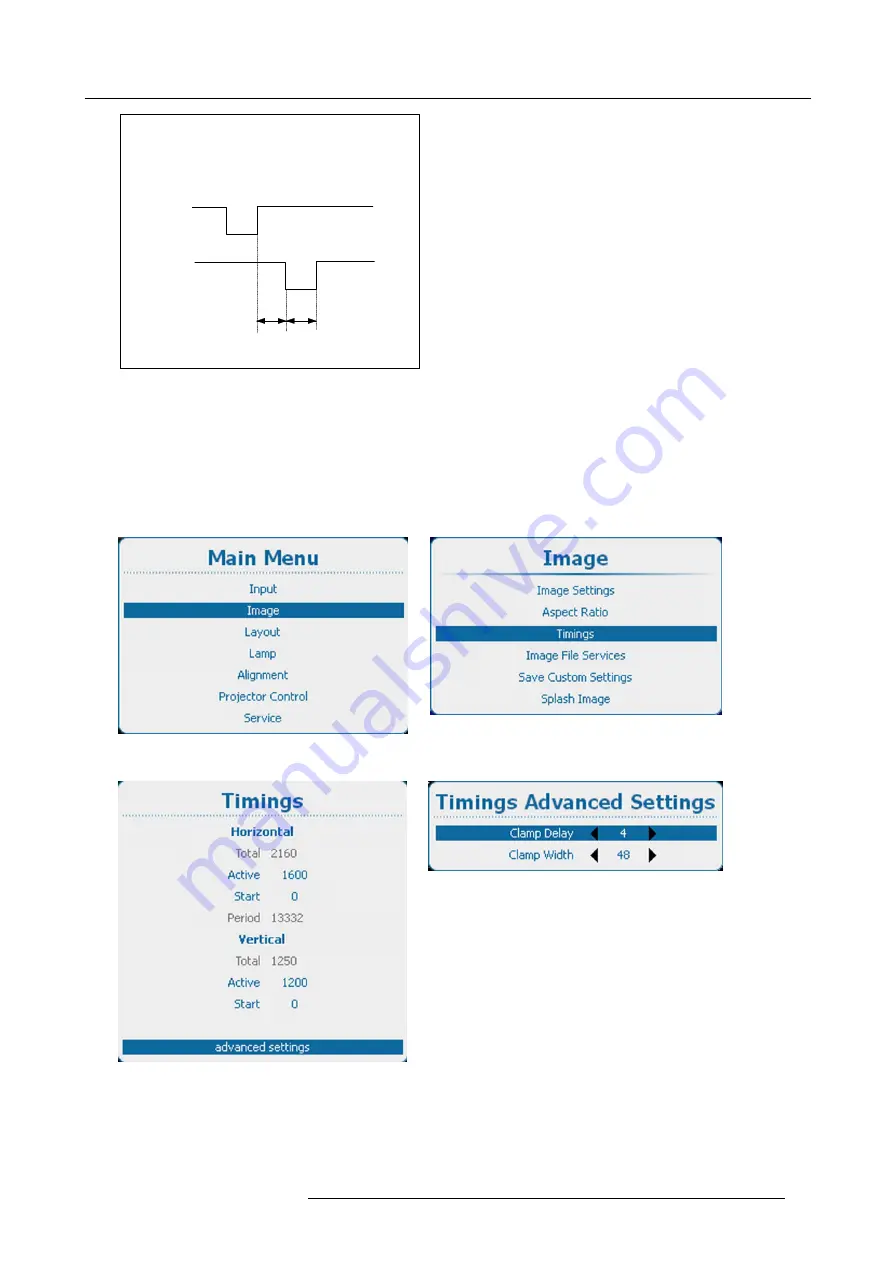
Sync
pulse

Clamp
pulse

Clamp
delay

Clamp
width

L

ead

in

g

 ed

g

e

Tr

ai

lin

g

ing e

d

ge

Image 9-50

How to change the clamp delay - clamp width

1. Press

Menu

to activate the menus and select

Image

Timings

Advanced settings

(image 9-51, image 9-52, image 9-53)

2. Press

ENTER

to select. (image 9-54)

3. Use the

or

key to select

Clamp Delay

or

Clamp Width

and use the

or

key to change the value.

Or,
press

ENTER

to open the speci

fi

c adjustment menu. Follow the adjustment method as described in "Navigation and adjust-

ments", page 64.

Image 9-51
Main menu, Image

Image 9-52
Image, timings

Image 9-53
Timings, advanced settings

Image 9-54
Clamp delay

R5905158 HDF W SERIES 10/07/2012

97

Содержание HDF W series

Страница 1: ...HDF W series Installation manual R5905158 01 10 07 2012 ...

Страница 2: ...Barco nv Entertainment Division Noordlaan 5 B 8520 Kuurne Phone 32 56 36 82 11 Fax 32 56 36 883 86 Support www barco com esupport Visit us at the web www barco com Printed in Belgium ...

Страница 3: ...oned in this manual serve as comments or examples and are not to be understood as advertising for the products or their manufacturers EN55022 CISPR22 Class A ITE Information Technology Equipment Class A ITE is a category of all other ITE which satisfies the class A ITE limits but not the class B ITE limits Such equipment should not be restricted in its sale but the following warning shall be inclu...

Страница 4: ......

Страница 5: ...nput Communication 39 4 1 Introduction 39 4 2 Input source connections 40 4 3 Communication connections 41 5 Getting started 45 5 1 RCU Local keypad 45 5 2 Terminology overview 45 5 3 Power on projector 47 5 4 Switching to standby 50 5 5 Power off projector 50 5 6 Status LEDs 51 5 7 Using the RCU 51 5 8 Projector Address 53 5 8 1 Displaying and Programming addresses into the RCU 53 5 8 2 Controlli...

Страница 6: ...3 File Load Filter 99 9 6 4 Delete a file 100 9 6 5 Delete all custom files 101 9 6 6 Rename custom files 101 9 6 7 Copy custom file 102 9 6 8 Image file service options Load file 103 9 6 9 Image file service options Auto Picture Alignment 104 9 7 Save custom settings 105 9 8 Splash image 105 10 Layout 107 10 1 Layout menu overview 107 10 2 Introduction 107 10 3 Main window 108 10 3 1 Main window ...

Страница 7: ... overview 163 13 2 Individual Projector Address 164 13 3 Projector Common Address 164 13 4 Serial Communication 165 13 4 1 Baud rate setup 165 13 4 2 Interface Standard 166 13 5 Network 167 13 5 1 Introduction to a Network connection 167 13 5 2 Wired DHCP set up 168 13 5 3 Wired IP address set up 168 13 5 4 Wired subnet mask set up 169 13 5 5 Wired default gateway set up 170 13 5 6 Wireless networ...

Страница 8: ... lamp cover 228 16 8 Installation of the input cover 229 17 Servicing 231 17 1 Inserting an input module 231 17 2 Replacement of the dust filter on the front side 232 17 3 Replacement of the dust filter on the bottom side 233 17 4 Replacement of the dust filter on the top side 234 17 5 Pressure verification of the liquid cooling circuit 235 17 6 Removal of the lamp house 235 17 7 Installation of t...

Страница 9: ... warnings on the projector and in the documentation manuals should be adhered to All instructions for operating and use of this equipment must be followed precisely All local installation codes should be adhered to Notice on safety This equipment is built in accordance with the requirements of the international safety standards IEC60950 1 EN60950 1 UL60950 1 and CAN CSA C22 2 No 60950 1 which are ...

Страница 10: ...or repair work is required Do not use an accessory attachment which is not recommended by the manufacturer Lightning For added protection for this video product during a lightning storm or when it is left unattended and unused for long periods of time unplug it from the wall outlet This will prevent damage to the device due to lightning and AC power line surges To prevent personal injury Isolate e...

Страница 11: ... on an electrical fire Always have service performed on this projector by authorized Barco service personnel Always insist on genuine Barco replacement parts Never use non Barco replacement parts as they may degrade the safety of this projector Slots and openings in this equipment are provided for ventilation To ensure reliable operation of the projector and to protect it from overheating these op...

Страница 12: ...d reliability fire electric shock or other hazards Unauthorized substitutions may void warranty Safety check Upon completion of any service or repairs to this projector ask the service technician to perform safety checks to determine that the product is in proper operating condition Possible explosion hazard Always keep in mind the caution below CAUTION Xenon compact arc lamps are highly pressuriz...

Страница 13: ...1 Safety Use an appropriate forklift to raise flight cases and take the necessary precautions to avoid personnel injury R5905158 HDF W SERIES 10 07 2012 9 ...

Страница 14: ...1 Safety 10 R5905158 HDF W SERIES 10 07 2012 ...

Страница 15: ...w of clean air into the projectors ventilation inlets For installations in environments where the projector is subject to airborne contaminants such as that produced by smoke machines or similar these deposit a thin layer of greasy residue upon the projectors internal optics and imaging electronic surfaces degrading performance then it is highly advisable and desirable to have this contamination r...

Страница 16: ... projector 1 Remove the banding around the carton box by releasing the fastening clips as illustrated and remove the top cover image 2 1 2 Remove the power cord which is attached to the packaging with a cable ties and the two smaller carton boxes located between the inner carton sleeve and outer carton box image 2 2 Note The two smaller carton boxes contain the manuals the remote control unit RCU ...

Страница 17: ...ight case The HDF W series flight case is designed to transport the HDF W series projector in a safe and secure manner The four caster wheels provided with breaks and the eight handles make the HDF W series flight case easy to handle The floor of the flight case wagon is equipped with two small covered compartments to store the remote control and the rigging clamps Furthermore three Velcro strips ...

Страница 18: ...the projector can be mounted in different ways the 4 different configurations are 1 Front Table F T 2 Front Ceiling F C 3 Rear Table R T 4 Rear Ceiling R C Front projection The projector is installed either in a table mount or ceiling mount configuration at the same side of the screen as the audience F C AUDIENCE F T FLOOR SCREEN Image 2 6 Front projection Rear projection The projector is installe...

Страница 19: ... completely and the vertical lens shift is set to zero 0 On Axis Off Axis projection The position of the projector with reference to the screen may also be different depending on the installation Basically the projector can be positioned in On Axis or Off Axis configuration On Axis configuration means that the projector is positioned so as to have the centre of the lens coinciding with the centre ...

Страница 20: ...ical and horizontal shift range P DMD F Field of view It is mechanical possible to shift outside the recommended field of view but it will result in a decline of image quality depending on the used lens and the zoom position of the used lens Furthermore shifting too much in both directions will result in a blurred image corner Best image quality is projected in the On Axis configuration Horizontal...

Страница 21: ...hots can be taken A snapshot represents a current state of a configuration and can be reloaded to return to this typical state These terms will be used through the complete software Projector Toolset is a stand alone application that runs on a Java Virtual Machine and that does not require extra services to run Several configurations can be controlled simultaneously Even when the configurations ar...

Страница 22: ... in front of the screen at the expected throw distance Ensure that the projector is installed at right angles horizontally and vertically with the screen See Projector configurations page 14 3 Select and install an appropriate lens which covers the throw ratio screen size projector screen distance See Lenses page 23 4 Connect the projector with the local power net See Power connection page 33 5 Co...

Страница 23: ...ged case C XLR adaptor Overview RCU battery installation RCU rugged case installation RCU XLR adaptor installation Using the XLR adaptor of the RCU RCU usage possibilities 3 1 1 RCU battery installation Where to find the batteries for the remote control The batteries are not placed in the remote control unit to avoid control operation in its package resulting in a shorter battery life time At deli...

Страница 24: ...if battery is incorrectly installed Replace only with the same or equivalent type recommended by the manufacturer Disposal of used batteries must be done according to the manufacturer s instruction 3 1 2 RCU rugged case installation How to install the rugged case of the remote control 1 Slide the bottom of the RCU into the rugged case and then pull the top of the rugged case over the top of the RC...

Страница 25: ... adaptor is on top 2 Fasten the two screws S of the XLR adaptor Turn each screw repeatedly one or two turns until both screws are tight S C S Image 3 6 3 1 4 Using the XLR adaptor of the RCU How to use the XLR adaptor of the remote control unit 1 Connect a cable with XLR plug into the XLR adaptor 2 Connect the other end of the cable with your HDF W series projector 3 Push the XLR adaptor completel...

Страница 26: ... e RCU with rugged case and XLR adaptor pulled out REMOTE and not wired The XLR adaptor must be in the pulled out position REMOTE otherwise the RCU will not function f RCU with rugged case and XLR adaptor pulled out REMOTE and wired The RCU will send the commands via infra red to the projector g RCU with rugged case and XLR adaptor pushed in WIRED and wired The RCU will send the commands via the c...

Страница 27: ... for the HDF W series projector Image 3 9 R9840775 TLD 1 16 1 fixed lens Image 3 10 R9862000 TLD lens 0 67 1 Image 3 11 R9862005 TLD zoom lens 1 16 1 49 1 Image 3 12 R9862010 TLD zoom lens 1 39 1 87 1 Image 3 13 R9862020 TLD zoom lens 1 87 2 56 1 Image 3 14 R9862030 TLD zoom lens 2 56 4 16 1 Image 3 15 R9862040 TLD zoom lens 4 16 9 6 1 Image 3 16 R9829997 TLD zoom lens 9 6 10 39 1 R5905158 HDF W S...

Страница 28: ... lens caps on both sides 3 Place the lens holder in the unlocked position by moving the lens lock handle A towards the lens power supply socket B as illustrated image 3 18 4 Ensure that the lens holder stands in the On Axis position horizontal and vertical mid position Note The lens holder is placed default in the On Axis position at factory 5 Gently insert the lens in such a way that the lens con...

Страница 29: ... Image 3 20 Lock lens 3 2 4 Lens removal How to remove 1 Support the lens with one hand while you unlock the lens holder by sliding the lock handle towards the unlocked position as illustrated image 3 21 2 Gently pull the lens out of the lens holder image 3 22 R5905158 HDF W SERIES 10 07 2012 25 ...

Страница 30: ...fety cable optional When using the safety cable The lens safety cable can be used in any circumstances to protect a mounted lens in the lens holder How to mount the cable 1 Put the safety cable around the lens Make sure the cable is mounted between the motor part and the mounting flange im age 3 23 2 Insert both cable sides into the clamp Strap the cable and make sure that the clamp is positioned ...

Страница 31: ...3 Physical installation 1 2 3 3 Image 3 23 Lens safety cable 1 Lens motor block 2 Mounting flange 3 Clamp Image 3 24 Clamp position R5905158 HDF W SERIES 10 07 2012 27 ...

Страница 32: ...mage 3 26 2 Use the or key to zoom the lens Use the or key to focus the lens Press ENTER to switch to Lens shift adjustment image 3 27 3 Use the or key to shift the lens in vertical direction Use the or key to shift the lens in horizontal direction Press ENTER to switch to zoom focus adjustment Image 3 26 Zoom Focus adjustment 28 R5905158 HDF W SERIES 10 07 2012 ...

Страница 33: ...d image on the screen due to a tilt or swing of the lens plane with respect to the DMD plane This is also known as Sheimpflug s law To solve this the lens plane must be placed parallel with the DMD plane This can be achieved by turning the lens holder to remove the tilt or swing between lens plane and DMD plane Lp3 Lp4 SCREEN DMD Lp1 Lp2 Fp1 Fp2 SCREEN DMD Lp3 Lp4 Fp3 Fp4 Scheimpflug Image 3 28 Sc...

Страница 34: ...ee image 3 29 5 Optimize the focus of the projected image as follows a Place the zoom lens in TELE position smallest projected image and adjust the focus using the lens focus barrel or motorized focus control b Place the zoom lens in WIDE position largest projected image and adjust the focus by turning equally on nut 1 2 and 3 c Repeat steps a and b until the projected image is as sharp as possibl...

Страница 35: ...3 Physical installation Image 3 30 1 2 3 F Image 3 31 Center focusing R5905158 HDF W SERIES 10 07 2012 31 ...

Страница 36: ...3 Physical installation 1 F Image 3 32 Left bottom focusing 2 F Image 3 33 Right bottom focusing 32 R5905158 HDF W SERIES 10 07 2012 ...

Страница 37: ...rn in set screw D lightly by hand allowing the image to move slightly 1 3 to 1 2 of a square image 3 35 4 Fasten lock nut d 5 Tighten nut 4 until the offset of the image movement created in step 3 is canceled Tip The amount of image movement in step 3 will determine how tight the nut in step 5 will need to be turned to return the image to its original position 1 3 to 1 2 Image 3 35 3 3 Power conne...

Страница 38: ...e of the projector Note that in case the power net drops significantly during start up the lamp will fail the ignite If this is the case take the necessary measures to reinforce the power net to the projector before starting up the projector again Volt meter is protected with a Miniature Fuse 5 x 20 mm T 1AH 250 VAC UL 115 V 300 VDC Spare power plug The projector is delivered with a spare power pl...

Страница 39: ...with heavy loads Warning Always secure the rigging points after adjustment 3 Turn in the rigging clamps A into the rigging points using a 17 mm open ended spanner and secure the rigging clamps by turning the safety nut B on the rigging clamp against the rigging point using a 17 mm open ended spanner image 3 41 Warning Always use four 4 rigging points equally spread to suspend the projector 4 Place...

Страница 40: ... Physical installation X mm N Image 3 40 Rigging points distance A B B Image 3 41 Mounting clamps Image 3 42 Opening clamps Image 3 43 Lowering and mounting truss bar 36 R5905158 HDF W SERIES 10 07 2012 ...

Страница 41: ...3 Physical installation S S Image 3 44 Mounting Safety chains Proceed with the alignment procedure see Alignment of a ceiling mount HDF W series projector page 55 R5905158 HDF W SERIES 10 07 2012 37 ...

Страница 42: ...3 Physical installation 38 R5905158 HDF W SERIES 10 07 2012 ...

Страница 43: ... modules f e 5 cable input 1 2 3 4 5 6 7 9 10 11 12 13 15 16 8 14 Image 4 1 Input Communication connections 1 Display 2 Optional antenna for Wifi connection 3 12 V output as power supply to external equipment 4 DMX in out 5 XLR input port for remote control 6 RS232 RS422 input port 7 Dual Link DVI I HDCP input 8 Free input slot 9 Button module 10 Optional antenna for GSM 11 RS232 RS422 input port ...

Страница 44: ... using a specific pixel packing We support the pixel packing that is implemented by Silicon Image Sil7189 DVI re ceiver 3G Dual HDSDI input specifications 3G follows the SMPTE 425M standard HDSDI follows he SMPTE 292M standard Dual link follows the SMPTE 372M standard SDI follows the 259M standard 5 cable input optional Optional multi purpose input which can be inserted in the free slots BARCO R P...

Страница 45: ... R Y 0 7Vpp 3dB 75 Ohm termination o Ys 1Vpp 3dB 0 7V Luma 0 3V Sync 75 Ohm termination o B Y 0 7Vpp 3dB 75 Ohm termination RG s B o R 0 7Vpp 3dB 75 Ohm termination o G s 1Vpp 3dB 0 7Vpp G 0 3Vpp Sync 75 Ohm termination o B 0 7Vpp 3dB 75 Ohm termination Diagnostic LED s on front panel Green LED Lights up in case input module is selected Yellow LED Lights up in case sync detected 4 3 Communication ...

Страница 46: ...vices Standardized by USITT Wired remote control XLR If desired the remote control unit can be wired and plugged in into the male XLR port on the communication interface XLR Remote CTRL in Pin Description 1 GND 2 RC5 in 3 XLR present sense RS232 RS422 input The communication interface of the HDF W series projector supports RS232 and RS422 serial communication on two different types of input connec...

Страница 47: ...ters When the difference between the 2 lines is 0 2V that equals with a logical 0 When the difference is 0 2V that equals to a logical 1 USB port The communication interface is equipped with a master USB port type A connector This USB port will simplify the service pro cedures for software updates or for taking backup files from the projector without network connection An USB stick is plugged into...

Страница 48: ...hernet 10 100 orange When a 100 MB network is detected IR red IR received but not acknowledged green IR received and acknowledged WIFI sel orange When WiFi is selected ACT green When WiFi is connected with an Ethernet ERR red See Status LEDs page 51 PWR orange See Status LEDs page 51 LMP orange See Status LEDs page 51 44 R5905158 HDF W SERIES 10 07 2012 ...

Страница 49: ...local keypad The local keypad is located on the input side of the projector Remote control functions This remote control includes a battery powered infrared IR transmitter that allows the user to control the projector remotely This remote control is used for source selection control adaptation and set up Other functions of the remote control are switching between stand by and operational mode swit...

Страница 50: ...ng one digit button between 0 and 9 5 LENS Direct access key to the lens adjustment menus Toggling this key will change the projected pattern 6 PAUSE To stop projection for a short time press PAUSE The image disappears but full power is retained for immediate restarting Shutter is closed 7 STBY Standby function switch off the lamp and lamp electronics The lamp cooling fans remain active for about ...

Страница 51: ... Direct access key for picture in picture selection 22 Info Displays help information when on a certain menu item of the sofrware 23 RC Operating indication Lights up when a button on the remote control is pressed This is a visual indicator to check the operation of the remote control Table 5 1 5 3 Power on projector How to power on 1 Press the power switch at the back of the projector to switch o...

Страница 52: ... Projector Toolset with an installed HDF W series plug in Lamp overview Once the projector is started press Lamp to get an overview of the lamp parameters such as Image 5 3 Local screen lamp number of Strikes Run time in hours Remaining run time in hours slide bar indication with percentage indication of the current run time compared with the maximum life time of the lamp 48 R5905158 HDF W SERIES ...

Страница 53: ...rsion Mgr software GUI software Starting image projection via the standby key 1 Press Stand by key once on the local keypad or on the remote control image 5 5 The projector status LED lights up The projector starts up on the last saved source Some lamp and runtime warnings can be displayed when an image is displayed after a start up R5905158 HDF W SERIES 10 07 2012 49 ...

Страница 54: ...ssage Keep on pressing is displayed This message changes to Saving data The projector goes to standby All custom settings are written to the internal backup device A message Saving data indicates this process Never switch off the projector while this message is displayed When switching to standby an after cooling process will start to cool down the projector The after cool time depends on the temp...

Страница 55: ...tor in standby Full white Shutter is undefined shutter not open and not closed Pause button Full white toggles on off Shutter is closed during reset formatter Off Projector powers up Red Standby Orange ECO standby PWR power LED Green Projector is on Off Lamp is off Red No lamp inserted Orange Lamp is on in ECO mode Green Lamp is on in normal mode LMP lamp LED Green Orange Lamp is on in CLO mode Of...

Страница 56: ...he effective operating distance 30m 100ft in a straight line The remote control unit will not function properly if strong light strikes the sensor window or if there are obstacles between the remote control unit and the projector IR sensor F1 F2 F3 F4 F5 ADJ EXIT ENTER PAUSE PHASE TEXT SHARPN TINT COLOR BRIGHTN CONTR TREBLE BALANCE BASS VOL 9 0 7 8 5 6 3 4 1 2 F1 F2 F3 F4 F5 ADJ EXIT ENTER PAUSE P...

Страница 57: ...t lit up while pressing a digit key Otherwise the address is not entered in the remote control 5 8 2 Controlling the projector Projector address Address installed in the projector to be individually controlled Common address Projector will always execute the command coming from a RCU programmed with that common address Why a projector address As more than one projector can be installed in a room e...

Страница 58: ...on the remote control or local keypad can now control that selected window To select the source for the picture in picture window press Window button until PiP window is activated and then select the desired source with the digit keys To select the source for the main window press Window button until the main window is activated and then select the desired source with the digit keys 5 10 Alignment...

Страница 59: ...ternal hatch patterns on the screen 3 Release the lock nut ref B image 5 11 of the rigging clamps 4 Adjust the height of the rigging clamps with respect to the projector until the projected hatch pattern is perfectly rectangle shaped and leveled image 5 11 When this is achieved the projector is set horizontal and vertical at right angles to the screen image 5 12 5 Fasten the lock nut B of the rigg...

Страница 60: ...5 Getting started 56 R5905158 HDF W SERIES 10 07 2012 ...

Страница 61: ...CD screen 1 2 3 4 5 6 7 8 9 0 MENU EXIT ENTER RGB STBY PAUSE TEXT PATTERN WINDOW PIP LENS AUTO FN MENU EXIT ENTER PAUSE TEXT PHASE LENS 5 3 7 7 51 3 3 1 2 8 7 2 0 1 1 Image 6 1 Text button To toggle Text ON or OFF press the TEXT key on the remote control or local keypad 6 2 Quick Lens Adjustment via LENS key Quick zoom focus adjustment 1 Press the LENS key on the remote control or local keypad to ...

Страница 62: ... LENS key to switch to another pattern Different patterns are available Quick shift adjustment 1 Press the LENS key on the remote control or local keypad to open the Zoom Focus Adjustment menu image 6 4 2 Press ENTER to go to the Shift menu image 6 5 3 Use the or key to shift the lens in vertical direction Use the or key to shift the lens in horizontal direction Press ENTER to switch to zoom focus...

Страница 63: ... allowing direct alignment for lens ZOOM FOCUS HORIZON TAL SHIFT and VERTICAL SHIFT 1 Press LENS ZOOM button or A for correct image size on the screen image 6 6 2 Press LENS FOCUS button or C for an overall focus of the image 3 Press LENS SHIFT button for correct vertical position of the image on the screen 4 Press LENS SHIFT button for correct horizontal position of the image on the screen R59051...

Страница 64: ... key to scroll to the desired layout and press ENTER to activate Select Main full screen to switch off PIP Image 6 7 Load layout file list 6 5 Quick language selection Language selection 1 Press Menu to activate the menus and select Projector Control Change Language 2 Press ENTER to open the language selection menu 3 Select the desired language with the key and press ENTER to activate The current ...

Страница 65: ...6 Quick set up adjustment Image 6 8 Main menu Image 6 9 Projector Control Image 6 10 Change language R5905158 HDF W SERIES 10 07 2012 61 ...

Страница 66: ...6 Quick set up adjustment 62 R5905158 HDF W SERIES 10 07 2012 ...

Страница 67: ...mp mode the lamp use lamp type and history Alignment groups all controls necessary during the setup of the projector onto a screen Projector control contains the accessibility settings of the projector such as address and communication setup Service contains information about how the projector is performing This information will be useful when calling for a service intervention 7 2 About the use o...

Страница 68: ...ith the remote control or the local keypad navigate through the menu structure until the desired item is selected Press the or key until the desired item is reached Press EXIT to finalize the adjustment With the local keypad or remote control press the or key until the desired value setup is reached Press EXIT to finalize the adjustment Direct adjustment within the menu Image 7 2 Use the or key to...

Страница 69: ...uilt up by the content of a previous menu cannot be stored behind a shortcut How to use a shortcut key While in the operational mode no menu selected just press on the desired digit key to open the menu behind that shortcut key How to create a shortcut key Scroll to the desired menu Press the digit key behind which the menu must be stored for 5 seconds When the creation is success fully a confirma...

Страница 70: ... For many items in the adjustment mode help information is available When on an item just click on the info button of your remote control to display information about the selected item MENU EXIT ENTER 5 3 7 7 51 3 3 1 2 1 Image 7 7 Info button When no information is available for the selected item the message No help available for this item is displayed To return to the adjustment mode press EXIT ...

Страница 71: ...GB DVI DVI Dual link RGB HS VS YUV HS VS SDI SD HD 3G Dual Input 1 Priority Input 2 Priority Input 1 Input 2 DUAL SDI Input Locking Input on Main Window Input on Pip Window Input 1 Input 2 Input 3 Input 4 Free Run Free Run Options Native Resolution On Off No Signal Color black blue Logo On Off Shutdown Off On Shutdown time Auto dimming On Off EDID Configure Create Delete R5905158 HDF W SERIES 10 0...

Страница 72: ...and 4 can be filled up with optional input modules Identical modules are allowed 8 2 2 Input configuration How to change 1 Press Menu to activate the menus and select Input Slot module type 2 Press ENTER The slot overview window is displayed with the actual situation filled out 3 Use the or key to select a slot Press ENTER to open the selection menu which will be different from input type to input...

Страница 73: ...HD 3G SDI Input can accept standard definition SD high definition HD and 3 Gigabit definition serial digital inter face SDI signals How to select Select SDI SD HD 3G Dual and press ENTER to open the selections Image 8 5 SDI input type selection The following selections are possible Input 1 Priority when 2 sources are present the source on input 1 will have the priority Input 2 Priority when 2 sour...

Страница 74: ...t the 3G setting Use the or key to select and press ENTER to accept 3G A and 3G B Direct Mapping Dual HD When Dual HD is selected it is possible to use Swap links If Swap links must be used use the or key to select and press ENTER to accept The check box will be checked Dual HD Swap links 8 2 5 5 cable input How to select Select 5 cable and press ENTER to open the selections 70 R5905158 HDF W SERI...

Страница 75: ...ut of the Main window or Pip window When locked to the corresponding input sync the output will be shown without movement artifacts With locking to a specific input a set of projectors can be kept in sync no matter what input image is shown How to set up 1 Press Menu to activate the menus and select Input Input locking 2 Press ENTER The Input locking window is displayed with the current selection ...

Страница 76: ...n is selected radio button selected then the Free Run Options become available Image 8 12 Free run options Use the or key to select Fixed 60 Hz or Manual and press ENTER to select Fixed 60 Hz locking is done on an internal sync of 60 Hz Manual locking is done on the indicated vertical frequency which can be changed by the user between 24 Hz and 60 Hz To change the locking frequency for Manual use ...

Страница 77: ...4 When the show native resolution function is in the ON position the projector handles the source as follows Source Projected image Name Ratio Resolution Ratio Resolution XGA 4 3 1024x768 4 3 1024x768 image projected with black borders SXGA 5 4 1280x1024 5 4 1280x1024 image projected with black borders SXGA 4 3 1400x1050 4 3 1400x1050 image projected with black borders UXGA 4 3 1600x1200 4 3 1600x...

Страница 78: ... can be set to blue or black or a personal defined logo can be displayed or the projector can shutdown after a certain time or auto dimming can be started 8 5 1 Background color How to set the background color 1 Press Menu to activate the menus and select Input No Signal Color 2 Press ENTER to toggle between Blue or black image 8 17 image 8 18 image 8 19 Image 8 17 Main window Image 8 18 Input no ...

Страница 79: ...TER to toggle between On or Off image 8 20 image 8 21 image 8 22 Image 8 20 Main window Image 8 21 Input no signal Image 8 22 No signal logo A dedicated logo can be loaded via Projector Toolset with a HDF W series plug in installed 8 5 3 Shutdown settings How to change the settings 1 Press Menu to activate the menus and select Input No Signal Shutdown image 8 23 image 8 24 image 8 25 2 Press ENTER...

Страница 80: ...the time between no signal is detected and the moment that the projector shuts down How to set the retarding time 1 Press Menu to activate the menus and select Input No Signal Shutdown time min image 8 26 image 8 27 image 8 28 2 Press ENTER to toggle between 1 3 5 and 10 minutes Image 8 26 Main window Image 8 27 Input no signal Image 8 28 76 R5905158 HDF W SERIES 10 07 2012 ...

Страница 81: ...l auto dimming 8 6 EDID EDID Extended Display Identification Data About EDID The EDID file available for DVI input connectors includes timings supported by the projector display size and other information about the display i e projector It is the set of information that is used by digital sources connected to the projector to generate a suitable image signal From the OSD you can for each DVI input...

Страница 82: ... to select the input to configure Press ENTER to open the selection list The current active file is checked 4 Use the or key to select the correct file Press ENTER to select this file Press EXIT to return to the EDID Configuration menu 5 Use the or key to select Apply Your selection is applied and stored for this input The EDID Configuration menu remains open to configure another input Or use the ...

Страница 83: ...rdinated Video Timings CVT RB Coordinated Video Timings Reduced Blanking CVT MB Coordinated Video Timings Minimum Blanking not a standard GTF Generalized Timing Formula 6 Select the Options If necessary scroll down to see extra options Select or clear the check boxes image 8 41 The following options are possible Stereo this check box is currently not in use You can leave it unchecked Deep color se...

Страница 84: ...window Image 8 38 Input EDID Image 8 39 EDID create Image 8 40 EDID file creation Image 8 41 EDID file creation options 8 6 3 Delete a custom EDID file Standard EDID files cannot be deleted 80 R5905158 HDF W SERIES 10 07 2012 ...

Страница 85: ...mage 8 43 image 8 44 3 Use the or key to select the file which must be deleted Press ENTER to delete image 8 45 image 8 46 A confirmation window opens 4 Select Yes to delete the file and press ENTER Image 8 42 Main window Image 8 43 Input EDID Image 8 44 EDID delete Image 8 45 EDID delete list Image 8 46 Confirmation R5905158 HDF W SERIES 10 07 2012 81 ...

Страница 86: ...8 Input 82 R5905158 HDF W SERIES 10 07 2012 ...

Страница 87: ... Level 3 Level 4 Image Image settings Contrast Brightness Saturation Tint Phase Sharpness Color Temperature Projector white Computer 9300 Video 6500 Film 5400 Broadcast 3200 Custom Balance Input Balance Black Balance White Balance Aspect ratio 4 3 16 9 5 4 2 35 1 88 1 85 1 78 1 67 16 10 Custom Timings Horizontal Total Pixels Active pixels Horizontal start Period Total vertical lines R5905158 HDF W...

Страница 88: ...pe of the connected source some settings are grayed out 9 3 1 Contrast About Contrast The contrast function is used to adjust the contrast between the light and the dark areas of the displayed image It applies a gain to the red green and blue signals Contrast adjustment can be done with the Contrast key on the RCU or via the menu structure How to adjust 1 Press Menu to activate the menus and selec...

Страница 89: ...red green and blue signals Brightness adjustment can be done with the Brightness key on the RCU or via the menu structure How to adjust 1 Press Menu to activate the menus and select Image Image Settings Brightness image 9 7 image 9 8 image 9 9 2 Press ENTER to select 3 To change the value directly in the Image Settings window use the or key or a numeric key 0 9 to adjust as a of the full range To ...

Страница 90: ...y or a numeric key 0 9 to adjust as a of the full range To adjust via the bar scale menu press ENTER to display the Saturation menu and adjust with the or key Press ENTER again to enter the value directly with the numeric keys Press EXIT to return to Image Settings menu Image 9 11 Main menu Image Image 9 12 Image settings saturation Image 9 13 Saturation adjustment 9 3 4 Phase About Phase adjustme...

Страница 91: ...the full range To adjust via the bar scale menu press ENTER to display the Phase menu and adjust with the or key Press ENTER again to enter the value directly with the numeric keys Press EXIT to return to Image Settings menu Image 9 15 Main menu Image Image 9 16 Image adjustments Image 9 17 Image settings phase Image 9 18 Phase adjustment 9 3 5 Color temperature fixed values Color temperature The ...

Страница 92: ... setting a request window is displayed to ask if the color space setting should be switched to Off Color temperature selection can only be done when the color space settings is set on Off image 9 23 Click Yes to continue 3 Use the or key to select the desired value Press ENTER to accept The following fixed choices are possible Projector White Computer 9300 Video 6500 Film 5400 Broadcast 3200 Next ...

Страница 93: ...y as the red gain using the or key 5 When finished press EXIT to return Image 9 24 Main menu Image Image 9 25 Image adjustments Image 9 26 Image settings color temperature Image 9 27 Custom color temperature 9 3 7 Input Balance 9 3 7 1 Introduction to Input Balance Introduction Unbalanced color signals When transporting signals there is always a risk of deterioration of the information contained i...

Страница 94: ...nalog color signals must pass through an Analog Digital conversion circuit prior to any digital processing in the PMP A typical ADC transforms the analog value into an 8 bit coded digital signal The graphic shows that when converting a signal containing a DC offset component the range of the converter is not optimally used Black level Δ R ADC 0 255 i1 superfluous information i2 video information I...

Страница 95: ...over from min to max is indicated by the apparition of bright spots also called digital noise An alternative to a full screen White black pattern is the standard gray scale pattern the white bar will be used for white balance and the black bar for black balance Image 9 32 How to adjust 1 Press Menu to activate the menus and select Image Image Settings Input Balance image 9 33 image 9 34 image 9 35...

Страница 96: ...ern If yes use the or key to select Adjustment Pattern and press ENTER to toggle between on and off If no select a white pattern or gray scale as alternative 5 Use the or key to select White balance red 6 Adjust the red white level gain on a minimal value 7 Use the or key to select White balance blue and adjust the blue white level gain on a minimal value Note This minimal value is not necessary p...

Страница 97: ... the black bar the rest must be mid gray except the white bar 5 If you see multiple or no white bars in stead of one change white balance for green higher or lower until only one bar is visible 9 4 Aspect Ratio Aspect ratio Relation between the horizontal vertical dimension in which the window will be displayed e g 4 by 3 or 16 by 9 Can also be expressed as a decimal number such as 1 77 The larger...

Страница 98: ...de screen cinema format WUXGA format Custom Any custom format can be set up Some example images 4 3 signal 16 9 RGB signal Image 9 41 Example images aspect ratio How to set 1 Press Menu to activate the menus and select Image Aspect Ratio image 9 42 image 9 43 2 Press ENTER to select 3 Use the or key to select the desired aspect ratio image 9 44 4 Press ENTER to activate Image 9 42 Main menu Image ...

Страница 99: ...nal Horizontal Active Active horizontal pixels width number of active pixels in the input signal This value is normally given in the source specifications If not adjust until full image is displayed no missing pixels Vertical start in lines number of lines between the vertical sync signal and active video information in the input signal Vertical Active Active vertical lines number of active lines ...

Страница 100: ...on and adjust ments page 64 5 Continue with the other settings in the same way until all timings are set Image 9 47 Main menu Image Image 9 48 Image timings Image 9 49 Timings window 9 5 2 Advanced timings clamp delay clamp width About the advanced settings Clamp delay The time between the trailing edge of the sync pulse and the leading edge of the clamp pulse in pixels Can be any value between 0 ...

Страница 101: ...mage 9 52 image 9 53 2 Press ENTER to select image 9 54 3 Use the or key to select Clamp Delay or Clamp Width and use the or key to change the value Or press ENTER to open the specific adjustment menu Follow the adjustment method as described in Navigation and adjust ments page 64 Image 9 51 Main menu Image Image 9 52 Image timings Image 9 53 Timings advanced settings Image 9 54 Clamp delay R59051...

Страница 102: ...tions are possible Load load the settings of a selected file for the current selected source of the active window main or PiP Rename renaming a file Delete deleting a file only custom files Delete all delete all custom files Options way of loading a file when a source is selected 9 6 2 Manual Load file How to load 1 Press Menu to activate the menus and select Image Image File Services Manual Load ...

Страница 103: ...ile filter the load list can be reduced to the fitted files or can be expanded to show all files Fit reduced list corresponding with the input source All full list with all available files in the projector How to set up 1 Press Menu to activate the menus and select Image Image File Services File Load Filter image 9 59 image 9 60 im age 9 61 2 Press ENTER to toggle between All and Fit Image 9 59 Ma...

Страница 104: ...ge 9 63 image 9 64 2 Press ENTER to select The available custom files are displayed If no custom files are available a message that no custom files are available is displayed 3 Use the or key to select the file to delete image 9 65 4 Press ENTER to delete the selected file Image 9 62 Main menu Image Image 9 63 Image image file services Image 9 64 Image file services delete Image 9 65 Delete custom...

Страница 105: ...s displayed 2 Use the or key to select Yes or No image 9 69 3 If Yes is selected press ENTER to delete all custom files If No is selected press ENTER to return to the Image File Services menu without deleting any custom file Image 9 66 Main menu Image Image 9 67 Image image file services Image 9 68 Delete all custom files Image 9 69 Delete all No recovery possible 9 6 6 Rename custom files A renam...

Страница 106: ...as the backspace functionality 5 Press ENTER to finalize the rename action Image 9 70 Main menu Image Image 9 71 Image image file services Image 9 72 Image file services rename Image 9 73 Rename list of files Image 9 74 Rename file 9 6 7 Copy custom file How to copy 1 Press Menu to activate the menus and select Image Image File Services Copy image 9 75 image 9 76 image 9 77 2 Press ENTER to select...

Страница 107: ...ces copy Image 9 78 Copy files list Image 9 79 No custom files Image 9 80 Copy custom files 9 6 8 Image file service options Load file How to set 1 Press Menu to activate the menus and select Image Image File Services Options Load File image 9 81 image 9 82 image 9 83 image 9 84 2 Press ENTER to toggle between Automatic Manual or Custom only Automatic correct file will be loaded automatically Manu...

Страница 108: ...tivate the menus and select Image Image File Services Options Auto Picture Alignment image 9 85 image 9 86 image 9 87 image 9 88 2 Press ENTER to toggle between Off Always or Load File Off auto picture alignment deactivated Always auto picture alignment is always activated Load file when new file is loaded for the selected source Image 9 85 Main menu Image Image 9 86 Image image file services 104 ...

Страница 109: ...ch off the projector How to save 1 Press Menu to activate the menus and select Image Save Custom Settings image 9 89 image 9 90 2 Use the or key to select Yes and press ENTER image 9 91 Image 9 89 Main menu Image Image 9 90 Image save custom settings Image 9 91 Save custom settings question 9 8 Splash image About a splash image When splash image is on a dedicated image is displayed after start up ...

Страница 110: ...layed at startup Image 9 92 Main menu Image Image 9 93 Image splash image Image 9 94 Splash image enabling Time out setup 1 Press Menu to activate the menus and select Image Splash image image 9 95 image 9 96 2 Select Timeout sec image 9 97 3 Press ENTER to open the edit mode Enter the time with 2 digits e g 05 or 15 image 9 98 Note Maximum timeout 15 seconds Image 9 95 Main menu Image Image 9 96 ...

Страница 111: ... Main Full Screen Native Resolution Pip Up Right Split Left Right Split Top Bottom Custom x Rename Delete Delete all Copy Save as Zoom Focus Shift Same zoom focus shift yes no 10 2 Introduction Overview Layout files determine the size and the position of the main and PiP window on the screen Some pre defined layouts are available in the projector but custom layouts can be created and saved for fut...

Страница 112: ...ge 10 2 image 10 3 2 Press ENTER to select The Select Source window opens image 10 4 3 Use the or key to select the desired source and press ENTER The radio button of the selected source is checked and the source is linked with the main window Image 10 1 Main menu layout Image 10 2 Layout main window Image 10 3 Main window source Image 10 4 Select source 10 3 2 Main window size What can be done Th...

Страница 113: ...dow opens image 10 9 3 To keep the current aspect ratio press ENTER to check Lock Once Lock is checked the width and the height will follow each other when changing one of the dimensions 4 Use the or key to change the height and the or key to change the width 5 When the desired size is reached press EXIT A Save Layout window opens image 10 10 6 Use the or key to select Yes and press ENTER to save ...

Страница 114: ... activate the menus and select Layout Main window Position image 10 12 image 10 13 image 10 14 2 Press ENTER to select The Position window opens image 10 15 3 Use the or key to change the Top position and the or key to change the Left position 4 When desired position is reached press EXIT A Save Layout window opens image 10 16 5 Use the or key to select Yes and press ENTER to save Select No if you...

Страница 115: ...sk to create a custom layout 10 4 1 Introduction to PIP PiP PiP stands for Picture in Picture and allows to display multiple windows containing each of them an image The windows may be of the video or data type What are the different possibilities within the PiP mode The input section of the projector allows a combination of different input signals which may be projected in the 2 windows main and ...

Страница 116: ...ain menu layout Image 10 19 Layout PiP Window Image 10 20 PiP window activation 10 4 3 PiP window source selection How to select 1 Press Menu to activate the menus and select Layout PiP window Source image 10 21 image 10 22 image 10 23 2 Press ENTER to select The Select Source window opens image 10 24 3 Use the or key to select the desired source and press ENTER The radio button of the selected so...

Страница 117: ...n be done The width and height of the picture in picture window can be changed till the desired dimensions are obtained Image 10 25 Size PIP window A Width PIP window B Height PIP window The size of the picture in picture window can be changed with respect to the original aspect ratio of the PIP image Remark During adjustment of the window size scaling artifacts can be visible R5905158 HDF W SERIE...

Страница 118: ...idth and the height will follow each other when changing one of the dimensions 4 Use the or key to change the height and the or key to change the width 5 When the desired size is reached press EXIT A Save Layout window opens image 10 31 6 Use the or key to select Yes and press ENTER to save Select No if you want to quit without saving the current position Image 10 27 Main menu layout Image 10 28 L...

Страница 119: ... 10 33 image 10 34 2 Press ENTER to select The Position window opens image 10 35 3 Use the or key to change the Top position and the or key to change the Left position 4 When desired position is reached press EXIT A Save Layout window opens image 10 36 5 Use the or key to select Yes and press ENTER to save Select No if you want to quit without saving the current position Image 10 32 Main menu layo...

Страница 120: ...and select Layout Layout File Services Load image 10 37 image 10 38 image 10 39 2 Press ENTER to select The Load layout overview window opens image 10 40 3 Use the or key to select the desired file and press ENTER to activate The radio button in front of the selected file is checked Image 10 37 Main menu layout Image 10 38 Layout layout file services Image 10 39 Layout file services load Image 10 ...

Страница 121: ...cter will be selected automatically Arrow key left has the backspace functionality Image 10 41 Main menu layout Image 10 42 Layout layout file services Image 10 43 Layout file services rename Image 10 44 Image 10 45 Rename layout 10 5 3 Delete layout file Only custom created layouts can be deleted The current selected custom layout cannot be deleted How to delete 1 Press Menu to activate the menus...

Страница 122: ...10 5 4 Delete all layout files Only custom layout files can be deleted The current selected custom layout cannot be deleted How to delete 1 Press Menu to activate the menus and select Layout Layout File Services Delete All image 10 51 image 10 52 im age 10 53 2 Press ENTER to select The Delete all confirm window opens If no custom files are available a message that no custom files are available is...

Страница 123: ...age 10 55 image 10 56 image 10 57 2 Press ENTER to select The Copy layout file window opens If no custom layout files are available a message that no custom layout files are available is displayed image 10 58 3 Use the or key to change the selected character Use the or key to select another character Note Digits can be entered with the digit keys on the remote control or the local keypad When a di...

Страница 124: ...le layout will not change the current lens settings How to set the zoom focus setting 1 Press Menu to activate the menus and select Layout Zoom Focus Shift image 10 59 image 10 60 2 Press ENTER to select The Zoom Focus Shift window opens image 10 61 3 Press ENTER to toggle Same Zoom Focus Shift between Yes or No Yes each layout will use the same zoom focus shift settings The zoom focus shift setti...

Страница 125: ...10 Layout Image 10 61 Zoom focus shift setting Image 10 62 Lens calibration Image 10 63 Lens calibration message R5905158 HDF W SERIES 10 07 2012 121 ...

Страница 126: ...10 Layout 122 R5905158 HDF W SERIES 10 07 2012 ...

Страница 127: ...e lamp life time counts equal for normal or economic mode but the customer will see that the ageing of the lamp is lower in economic and long life mode Normal maximum allowed power is fed to the lamp Maximum light output is reached in this way Economic a reduced wattage is fed to the lamp Reduced light output but a longer life time for the lamp Long Life wattage fed to the lamp reduce to 75 Reduce...

Страница 128: ... of the lamp can be reduced by reducing the lamp power How to reduce the power 1 Press Menu to activate the menus and select Lamp Power Power image 11 4 image 11 5 image 11 6 2 Use the or key to change the power value The value can be changed between 75 and 100 Image 11 4 Main menu lamp Image 11 5 Lamp power 124 R5905158 HDF W SERIES 10 07 2012 ...

Страница 129: ...lue to its minimum value When returning out of pause the lamp power is restored to its previous value How to set up 1 Press Menu to activate the menus and select Lamp Power Auto Dimming when Pause image 11 7 image 11 8 im age 11 9 2 Press ENTER to toggle between On or Off On when switched to pause lamp power will be reduced Off when switched to pause power remains on its original value Image 11 7 ...

Страница 130: ...gle between On or Off On when no signal auto dimming is started Off when no signal no auto dimming is started Image 11 10 Main menu lamp Image 11 11 Lamp power Image 11 12 Auto dimming no signal 11 6 Auto dimming when Over temperature What can happen When an over temperature is detected the projector starts dimming the lamp so that the projector can cool down How to set up 1 Press Menu to activate...

Страница 131: ...d by natural aging of the lamp The light output is checked every 5 minutes if the target is not met the lamp power is adjusted Setting CLO off means that the lamp will operate at constant power no power adaptation to meet constant light output In the illustration below a normal light output curve is shown over the first 1000 hours image 11 16 By using CLO and setting the target to 60 of the maximu...

Страница 132: ...nstant Light Output working area Image 11 17 CLO mode setting On overrules the lamp power mode setting Projector will always play in CLO mode using the CLO target How to switch CLO mode 1 Press Menu to activate the menus and select Lamp Power CLO mode image 11 18 image 11 19 image 11 20 2 Press ENTER to toggle between On or Off 128 R5905158 HDF W SERIES 10 07 2012 ...

Страница 133: ... This value will force the projector to produce the target lumens when the CLO mode is set to On How to set the target 1 Press Menu to activate the menus and select Lamp Power CLO mode image 11 21 image 11 22 image 11 23 2 Use the or key to change the CLO target lumens Image 11 21 Main menu lamp Image 11 22 Lamp power R5905158 HDF W SERIES 10 07 2012 129 ...

Страница 134: ...d lamp These parameters are Serial number of the lamp Article number of the lamp Run time since first start up of the lamp Remaining run time for a safe operation of the lamp Number of strikes since the first start up of the lamp Software version These parameters are useful in case of a service request How to display 1 Press Menu to activate the menus and select Lamp Identification image 11 25 ima...

Страница 135: ... higher run times the light output of the lamp will decrease which results in a lower light output on the screen This light output decrease can be compensated by readjusting the position of the lamp This realignment has to be done by a qualified service technician How to display the light output 1 Press Menu to activate the menus and select Lamp Z axis image 11 28 image 11 29 2 Press ENTER to disp...

Страница 136: ...11 Lamp 132 R5905158 HDF W SERIES 10 07 2012 ...

Страница 137: ... Color space Scenergix 12 1 Alignment menu overview Overview table Level 1 Level 2 Level 3 Alignment Orientation Front Table Front Ceiling Rear Table Rear Ceiling Auto Front Auto Rear Lens Zoom Focus Shift Mid Position Home lens at startup Calibrate lens Warping Status Rotation Keystone Pin Barrel 4 corners Warp file service Reset Blanking Top Bottom Left Right Contrast Intensity Contrast enhancem...

Страница 138: ...g auto front automatic front projector detects itself if it is ceiling or table mounted and projects always a readable image auto rear automatic rear projector detects itself if it is ceiling or table mounted and projects always a readable image How to set the correct orientation 1 Press Menu to activate the menus and select Alignment Orientation image 12 1 image 12 2 2 Use the or key to select th...

Страница 139: ...t Lens image 12 4 image 12 5 2 Use the or key to select zoom focus and press ENTER to activate image 12 6 3 Use the or key to zoom the lens Use the or key to focus the lens Press ENTER to switch to Lens shift adjustment image 12 7 Image 12 4 Main menu alignment Image 12 5 Alignment lens Image 12 6 Lens Zoom Focus R5905158 HDF W SERIES 10 07 2012 135 ...

Страница 140: ...e 12 9 2 Use the or key to select Shift and press ENTER to activate image 12 10 3 Use the or key to shift the lens in vertical direction Use the or key to shift the lens in horizontal direction Press ENTER to switch to Zoom Focus adjustment image 12 11 Image 12 8 Main menu alignment Image 12 9 Alignment lens Image 12 10 Lens shift 136 R5905158 HDF W SERIES 10 07 2012 ...

Страница 141: ...he menus and select Alignment Lens image 12 12 image 12 13 2 Use the or key to select Mid Position and press ENTER to activate image 12 14 Lens will be shifted horizontally and vertically to its mid position Image 12 12 Main menu alignment Image 12 13 Alignment lens Image 12 14 Lens mid position R5905158 HDF W SERIES 10 07 2012 137 ...

Страница 142: ...p and press ENTER to toggle between on and off image 12 17 Image 12 15 Main menu alignment Image 12 16 Alignment lens Image 12 17 Home lens at startup 12 7 Calibrate lens Lens calibration is a time consuming operation How to calibrate 1 Press Menu to activate the menus and select Alignment Lens image 12 18 image 12 19 2 Use the or key to select Calibrate lens and press ENTER to activate image 12 2...

Страница 143: ... Rotation Keystone Pin Barrel correction 4 corners adjustment Warp file service 12 8 1 About warping Overview Image warping is the process of digitally manipulating an image to compensate for the distortion of the screen Consequently it can also be used to generate an image with irregular shape While an image can be transformed in various ways pure warping doesn t affect the colors Some examples o...

Страница 144: ...g possible Manual Warping can be manually adjusted File Warping is done by uploading a file which contains the warp settings How to set the warp status 1 Press Menu to activate the menus and select Alignment Warping image 12 24 image 12 25 image 12 26 2 Press ENTER to toggle between Off Manual or File Image 12 24 Main menu alignment Image 12 25 Alignment warping 140 R5905158 HDF W SERIES 10 07 201...

Страница 145: ...ress Menu to activate the menus and select Alignment Warping image 12 28 image 12 29 2 Press ENTER to open the Warping menu image 12 30 3 Use the or key to select Rotation 4 Press ENTER to check the Rotation check box 5 Use the key to open the rotation adjustment image 12 31 6 Use the or key to change the value of the selected adjustment or enter the value with the numeric keys R5905158 HDF W SERI...

Страница 146: ...rping Image 12 30 Warping rotation Image 12 31 Rotation 12 8 4 Keystone What can be done Horizontal and vertical keystone adjustment of the image is used to align the image when the device is mounted at a non standard projection angle 142 R5905158 HDF W SERIES 10 07 2012 ...

Страница 147: ...ck box 5 Use the key to open the keystone adjustments image 12 36 6 Use the or key to select Horizontal Keystone or Vertical Keystone Use the or key to adjust the value of the selected keystone or enter the desired value with the numeric keys Note Press ENTER to open the bar scale adjustment and use the or key or use the or key to adjust the horizontal or vertical keystone Image 12 33 Main menu al...

Страница 148: ...9 2 Press ENTER to open the Warping menu 3 Use the or key to select Pin Barrel image 12 40 4 Press ENTER to check the Pin Barrel check box 5 Use the key to open the keystone adjustments image 12 41 6 Use the or key to select Pinc Barrel Hor or Pinc Barrel Vert Use the or key to adjust the value of the selected Pin barrel or enter the value with the numeric keys Note Press ENTER to open the bar sca...

Страница 149: ...t Alignment Warping image 12 42 image 12 43 2 Press ENTER to open the Warping menu 3 Use the or key to select 4 Corners image 12 44 4 Use the key to open the 4 corners adjustment menu image 12 45 5 Use the or key to select the desired corner and direction Use the or key to adjust the value or enter the value with the numeric keys Note Press ENTER to open the bar scale adjustment and use the or key...

Страница 150: ...loaded on the projector via Projector Toolset equipped with a HDF W series plug in How to start up 1 Press Menu to activate the menus and select Alignment Warping Warp File Service image 12 46 image 12 47 im age 12 48 2 Press ENTER to activate A list with possible warp files is displayed image 12 49 3 Use the or key to select the desired warp file and press ENTER to load this file 146 R5905158 HDF...

Страница 151: ...an be done Blanking adjustments affect only the edges of the projected image and are used to frame the projected image on to the screen and to hide or black out unwanted information or noise A 0 on the bar scale indicates no blanking Which blanking adjustments are available top blanking bottom blanking left blanking right blanking R5905158 HDF W SERIES 10 07 2012 147 ...

Страница 152: ...o How to adjust 1 Press Menu to activate the menus and select Alignment Blanking image 12 51 image 12 52 2 Press ENTER to select The blanking adjustment menu opens image 12 53 3 Use the or key to select the desired blanking adjustment and adjust with the or key Image 12 51 Main menu alignment Image 12 52 Alignment blanking 148 R5905158 HDF W SERIES 10 07 2012 ...

Страница 153: ...e the menus and select Alignment Contrast Intensity image 12 54 image 12 55 2 Press ENTER to select image 12 56 3 Use the or key to select Contrast Enhancement Use the or key to change the contrast enhancement until the desired value is reached adjustable between 0 and 5 4 Use the or key to select Intensity Use the or key to change the intensity until the desired value is reached adjustable betwee...

Страница 154: ...mma 12 12 Internal patterns What can be done with these patterns The projector is equipped with different internal patterns which can be used for measurement and alignment purposes How to select a pattern 1 Press Menu to activate the menus and select Alignment Internal Patterns image 12 60 image 12 61 2 Press ENTER to select the pattern list image 12 62 3 Use the or key to select a pattern and pre...

Страница 155: ... A temporary custom adjustment is possible The maximum color space which can be displayed is the projector color space This color space is measured at the factory and stored inside the projector How to select a color standard 1 Press Menu to activate the menus and select Alignment Color Space image 12 63 image 12 64 image 12 65 2 Select Status and press ENTER to toggle between On or Off On project...

Страница 156: ...rms the corners of the color space By changing the coordinates the color reproduction can be changed Image 12 63 Main menu alignment Image 12 64 Alignment color space Image 12 65 Color space Image 12 66 Edit color targets Color targets will be used when Custom is selected 1 Select Edit Color Targets and press ENTER image 12 67 image 12 68 2 Use the or key to select a color coordinate Use the or ke...

Страница 157: ...s the appearance of a single view thus achieving realistic immersion for the majority of wide screen applications ScenergiX is limited to half the resolution of the projector Image 12 69 Why Soft Edge What is the Basic Principal of ScenergiX The principle of edge blending is achieved by linear modulation of the light output in the overlap zone so that the light output in that zone equals the light...

Страница 158: ...ojectors Convergence Geometry Color Matching Color Temperature Color Standard Input Balance Gamma 12 14 3 Scenergix activation How to activate 1 Press Menu to activate the menus and select Alignment Scenergix image 12 71 image 12 72 2 Press ENTER to select The Scenergix menu opens image 12 73 3 Use the or key to select Status and press ENTER to toggle between On and Off On Scenergix is activated O...

Страница 159: ... to toggle between On or Off On Internal scenergix pattern is displayed Off no scenergix pattern is displayed image 12 77 Image 12 74 Main menu alignment Image 12 75 Alignment Scenergix Image 12 76 Scenergix pattern activation 10 50 90 130 170 210 250 290 330 370 10 50 90 130 170 210 250290 330 370 10 50 90 130 170 210 250290 330 370 10 50 90 130 170 210 250 290 330 370 40 80 120 160 200240 280 32...

Страница 160: ...6 White level adjustment blending area How to set 1 Press Menu to activate the menus and select Alignment Scenergix White level image 12 81 image 12 82 image 12 83 2 Press ENTER to select the White level adjustments The White level position menu opens When Adjustment lines is On the different areas are displayed on the screen image 12 84 3 Use the or key to select one of the four size adjustments ...

Страница 161: ...lignment Image 12 81 Main menu alignment Image 12 82 Alignment Scenergix Image 12 83 Scenergix white level Image 12 84 White level position Image 12 85 Width selections R5905158 HDF W SERIES 10 07 2012 157 ...

Страница 162: ...is known as a DLP leakage area This area must also be exclude for the black level adjustment Therefore we can rise the black level of the remaining image excluding the overlap zone and the DLP leakage area First the width of the leakage area must be set The white cursor line indicates the border of the overlap area The green cursor line indicates the current installed DLP leakage area border and s...

Страница 163: ...tivate the menus and select Alignment Scenergix Black level image 12 89 image 12 90 image 12 91 2 Press ENTER to select the Black Level adjustments image 12 92 3 Use the or key to select one of the four size adjustments Use the or key to move the green border line to the desired position image 12 93 Image 12 89 Main menu alignment Image 12 90 Alignment Scenergix R5905158 HDF W SERIES 10 07 2012 15...

Страница 164: ...ate the menus and select Alignment Scenergix Black level image 12 94 image 12 95 image 12 96 2 Press ENTER to select and use the or key to select a color to adjust image 12 97 3 Adjust the black level of area A until the black level of area A B and C are equal Use the Adjust function Red Green and Blue in the Black level menu image 12 98 160 R5905158 HDF W SERIES 10 07 2012 ...

Страница 165: ...ain menu alignment Image 12 95 Alignment Scenergix Image 12 96 Scenergix Black level Image 12 97 Black level adjust A C B 12 13 11 R G B RGB Image 1 Image 2 Image 12 98 Black level adjustment R5905158 HDF W SERIES 10 07 2012 161 ...

Страница 166: ...12 Alignment 162 R5905158 HDF W SERIES 10 07 2012 ...

Страница 167: ...ew table Level 1 Level 2 Level 3 Projector Control Projector Address Projector address Common address Serial Communication Baud rate Interface standard Network Wired DHCP On Off IP address Subnet mask Default gateway Wireless Status DHCP IP address Subnet mask IR Control IR front IR back IR side DMX Address Universe Mode Art DMX On Off Monitor Buttons Shortcut keys Standby button Menu position Men...

Страница 168: ...nd select Projector Control Projector Address Projector Address image 13 1 im age 13 2 image 13 3 2 Press ENTER to activate the address input image 13 4 3 Use the or key to change the selected character Use the or key to select another character Note Digits can be entered with the digit keys on the remote control or the local keypad When a digit is entered in that way the next character will be se...

Страница 169: ... address Image 13 8 Projector common address 13 4 Serial Communication Overview Baud rate setup Interface Standard 13 4 1 Baud rate setup What can be done The baud rate for to establish a serial communication with a computer can be set How to set 1 Press Menu to activate the menus and select Projector Control Serial Communication Baudrate image 13 9 image 13 10 image 13 11 2 Press ENTER to toggle ...

Страница 170: ...etween the projector and a computer can be set to RS232 or RS422 How to set up 1 Press Menu to activate the menus and select Projector Control Serial Communication image 13 12 image 13 13 2 Use the or key to select Interface Standard Press ENTER to toggle between RS232 or RS422 image 13 14 Image 13 12 Main menu projector control Image 13 13 Projector control serial communication Image 13 14 Interf...

Страница 171: ...e network layer of TCP IP Required for communication with the internet Subnet mask A number that is used to identify a subnetwork so that IP addresses can be shared on a local area network Default Gateway A router that serves as an entry point into and exit point out of a network For example a local network LAN may need a gateway to connect it to a wide area network WAN or to the Internet MAC addr...

Страница 172: ...3 16 Projector control network Image 13 17 Wired DHCP 13 5 3 Wired IP address set up How to set up 1 Press Menu to activate the menus and select Projector Control Network image 13 18 image 13 19 image 13 20 2 Use the or key to select IP Address under Wired and press ENTER to activate the input box image 13 21 3 Use the or key to change the selected character Use the or key to select another charac...

Страница 173: ...ctor Control Network image 13 22 image 13 23 image 13 24 2 Use the or key to select Subnet Mask under Wired and press ENTER to activate the input box image 13 25 3 Use the or key to change the selected character Use the or key to select another character Note Digits can be entered with the digit keys on the remote control or the local keypad When a digit is entered in that way the next character w...

Страница 174: ...work image 13 26 image 13 27 image 13 28 2 Use the or key to select Default Gateway under Wired and press ENTER to activate the input box image 13 29 3 Use the or key to change the selected character Use the or key to select another character Note Digits can be entered with the digit keys on the remote control or the local keypad When a digit is entered in that way the next character will be selec...

Страница 175: ...an only be used with a wireless network module installed What can be done Before a wireless network can be used the status must be set to On How to activate 1 Press Menu to activate the menus and select Projector Control Network Wireless setup image 13 30 image 13 31 image 13 32 2 Press ENTER to select image 13 33 3 Press ENTER to toggle the status between Off and On R5905158 HDF W SERIES 10 07 20...

Страница 176: ...le when wireless network status is set to on Scan for access points 1 Select Scan access points and press ENTER to start the scan image 13 34 image 13 35 2 Use the or key to select the desired access point and press ENTER to activate The security type of the network is indicated with the radio button in front of Open or WPA WPA2 The network name is also indicated next to SSID Note WEP is not suppo...

Страница 177: ...wireless network image 13 36 im age 13 37 image 13 38 2 Press ENTER to activate the input field 3 Enter the passphrase The input is case sensitive Press ENTER to finish the input of the passphrase 4 Use the or key to select Apply and press ENTER to open the network connection An IP address can now be obtained via DHCP or a fixed IP address can be setup Image 13 36 Passprhrase selection Image 13 37...

Страница 178: ...work Wireless Setup image 13 39 image 13 40 image 13 41 image 13 42 2 Press ENTER to open the Wireless menu 3 Use the or key to select DHCP and press ENTER to toggle between On or Off On Wireless DHCP is activated An automatic IP address is assigned Off Wireless DHCP is deactivated A fixed address must be used Image 13 39 Main menu projector control Image 13 40 Projector control network 174 R59051...

Страница 179: ...3 46 2 Use the or key to select IP Address and press ENTER to activate the input box image 13 47 3 Press ENTER to open the Wireless menu 4 Use the or key to change the selected character Use the or key to select another character Note Digits can be entered with the digit keys on the remote control or the local keypad When a digit is entered in that way the next character will be selected automatic...

Страница 180: ...Subnet for Wired and Wifi must be different How to set up 1 Press Menu to activate the menus and select Projector Control Network Wireless Setup image 13 48 image 13 49 image 13 50 image 13 51 2 Press ENTER to open the Wireless menu 3 Use the or key to select Subnet Mask and press ENTER to activate the input box image 13 52 4 Use the or key to change the selected character 176 R5905158 HDF W SERIE...

Страница 181: ...ol or the local keypad When a digit is entered in that way the next character will be selected automatically Image 13 48 Main menu projector control Image 13 49 Projector control network Image 13 50 Network wireless Image 13 51 Network wireless Subnet Mask Image 13 52 Wireless Subnet Mask input R5905158 HDF W SERIES 10 07 2012 177 ...

Страница 182: ... to select Subnet Mask and press ENTER to activate the input box image 13 57 4 Use the or key to change the selected character Use the or key to select another character Note Digits can be entered with the digit keys on the remote control or the local keypad When a digit is entered in that way the next character will be selected automatically Image 13 53 Main menu projector control Image 13 54 Pro...

Страница 183: ...or deactivate 1 Press Menu to activate the menus and select Projector Control IR control image 13 58 image 13 59 image 13 60 2 Use the or key to select the desired IR control and press ENTER to check checkbox Checked IR receiver is enabled and can receive and process commands send by the remote control Not checked IR receiver is disabled and not receive any command Image 13 58 Main menu projector ...

Страница 184: ...be sent over the Ethernet cable Multiple universes are possible 13 7 1 DMX address What should be done Before a projector can execute DMX commands a unique address called DMX address should be given to the projector This address can vary from 1 to 512 How to set the DMX address 1 Press Menu to activate the menus and select Projector Control DMX Address image 13 61 image 13 62 image 13 63 2 Press E...

Страница 185: ...universe 1 Press Menu to activate the menus and select Projector Control DMX Universe image 13 65 image 13 66 image 13 67 2 Press ENTER to select image 13 68 3 Use the or key to change the selected character Use the or key to select another character Note Digits can be entered with the digit keys on the remote control or the local keypad When a digit is entered in that way the next character will ...

Страница 186: ... Universe image 13 69 image 13 70 image 13 71 2 Press ENTER to toggle between Basic Extended or Full Image 13 69 Main menu projector control Image 13 70 Projector control DMX Image 13 71 DMX mode 13 7 4 Art Net DMX What can be done DMX can be sent via Ethernet to the projector This function can be enabled or disabled Art Net DMX On DMX via Ethernet is enabled Art Net DMX Off DMX via Ethernet is di...

Страница 187: ... be set to 0V 9V 12V or 24V DMX Art Net can also enable the output voltage on the front XLR connector To avoid that per accident a voltage is activated via DMX Art Net set level to 0 V How to enable or disable 1 Press Menu to activate the menus and select Projector Control DMX Output voltage enable image 13 75 image 13 76 image 13 77 2 Press ENTER to toggle between On and Off On Front XLR Output v...

Страница 188: ...nable Output voltage level setup 1 Press Menu to activate the menus and select Projector Control DMX Output voltage level image 13 78 image 13 79 image 13 80 2 Press ENTER to toggle between 0 Volt 9 Volt 12 Volt and 24 Volt Image 13 78 Main menu projector control Image 13 79 Projector control DMX 184 R5905158 HDF W SERIES 10 07 2012 ...

Страница 189: ...isplayed in an on screen menu How to start up the monitoring 1 Press Menu to activate the menus and select Projector Control DMX Monitor image 13 81 image 13 82 image 13 83 2 Press ENTER to open the overview list image 13 84 Image 13 81 Main menu projector control Image 13 82 Projector control DMX Image 13 83 DMX monitor R5905158 HDF W SERIES 10 07 2012 185 ...

Страница 190: ... standby In ECO standby only the microcontroller communication interface and local or remote control are operational All other electronics are powered down How to set 1 Press Menu to activate the menus and select Projector Control Buttons Standby image 13 85 image 13 86 image 13 87 2 Press ENTER to toggle between Lamp only and Lamp and Power Lamp only only lamp will be switched off when Standby is...

Страница 191: ...cated shortcut keys can be cleared within this menu For the creation of a short cut key see Shortcut keys to the menus page 65 How to clear a shortcut key 1 Press Menu to activate the menus and select Projector Control Buttons Shortcut keys image 13 88 image 13 89 im age 13 90 image 13 91 2 Use the or key to select the desired key and press ENTER to remove the allocation Image 13 88 Main menu proj...

Страница 192: ...mid Right bottom Mid top Mid mid Mid bottom Left top Left mid Left bottom How to change the position 1 Press Menu to activate the menus and select Projector Control Menu Position image 13 92 image 13 93 image 13 94 2 Use the or key to select Menu position or Barscale position and press ENTER to toggle the different possibilities Image 13 92 Main menu projector control Image 13 93 Projector control...

Страница 193: ...ighting of the local LCD panel 4 Use the or key to select Time out image 13 98 5 Press ENTER to toggle between Off 10 30 60 or 120 Off LCD panel remains always on a value LCD shut down in x seconds Image 13 95 Main menu projector control Image 13 96 Projector control Local LCD Image 13 97 Local LCD back light Image 13 98 Local LCD time out 13 11 Language selection What can be done The user can cha...

Страница 194: ...ol Image 13 100 Projector control change language Image 13 101 Language selection 13 12 Scheduler About the scheduler The scheduler allows to start up different tasks at a given time which can control the screen layout and the status of the lamp These tasks can be scheduled in time with a certain recurrence and occurrence Multiple tasks can be added to the list of tasks and all these tasks will be...

Страница 195: ...tem in the setup When all items are correctly filled out select Apply and press ENTER to create the task image 13 105 Image 13 102 Main menu projector control Image 13 103 Projector control scheduler Image 13 104 Scheduler add task Image 13 105 Add task setup Start date and time 1 When selected press ENTER to select the day 2 Use the or key to change the current setting Use the or key to jump to t...

Страница 196: ...up the occurrences 1 Select Occurrence and press ENTER 2 Use the or key to change the occurrence image 13 108 Occurrence the number of loops that will take place as set in the recurrence E g an occurrence of 2 with a recurrence of 3 means that the schedule will be executed at the start date start date 3 and due to the occurrence 2 also at start date 6 Image 13 108 Occurrence setup Layout selection...

Страница 197: ...n be added at the end of the current displayed characters Creating the task 1 Select Apply and press ENTER to create the task The task is added to the list of tasks 13 12 2 Edit a task What can be done An existing task in the list of tasks can be edited and saved with the same name How to edit 1 Press Menu to activate the menus and select Projector Control Scheduler Edit task image 13 110 image 13...

Страница 198: ...eduler edit task Image 13 113 Task selection list Image 13 114 Edit task Changing the name and applying the task will replace the selected task with the edited task with the new name 13 12 3 Delete task What can be done A task stored in the list of tasks can be deleted from that list 194 R5905158 HDF W SERIES 10 07 2012 ...

Страница 199: ...t deleting the task Image 13 115 Main menu projector control Image 13 116 Projector control scheduler Image 13 117 Scheduler delete task Image 13 118 Delete task kist Image 13 119 13 12 4 Scheduler on or off What can be done The scheduler can be switched on or off When switched on the tasks in the list will be executed on the given time How to toggle the scheduler 1 Press Menu to activate the menu...

Страница 200: ...the list A schedule symbol is added at the left bottom corner of the local LCD panel Off No tasks are executed Image 13 120 Main menu projector control Image 13 121 Projector control scheduler Image 13 122 Scheduler on or off 196 R5905158 HDF W SERIES 10 07 2012 ...

Страница 201: ...vice menu overview Overview table Level 1 Level 2 Level 3 Service Identification Diagnostics Version Measurements Logging Board Id Notifications Tilt sensor Internal Service Patterns PMP IN OSD PMP OUT FIB Convergence Blue Green on Blue Red on Blue Factory Defaults USB Memory Save custom settings Load custom settings Reset Formatter Refill Mode Save Custom Settings Special HD Camera Mode Auto Dimm...

Страница 202: ...tion Baudrate IP address MAC address Status of the on screen text Serial number Projector Runtime Lamp on runtime Remaining Lamp runtime Customer Id How to display the overview 1 Press Menu to activate the menus and select Service Identification image 14 1 image 14 2 image 14 3 2 Use the or key to scroll through the menu Image 14 1 Main menu service Image 14 2 Service identification 198 R5905158 H...

Страница 203: ...rectly installed package The current is the updated software upgrade of downgrade Once the complete current is updated with new software then this current becomes the new reference means that the current software is equal to the latest reference the current has a higher version than the reference software the current has a lower version than the reference software How to display an overview 1 Pres...

Страница 204: ...n menu service Image 14 5 Service diagnosis Image 14 6 Diagnosis versions Image 14 7 Diagnosis versions list 14 3 2 Measurements About measurements Measurements contains the following parts 200 R5905158 HDF W SERIES 10 07 2012 ...

Страница 205: ...the menus and select Service Diagnosis Measurements image 14 8 image 14 9 image 14 10 image 14 11 2 Use the or key to select Voltages and get an overview of the voltages or to select Temperatures to get an overview of the internal temperatures or to select Fan Speeds to get an overview of current speeds of the different fans image 14 12 image 14 13 image 14 14 Image 14 8 Main menu service Image 14...

Страница 206: ... for the Lamp power supply How to display the logging 1 Press Menu to activate the menus and select Service Diagnosis Logging image 14 15 image 14 16 image 14 17 im age 14 18 2 Use the or key to select Main Controller to get a logging of the main controller or to select Lamp Power Supply to get a logging of the lamp power supply image 14 19 image 14 20 202 R5905158 HDF W SERIES 10 07 2012 ...

Страница 207: ...ervice Image 14 15 Main menu service Image 14 16 Service diagnosis Image 14 17 Diagnosis logging Image 14 18 Logging main controller Image 14 19 Main controller logging R5905158 HDF W SERIES 10 07 2012 203 ...

Страница 208: ...e number serial number etc How to get an overview 1 Press Menu to activate the menus and select Service Diagnosis Board Id image 14 21 image 14 22 image 14 23 2 Press ENTER to display an overview of the board IDs image 14 24 Image 14 21 Main menu service Image 14 22 Service diagnosis Image 14 23 Diagnosis board ID 204 R5905158 HDF W SERIES 10 07 2012 ...

Страница 209: ... projector Once powered off the notification logging is cleared How to display 1 Press Menu to activate the menus and select Service Diagnosis Notifications image 14 25 image 14 26 image 14 27 2 Press ENTER to display the notification list image 14 28 Image 14 25 Main menu service Image 14 26 Service diagnosis Image 14 27 Diagnosis notifications R5905158 HDF W SERIES 10 07 2012 205 ...

Страница 210: ... the lamp How to check the tilt sensor 1 Press Menu to activate the menus and select Service Diagnosis Tilt sensor image 14 29 image 14 30 image 14 31 2 Press ENTER to read out the tilt sensor image 14 32 The rotation of the projector is visually displayed Coordinates of the tilt sensor and the offset from the normal position are given in the tilt sensor pane The status pane indicates if the proje...

Страница 211: ...ss Menu to activate the menus and select Service Internal Service Patterns image 14 33 image 14 34 image 14 35 2 Use the or key to select the desired internal service pattern and press ENTER to open a selection menu Image 14 33 Main menu service Image 14 34 Service Internal service patterns R5905158 HDF W SERIES 10 07 2012 207 ...

Страница 212: ...ns an input board Image 14 36 Internal service patterns input Press ENTER to display the list of possible patterns Image 14 37 Input test patterns Pmp In patterns Image 14 38 Pmp In test patterns To change the options for the selected pattern use he key to open these options The number of options can change for the different patterns 208 R5905158 HDF W SERIES 10 07 2012 ...

Страница 213: ...n front of that item will be checked Osd patterns Image 14 40 Internal service patterns OSD Press ENTER to display the list of possible patterns Image 14 41 OSD Test patterns Pmp out patterns Image 14 42 Internal service patterns Pmp Out Press ENTER to display the list of possible patterns R5905158 HDF W SERIES 10 07 2012 209 ...

Страница 214: ...en these options The number of options can change for the different patterns Image 14 44 Pmp out internal service test patterns options Fib patterns Image 14 45 Internal service patterns Fib Press ENTER to display the list of possible patterns Image 14 46 Fib test patterns 210 R5905158 HDF W SERIES 10 07 2012 ...

Страница 215: ...tivate the menus and select Service Convergence image 14 47 image 14 48 image 14 49 2 Use the or key to select a pattern 3 Press ENTER to start the adjustment image 14 50 image 14 51 4 Use the convergence adjustments buttons on the light processor to adjust the convergence Adjust until the crossing of the center Green Red convergence pattern coincide with the diagonal line of the center Blue con v...

Страница 216: ... select Service Factory defaults image 14 52 image 14 53 image 14 54 By default the following settings are excluded IP address Serial settings DMX settings Electronic convergence 2 If you want to restore also one of the items in the list check the check box in front of that item Select Yes to restore the factory settings Select No to stop the restore process Image 14 52 Main menu service Image 14 ...

Страница 217: ...ice USB Memory image 14 55 image 14 56 image 14 57 2 Select Save Custom Settings and press ENTER to download this set Note Make sure a formatted USB stick is inserted in the USB connector When no USB stick is available a message will be shown No USB device is found The name of the custom settings files contains the serial number of the projector from which ti is downloaded Image 14 55 Main menu se...

Страница 218: ...B memory selection Image 14 61 Custom settings files 14 8 Reset Formatter Why and when A reset formatter is necessary when e g a color is missing artifacts are visible in the image or image is frozen and the formatter test patterns cannot be displayed How to reset 1 Press Menu to activate the menus and select Service Reset Formatter image 14 62 image 14 63 2 Press ENTER to select Use the or key to...

Страница 219: ...n the refill mode activates automatically the refill process For more information about the refill process consult the Service manual How to start the refill mode 1 Press Menu to activate the menus and select Service Refill Mode image 14 65 image 14 66 2 Press ENTER to select Use the or key to select Yes or No and press ENTER image 14 67 If you want to start the refill mode select Yes If you do no...

Страница 220: ...when the projector lamp was switched off When settings are changed when the lamp is off a manual Save custom settings must be executed to save the changes When the message Saving data is displayed never switch off the projector How to save 1 Press Menu to activate the menus and select Service Save Custom Settings image 14 68 image 14 69 2 Use the or key to select Yes and press ENTER image 14 70 21...

Страница 221: ... for the DMD s to support specific sources such as the Thompson Grass Valley Worldcam It shouldn t be used in any other circumstances as it would cause image flicker and dimmed images with normal sources Default position Off How to switch 1 Press Menu to activate the menus and select Service Special HD Camera Mode image 14 71 image 14 72 2 Press ENTER to toggle between On and Off R5905158 HDF W SE...

Страница 222: ...the menus and select Service Auto Dimming when Overtemperature image 14 73 image 14 74 2 Press ENTER to toggle between On and Off On Dimming is started when an over temperature is detected Off No dimming is started when over temperature is detected Image 14 73 Main menu service Image 14 74 Service auto dimming when over temperature 14 13 Time and Date How to set 1 Press Menu to activate the menus ...

Страница 223: ...r Note Digits can be entered with the digit keys on the remote control or the local keypad When a digit is entered in that way the next character will be selected automatically 4 Press ENTER to accept the changes Repeat for other values in the same way Image 14 75 Main menu service Image 14 76 Service time and date Image 14 77 Date and time set up R5905158 HDF W SERIES 10 07 2012 219 ...

Страница 224: ...14 Service 220 R5905158 HDF W SERIES 10 07 2012 ...

Страница 225: ...ction Warning Do not wipe back and forwards across the lens surface as this tends to grind dirt into the coating 3 Do not leave the cleaning cloth in either an open room or lab coat pocket as doing so can contaminate the cloth 4 If smears occur when cleaning lenses replace the cloth Smears are the first indication of a dirty cloth CAUTION Do not use fabric softener when washing the cleaning cloth ...

Страница 226: ...15 Maintenance 222 R5905158 HDF W SERIES 10 07 2012 ...

Страница 227: ...emarks above each procedure WARNING Always switch off the projector and unplug the power cord at the projector side before removing one of the covers 16 1 Removal of the front cover WARNING This procedure may only be performed by qualified technical service personnel Necessary tools 7 mm flat screw driver How to remove the front cover 1 Remove the lens See Lens removal page 25 2 Remove the rubber ...

Страница 228: ... similar Necessary tools 7 mm flat screw driver How to remove the side cover 1 Release the captive screw at the middle bottom of the side cover using a flat screw driver image 16 3 2 Remove the side cover from the projector as follows a gently pull out the bottom corners A of the side cover b then gently pull out the top corners B of the side cover c then move the side cover away from the projecto...

Страница 229: ...mp cover using a flat screw driver image 16 5 2 Remove the lamp cover from the projector as follows a gently pull out the left bottom corner A of the lamp cover b then gently pull out the left top corner B of the lamp cover c then move the lamp cover away from the projector C image 16 6 Image 16 5 Captive screws unlocking B A C Image 16 6 Lamp cover removal 16 4 Removal of the input cover WARNING ...

Страница 230: ...ctor as follows a gently pull out the right bottom corner A of the input cover b then gently pull out the right top corner B of the input cover c then move the input cover away from the projector C image 16 8 Image 16 7 Captive screws input cover B A C Image 16 8 Input cover removal 16 5 Installation of the front cover WARNING This procedure may only be performed by qualified technical service per...

Страница 231: ... studs in the corners click into their receivers image 16 9 4 Secure the front cover by locking the captive screw in the middle at the bottom of the front cover image 16 10 5 Reinstall the rubber dust ring around the lens holder Image 16 9 Front cover installation Image 16 10 Front cover dust ring 16 6 Installation of the side cover WARNING This procedure may only be performed by qualified technic...

Страница 232: ...12 4 Secure the side cover by locking the captive screw in the middle at the bottom of the side cover image 16 13 1 0 5 Image 16 11 Image 16 12 Mount side cover Image 16 13 Fixate captive screw 16 7 Installation of the lamp cover WARNING This procedure may only be performed by qualified technical service personnel Necessary tools 7 mm flat screw driver How to install the lamp cover 1 Install the l...

Страница 233: ...lat screw driver How to install the input cover 1 Install the input cover of the projector as follows a Bring the input cover towards its final position A b then gently push the locking stud at the right top corner B into its receiver c then gently push the locking stud at the right bottom corner C into its receiver image 16 16 2 Secure the input cover by locking the two captive screws at the left...

Страница 234: ...16 Removal and installation of the projector covers B C A Image 16 16 Input cover installation Image 16 17 Captive screws locking 230 R5905158 HDF W SERIES 10 07 2012 ...

Страница 235: ...m Regis tration is necessary If you are not yet registered click on Partnerzone registration and follow the instructions With the created login and password it is possible to enter the partnerzone where you can find extra service information about the projector WARNING Switch off the projector and unplug the power cord before starting the procedure WARNING Maximum service time is limited to 2 hour...

Страница 236: ...page 223 2 Remove the HEPA dust filter on the front side by pulling the two spring clamps away from the filter and then moving the filter forwards image 17 3 3 Insert a new HEPA1 filter by pulling the two spring clamps away and move the filter into position Caution Make sure that the airflow indicated on the dust filter match with the airflow of the fans 4 Reinstall the front cover of the projecto...

Страница 237: ...ws A using a 2 5 mm Allen key as illustrated image 17 4 3 Remove the filter F on the bottom side by pulling out the filter holder H as illustrated image 17 5 4 Place a new HEPA dust filter in the filter holder Caution Make sure that the airflow indicated on the dust filter match with the airflow of the fans 5 Reinstall the filter holder containing the new HEPA filter 6 Fasten the two wedge lock sc...

Страница 238: ...PA dust filter for the top side R9854480 How to replace the HEPA dust filter on the top side 1 Remove the side cover of the projector see Removal of the side cover page 224 2 Remove the filter F on the top side by pulling out the filter holder H as illustrated image 17 8 3 Place a new HEPA dust filter in the filter holder Caution Make sure that the airflow indicated on the dust filter match with t...

Страница 239: ...personnel How to check the pressure of the liquid cooling circuit 1 Remove the side cover of the projector see Removal of the side cover page 224 2 Look through the small window and check the pressure indicated on the internal manometer of the liquid cooling circuit im age 17 9 3 This pressure should be between 0 5 and 1 bar If the pressure indicated on the manometer is out of range inform the res...

Страница 240: ...ug the power cord at the projector side 2 Remove the lamp cover see Removal of the lamp cover page 225 3 Release the three spring lock screws of the lamp house as illustrated image 17 10 4 Clasp the lamp house by the handles and pull the lamp house out of the projector image 17 11 Image 17 10 Unlock lamp house Image 17 11 Lamp house removal While starting up the projector the electronics detect if...

Страница 241: ...and the power cord at the projector side is unplugged 2 Remove the lamp cover if not removed yet See Removal of the lamp cover page 225 3 Clasp the lamp house by its handles and gently slide the lamp house into its socket Note that the compartment is provided with guides G to position the lamp house correctly image 17 12 4 Push the lamp house forward until it slides fully into the projector 5 Secu...

Страница 242: ...rmed by qualified technical service personnel How to realign the lamp in its reflector 1 Remove the cover of the lamp see Removal of the lamp cover page 225 2 Connect the projector to the local power net 3 Start up the projector enter the menu structure and select Lamp Z axis 4 Carefully turn the thumb screw 1 at the rear of the lamp house clockwise for maximum light output Once over the maximum t...

Страница 243: ...17 Servicing 1 Image 17 14 Z axis alignment R5905158 HDF W SERIES 10 07 2012 239 ...

Страница 244: ...17 Servicing 240 R5905158 HDF W SERIES 10 07 2012 ...

Страница 245: ...ft Vertical 10 to 110 Horizontal 30 on zoom lenses memorised Color correction P7 Lamps 3 8 kW xenon Lamp lifetime 1 000 Hrs Transport with lamp Yes Lamp house quick replace Yes Customer bulb replace Yes Lamp warranty field replace factory replace 90 days 500 hours pro rata 500 hours Sealed DLP core Standard Optical dowser Standard Picture in picture Two sources simultaneously Orientation table cei...

Страница 246: ...ondens Dissipation BTU Max 13660 BTU h Dimensions WxLxH 707 x 1025 x 548mm 27 83 x 40 35 x 21 57 inches Weight 99kg 218 25lbs Shipping Dimensions LxWxH 1200 x 980 x 760 mm 47 24 x 38 58 x 29 92 inches Shipping Weight from Factory 151kg 333lbs Accessories Power cord wireless XLR wired rugged remote control Certifications Compliant with UL60950 1 and EN60950 1 complies with FCC rules regulations par...

Страница 247: ... output Standard 3D Active eyewear optional passive Infitec optional passive circular optional Inputs DVI I HDCP including analog RGB YUV SDI HDSDI Dual HDSDI 3G BarcoLink Optional Inputs 5 BNC RGBHV RGBS RGsB YUV CS SOY Composite video S Video DVI I HDCP including analog RGB YUV SDI HDSDI Dual HDSDI 3G 3D HDMI DisplayPort Input Resolutions From NTSC up to QXGA 2048x1536 max pixel clock 200 MHz So...

Страница 248: ...Shipping Weight from Factory 151kg 333lbs Accessories Power cord wireless XLR wired rugged remote control Certifications Compliant with UL60950 1 and EN60950 1 complies with FCC rules regulations part 15 Class A and CE EN55022 Class A RoHS Warranty 2 years 244 R5905158 HDF W SERIES 10 07 2012 ...

Страница 249: ...he HDF W series flight case B 1 Dimensions of the HDF W series projector Dimensions 730 250 520 643 14 8 130 148 148 480 485 459 485 643 676 1 771 1 771 1 1040 598 05 483 5 512 6 310 5 47 5 115 25 78 05 47 5 43 5 9 Image B 1 Dimensions given in millimeters R5905158 HDF W SERIES 10 07 2012 245 ...

Страница 250: ...ity 233 359 224 5 Image B 2 Dimensions given in millimeters B 2 Dimensions of the HDF W series flight case Dimensions 1194 660 817 5 808 1175 819 800 Image B 3 Dimensions given in millimeters 246 R5905158 HDF W SERIES 10 07 2012 ...

Страница 251: ...68 1024x768 60 60 004 48 363 65 000 1344 1024 806 768 1024x768 70 70 068 56 475 74 999 1328 1024 806 768 1024x768 75 75 030 60 024 78 751 1312 1024 800 768 1024x768 85 84 996 68 677 94 499 1376 1024 808 768 1152x864 75 74 999 67 499 107 999 1600 1152 900 864 1280x768 60 59 870 47 776 79 499 1664 1280 798 768 1280x768 75 74 992 60 288 102 249 1696 1280 805 768 1280x768 85 84 838 68 634 117 502 1712...

Страница 252: ... 2272 1680 1099 1050 1680x1050 85 84 941 93 859 214 750 2288 1680 1105 1050 1680x1050RB 60 59 883 64 674 119 000 1840 1680 1080 1050 1792x1344 60 60 000 83 640 204 751 2448 1792 1394 1344 1792x1344 75 74 996 106 270 260 999 2456 1792 1417 1344 1856x1392 60 59 995 86 333 218 251 2528 1856 1439 1392 1920x1140 60 60 001 90 001 234 002 2600 1920 1500 1140 1920x1200 50 50 000 61 816 158 250 2560 1920 1...

Страница 253: ...74 176 2200 1920 562 540 hd 1920x1080_2 25i50 000 31 25 74 250 2376 1920 625 540 hd 1920x1080 50p 50 000 56 250 148 500 2640 1920 1125 1080 hd 1920x1080 60p 60 000 67 500 148 500 2200 1920 1125 1080 VIDEO525 59 940 15 734 13 500 858 720 262 242 VIDEO525p 59 940 31 469 27 000 858 720 525 484 VIDEO625 50 000 15 625 13 500 864 720 312 288 VIDEO625p 50 000 31 250 27 000 864 720 625 576 Table C 1 R5905...

Страница 254: ...C Standard source files 250 R5905158 HDF W SERIES 10 07 2012 ...

Страница 255: ...4 71 Activate layout 8 If held for 2 seconds 72 79 Activate layout 9 If held for 2 seconds 80 87 Activate layout 10 If held for 2 seconds 88 95 Input 1 If held for 2 seconds 96 103 Input 2 If held for 2 seconds 104 111 Input 3 If held for 2 seconds 112 119 Input 4 If held for 2 seconds 120 207 No function 208 215 Power On Lamp On If held for 5 seconds 216 223 Stand by lamp Off If held for 5 second...

Страница 256: ...eld for 5 seconds 0 31 Stop 32 63 Run 64 223 No function 6 Motor Go 224 255 0 Move lens to maximum position 0 31 Stop 32 63 Run 64 223 No function 7 Motor Go 224 255 0 Move lens to minimum position 8 Free 0 255 0 24 0 Powered at 100 25 49 Powered at 95 50 74 Powered at 90 75 99 Powered at 85 100 124 Powered at 80 125 149 Powered at 75 150 174 Powered at 70 175 199 Powered at 65 200 224 Powered at ...

Страница 257: ...rol 248 255 0 No function 6 Focus MSB 0 255 128 Coarse lens focus adjustment10 7 Focus LSB 0 255 128 Fine lens focus adjustment10 8 Zoom MSB 0 255 128 Coarse lens zoom adjustment10 9 Zoom LSB 0 255 128 Fine lens zoom adjustment10 0 7 Lamp power 100 8 15 Lamp power 95 16 23 Lamp power 90 24 31 Lamp power 85 32 39 Lamp power 80 40 47 Lamp power 75 48 55 Lamp power 70 56 63 Lamp power 65 64 71 Lamp p...

Страница 258: ...D DMX chart 254 R5905158 HDF W SERIES 10 07 2012 ...

Страница 259: ...ch other Ensure that all three interlocking pins A match with their corresponding interlocking sockets B image E 1 Tip In case of stacking projectors for a ceiling mount configuration first turn the projectors upside down before placing the projectors on top of each other 3 Attach the two projectors together by closing all three interlocking adapters as illustrated image E 2 4 Are these projectors...

Страница 260: ... safety cables of the lowest projector to secure a stacked projector in a ceiling mount configuration WARNING Always mount a safety chain around the truss and the first projector in that way that projector cannot drop more than 20 cm How to open an interlocking adapter 1 Open an interlocking adaptor as illustrated image E 5 256 R5905158 HDF W SERIES 10 07 2012 ...

Страница 261: ...oles of the adjustment ring 4 If necessary adjust the inclination of the stacked projector with respect to the reference projector by turning the height adjustment ring of the interlocking adaptor at the front of the stacked projector in or out Adjust until the outline of the hatch pattern is most symmetric with the reference hatch pattern image E 7 5 If necessary adjust the skew of the stacked pr...

Страница 262: ...HDF W series projectors Rotation Image E 6 Rotation adjustment Inclination Image E 7 Inclination adjustment Skew Q Q Image E 8 Skew adjustment Shift Image E 9 Shift adjustment 258 R5905158 HDF W SERIES 10 07 2012 ...

Страница 263: ...E 10 Zoom adjustment In case of a triple stacked table mount projector configuration adjust and align first the bottommost projector reference than the projector in the middle and finally the uppermost projector R5905158 HDF W SERIES 10 07 2012 259 ...

Страница 264: ...E Stacking HDF W series projectors 260 R5905158 HDF W SERIES 10 07 2012 ...

Страница 265: ...ee Disposal of batteries in the product This product contains batteries covered by the Directive 2006 66 EC which must be collected and disposed of separately from municipal waste If the battery contains more than the specified values of lead Pb mercury Hg or cadmium Cd these chemical symbols will appear below the crossed out wheeled bin symbol By participating in separate collection of batteries ...

Страница 266: ... o o o o o 正面 前 面板 Front panel o o o o o o 金属制品 制造 Metalwork o o o o o o 塑胶制品 制造 Plastic work o o o o o o 电池 组 Batteries o o o o o o 文件说明书 Paper Manuals o o o o o o 光盘说明书 CD Manual o o o o o o 装置配件 Installation kit o o o o o o O 表示该有毒有害物质在该部件所有均质材料中的含量均在 SJ T 11363 2006 标准规定的限量要求以下 O Indicates that this toxic or hazardous substance contained in all of the homogeneous materials for this part is bel...

Страница 267: ...mentation Noordlaan 5 B 8520 Kuurne Phone 32 56 36 82 11 Fax 32 56 36 88 24 Support www Barco com esupport Web www barco com From Date Please correct the following points in this documentation R5905158 01 page wrong correct R5905158 HDF W SERIES 10 07 2012 ...

Отзывы: