manualshive.com logo in svg
background image

Controlling

4-3

5976283 BARCOGRAPHICS 808s  160501

How to program an address into the RCU?

Press  the ADDRESS key (recessed key on the RCU) with a pencil

and enter the address with the digit buttons.  That address can be

any digit between 0 and 9.

When programming '0', zero address, the RCU will control a projector

regardless of the projector's address.  This feature allows multiple

projectors with different addresses to be controlled by a single RCU.

Input selection

Port No Projector input

Press Digit

Button

1

Comp. Video

1

2

S-Video

1

/Comp. Video*

2

3

RGB

2

3

4/5

RGB

2

4 or 5

4/5

Component video

3

6

4/5

RGB with Tri level sync

4

7

4/5

Component video

with Tri-level sync

5

8

Only available when the optional Tri-level sync module is

installed.

1

Input signal Y/C (luma/chroma)

2

Input signal : R, G and B with automatic sync detection between

seperate sync (separate composite sync or with separate Hor

and Vert. sync) or sync on green (composite sync).

3

Input signal : R-Y, Y and B-Y with separate composite  sync

or with separate Hor and Vert. sync or with composite sync on

Y.

4

Input signal : R, G and B with separate Tri level sync or with Tri-

level sync on green.

5

Input signal : R-Y, Y and B-Y with separate Tri level sync or with

composite Tri-level sync.

* Video or S-Video : switchable in the Picture Tuning menu.

With the digit buttons on the RCU, it is possible to select input sources,

Video, S-Video, RGsB or RGBS, RG3sB or RGB3S.

When a valid and available source is selected, there will be informa-

tion displayed on the screen about that source (if "Text" is on).  This

information includes :

- Source number

- Horizontal frequency

- Vertical frequency

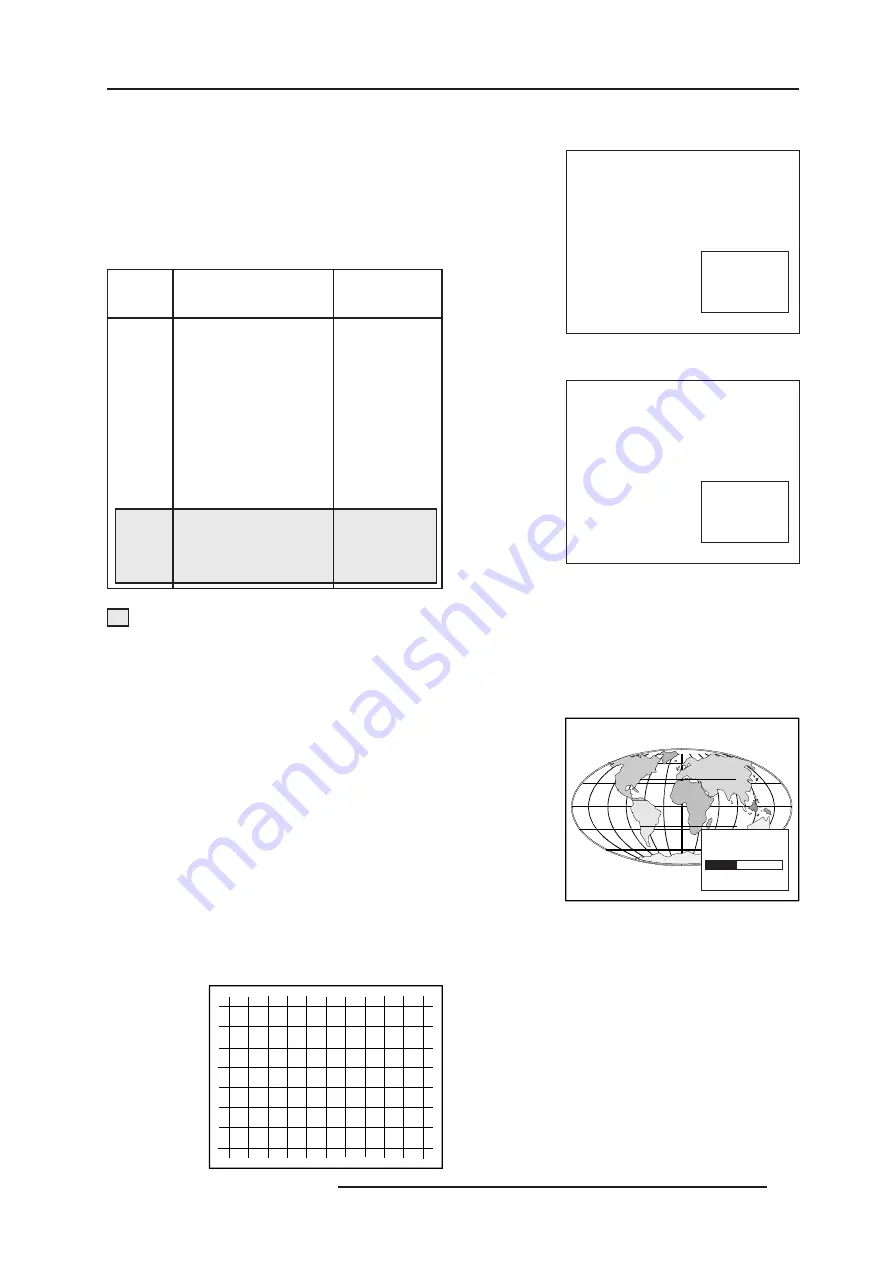
When the entry is a non valid source

number, a warning appears on the screen : '

input not available

'.

When a valid source number is selected, the projector will display this

source or it will wait on the selected source number until the source

becomes available.  A message 'source not available' will be

displayed for a short time.

Analog Picture Controls

The analog picture controls can be adjusted with the RCU.  The control

keys are located on the lower right side of the key panel of the RCU

and indicated with the name of the control and an icon.

When an analog picture control is pressed, a text box with bar scale

and the function name of the control, e.g. 'brightness...' appears on

the screen (only if 

'TEXT'

 is ON).  The length of the bar scale indicates

the current memorized setting for this source.  The bar scale changes

as the + or -  buttons of the control are pressed.

Brightness Control

A correct 

'brightness'

 setting is important for good image reproduc-

tion.  Adjust the brightness with the + or - button (RCU) until the darkest

parts of the picture appear black.

A bar scale gives a visual indication on the screen of the current

brightness setting while pressing on the above  indicated keys.  If the

bar scale is not visible on the screen, press '

TEXT

' key once and retry

the above indicated keys.

WARNING

INPUT NOT

AVAILABLE

WARNING

SOURCE NOT

AVAILABLE

BRIGHTNESS

35

All manuals and user guides at all-guides.com

Содержание GRAPHICS 808s

Страница 1: ...R9000904 OWNER S MANUAL GRAPHICS 808s All manuals and user guides at all guides com a l l g u i d e s c o m...

Страница 2: ...All manuals and user guides at all guides com...

Страница 3: ...BARCO PROJECTION SYSTEMS Date 160403 Art No R5976283 R9000904 OWNER S MANUAL GRAPHICS 808s Revision 01 All manuals and user guides at all guides com...

Страница 4: ...3 All rights reserved Trademarks are the rights of their respective owners Printed in Belgium BARCOn v ProjectionSystems Noordlaan5 B 8520Kuurne Belgium Tel 32 56 368211 Fax 32 56 351651 E mail sales...

Страница 5: ...t 3 5 Connecting a RCVDS 05 switcher to the projector 3 5 Connecting a VS05 switcher to the projector 3 5 CONTROLLING 4 1 Battery installation in the RCU 4 1 How to use your RCU 4 2 Projector Address...

Страница 6: ...ervice mode 7 1 Overview flowchart Service mode 7 1 Identification 7 2 Copy a block 7 2 Deletion of blocks 7 3 Deleting block by block 7 3 Deletion of all blocks 7 3 Change password 7 4 Change Languag...

Страница 7: ...plug WARNING FOR THE CUSTOMERS THIS APPARATUS MUST BE GROUNDED EARTHED via the supplied 3 conductor AC power cable If the supplied power cable is not the correct one consult your dealer A Mains lead P...

Страница 8: ...ng therefore avoid touching the lens To remove dust on the lens use a soft dry cloth Do not use a damp cloth detergent solution or thinner On repacking Save the original shipping carton and packing ma...

Страница 9: ...e status of the projector Unlit mains power switch is not pressed Lit mains power switch is pressed and the indicated color shows the projector mode Green color operational mode of the projector Red c...

Страница 10: ...rojector between 0 and 9 Press the address key followed by pressing one digit button between 0 and 9 4 STBY Stand by button To initiate remote power up operation To stop projection without main power...

Страница 11: ...ion of the projector Switching On Off The projector is switched ON and OFF using the power mains switch ON OFF on the rear panel Pressed ON Not pressed OFF The projector can start in the operational m...

Страница 12: ...entvideo3 6 4 5 RGB with Tri level sync4 7 4 5 Componentvideo withTri levelsync5 8 2 Input signal R G and B with automatic sync detection between seperate sync separate com posite sync or with separat...

Страница 13: ...O interfaces which can be applied RGB input selection RGB R G B signals with automatic sync detection Press digit button 4 or 5 on the RCU or the local keypad 21 2 32 5 0 1 6 SHULSKHUDOV 5 RPS 6 QF9 6...

Страница 14: ...SHUDWLRQ UHG VWDQGE 3 257 3257 2 21 2KP 3 52 7 25 02 798 7KLV GHYLFH FRPSOLHV Z LWK SDUW RI WKH UXOHV 2SHUDWLRQ LV VXEMHFW WR IR O OR Z LQ J WZ R FR Q G LWLR Q V 7K LV GHYLFH PD QRW FDXVH KDUPIXO LQWH...

Страница 15: ...nnecting a VS05 switcher to the retroprojector The VS05 can switch up to 5 Composite Video sources 3 S Video Sources and 1 RGB analog or component Video source to the retroprojector In addition an aud...

Страница 16: ...Connections 3 6 5976283 BARCOGRAPHICS 808s 160403 All manuals and user guides at all guides com a l l g u i d e s c o m...

Страница 17: ...procedure Remove the battery cover on the backside of the RCU by pushing the indicated handle a little to the bottom of the RCU Lift up the top side of the cover at the same time fig 1 Insert the new...

Страница 18: ...set to any value between 0 and 255 When the address is set the projector can be controlled now with the RCU for addresses between 1 and 9 computer e g IBM PC or compatible Apple MAC etc for addresses...

Страница 19: ...RGB3S When a valid and available source is selected there will be informa tion displayed on the screen about that source if Text is on This information includes Source number Horizontal frequency Ver...

Страница 20: ...when using the NTSC 4 43 or NTSC 3 58 system A bar scale gives a visual indication on the screen of the current tint setting while pressing the or buttons RCU If the bar scale is not visible on the s...

Страница 21: ...ed technician to perform the installation procedure see example of projected warning on the next page GUIDED Guided should be selected if the user intends to perform a complete alignment of the projec...

Страница 22: ...ith the numeric keys on the RCU Example 2 3 1 9 For each digit entered a X appears on the screen under the displayed text enter password When your password is correct you gain access to the Adjustment...

Страница 23: ...DOM ACCESS SERVICE IRIS Source 01 Select with or then ENTER EXIT to return ENTER continues to Setup Pattern Selection EXIT returns to Operational mode RANDOMACCESS ADJUSTMENTMODE Overview Random Acces...

Страница 24: ...ADJUSTMENT From next page From next page SETUPPATTERNSELECTION FOCUSING BLUE GREEN RED BLUE GREEN RED REDANDBLUE BLUEANDGREEN REDANDGREEN COLORSELECT ORBITING CONTRASTMODULATION SOFTEDGECORRECTION CON...

Страница 25: ...n this manual are created for an external source connected to one of the inputs and the Genlocked Pattern is selected Internal Cross Hatch Pattern The Internal pattern menu will be displayed if the in...

Страница 26: ...l disc and press enter to start the adjustment Push the control disc or to adjust the red cut off and push the control disc or to adjust the blue cut off Select custom Green cut off with the control d...

Страница 27: ...ing Highlight CLAMP TUNING by pushing the control disc or and press ENTER to toggle between NORMAL and RESTORATION Select Normal for all standard sources and all sources with a backporch 0 8 s for sou...

Страница 28: ...ss ENTER to toggle between ON active and OFF non active EXIT will return to the random access selection menu Select with or ENTER to accept EXIT to return PICTURE TUNING COLOR BALANCE SYNC FAST PORT2...

Страница 29: ...right to adjust the top focusing Adjust until the upper part of the image is sharp ENTER to return to the Green Focusing menu Bottom image focusing The same procedure has to be repeated as for the mid...

Страница 30: ...Corrections Left Side Corrections Top Bottom Corrections Horizontal Size Vertical Linearity Vertical Size Blanking The convergence corrections are disabled during geometry correc tions The blanking c...

Страница 31: ...N TOP BOTTOM N S H SIZE V LINEARITY V SIZE BLANKING ENTER will select green raster shift adjustment EXIT returns to random access adjustment mode menu Warning In order to ensure maximum CRT longevity...

Страница 32: ...IDE KEYSTONE SEAGULL CORRECTION Warning Use this correction to adjust the right side of the image The warning Use this correction to adjust the right side of the image appears on the screen when selec...

Страница 33: ...e bow and keystone adjustments are done prior to these fine adjustments The following adjustments can be executed Left keystone Left bow Push the control disc or to highlight LEFT SIDE CORRECTION on t...

Страница 34: ...s are straight To enter an alignment push the control disc or to highlight a function and press ENTER to activate this function Press EXIT to return TOP BOTTOM Select with or then ENTER EXIT to return...

Страница 35: ...V SIZE BLANKING TOP BOTTOM N S H CENTERLINE BOW H CENTERLINE SKEW TOP KEYSTONE TOP BOW BOTTOM KEYSTONE BOTTOM BOW SEAGULL CORRECTION Horizontal Size Adjustment Pushthecontroldisc or tohighlightHSIZEon...

Страница 36: ...sh the control disc forward or backward to highlight V SIZE on the Geometry menu and then press ENTER ENTER will select vertical size adjustment EXIT returns to random access adjustment mode menu ADJU...

Страница 37: ...with or then ENTER EXIT to return BLANKING TOP BOTTOM LEFT RIGHT The following blanking corrections are possible Top blanking Bottom blanking Left blanking Right blanking Therefore If the internal pat...

Страница 38: ...tal sides adjust the vertical lines within a certain area on both sides without influencing the lines on the middle of the image Vertical corners adjust the horizontal lines in the four corners within...

Страница 39: ...vertical convergence adjustments in the selected zone and then press ENTER to move the box to another zone or EXIT to return to the Convergence menu ENTER toggles arrow keys between zone selection and...

Страница 40: ...Random Access Adjustment Mode 6 18 5976283 BARCOGRAPHICS 808s 160403 All manuals and user guides at all guides com...

Страница 41: ...h the control disc forward or backward to select more Select with or then ENTER EXIT to return SERVICE MODE IDENTIFICATION COPY A BLOCK DELTE A BLOCK DELETE ALL BLOCKS CHANGE PASSWORD CHANGE LANGUAGE...

Страница 42: ...s ENTER ENTER will select the highlighted item To copy the settings of a closed block to the block you are working on active block use the control disc to select a block All existing settings will be...

Страница 43: ...LOCK The selected block will be deleted ENTER to confirm EXIT to cancel Push the control disc or to select the desired adjustment block Press ENTER todeletetheselectedadjustmentblock Aconfirmation men...

Страница 44: ...0 0 0 0 Password will be reprogrammed as xxxx ENTER to confirm EXIT to cancel CHANGE PASSWORD IDENTIFICATION COPY A BLOCK DELTE A BLOCK DELETE ALL BLOCKS CHANGE PASSWORD CHANGE LANGUAGE RUN TIME SET...

Страница 45: ...l settings are reset to the previous settings Convergence Mid Item is password protected Highlight convergence mid with the control disc and press ENTER to set all convergence settings to their midpos...

Страница 46: ...CHANGE PASSWORD CHANGE LANGUAGE RUN TIME SET TO MIDPOSITION CONVERGENCE MID DYNAMIC ASTIGMATISM MORE DYNAMIC ASTIGMATISM ON SELECTED SOURCE RED GREEN BLUE ON GENLOCKED PATTERN RED GREEN BLUE Select p...

Страница 47: ...ING RISK OF INCORRECT ADJUSTMENT OF THE PROJECTOR THE GAMMA CORRECTIONS ARE FACTORY ADJUSTED USING AN ACTAS COLOUR ANALYSER THEREFORE ONLY QUALIFIED INSTALLTION OR SERVICE PERSONNEL SHOULD PERFORM THE...

Страница 48: ...jector it starts immediately with the projection of the selected source CRT Drive Mode The projector CRT s can be driven with the normal current normal mode a lower current economic mode or with a hig...

Страница 49: ...t of an RCVDS where the input board is missing When selecting a new source information about this source will be displayed on the screen Source number horizontal and vertical frequencies of the dis pl...

Страница 50: ...er has to answer FAILURE invalid RWI soft version Wrong software version in your projector Call for technical sup port FAILURE I2 C error addr 7FH3 Hardware failure Call a quali fied service technicia...

Страница 51: ...ctor settings Remote Control Simulation Advantage address range 0 to 255 Adjustment Data Where can it be located when a IBM PC or compatible or MAC or Workstation is connected Hard memory device with...

Страница 52: ...provides several cables to connect peripheral equipment to the projector a D9 D9 communication cable To connect an IBM PC or compatible to the projector To connect a RCVDS05 to the projector To connec...

Страница 53: ...TMENT BLOCKS AND SOURCE NUMBERS 90 99 Source numbers 90 99 Source numbers 90 99 do not correspond to physical inputs to the projector or RCVDS They are used to assign an additional adjustment block to...

Отзывы: