


ENTER
TEST
PAT
PRESETS
BLACK
Quick System Setup
Install and Cable LED Walls
— Ensure that your LED
wall(s) are properly installed and cabled.
1
Rackmount DX-700
— Ensure that the DX-700 is
properly installed in your equipment rack.
(Chapter 3, “Rack-Mount Installation”)
2
5
6
P/N 26-0601004-00, Rev 02
Quick Start Guide
Visibly yours
Barco, Inc.
11101 Trade Center Drive
Rancho Cordova, CA
95670 • USA
Phone:
Fax:
Technical Support:
Customer Service Portal:
Website:
+1 (916) 859-2500
+1 (916) 859-2515
+1 (866) 374-7878
www.barco.com/esupport
www.barco.com
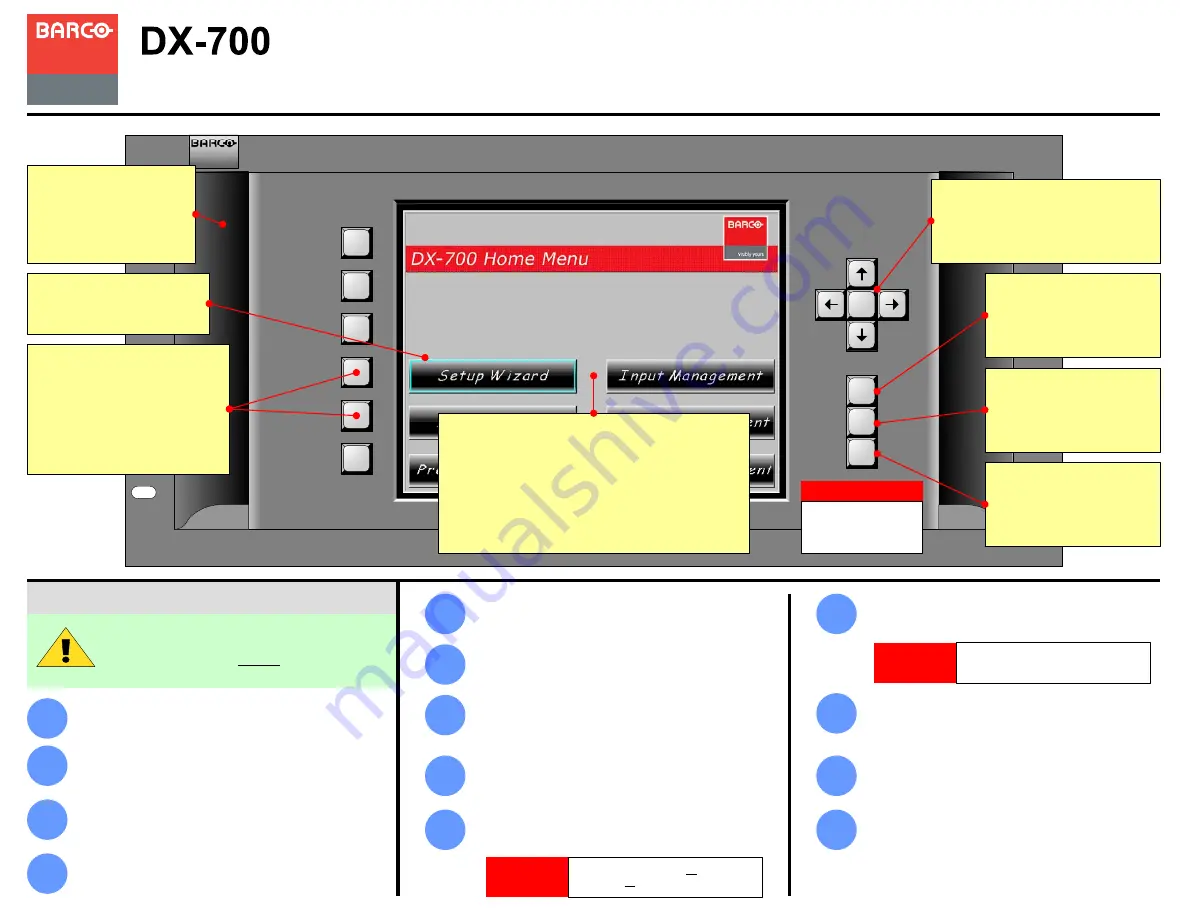
Handles
Two recessed handles are
provided. Chassis weight
depends on the number of
modules installed.
Softkeys
Six softkeys activate functions or
access menus. Softkey labels
appear in the Touch Screen’s left-
hand column. To operate, press
the Touch Screen button, or the
adjacent softkey.
Touch Screen
There are 3 ways to use the Touch Screen:
1) Press a button on the Touch Screen itself.
2) Press a softkey directly adjacent to a button in
the Touch Screen’s left-hand column.
3) Use the arrows to move the cyan “focus”
highlight. Then, press
ENTER
to activate.
Navigation
Use the arrows move the “focus”
highlight, and to scroll lists. To activate
a highlighted function, press
ENTER
.
TEST PAT
Press to access the
Test
Pattern Menu
, to assign test
patterns to selected outputs.
PRESETS
Press to access the
Preset
Management Menu
, to recall
and manage presets.
BLACK
Press to take all outputs to
black. Press again to restore
the previous video.
Focus
The cyan “focus” can be moved
with the
Navigation
buttons.
Configure DX-700 Modules
— Ensure that all
modules are installed in the proper configuration.
(Chapter 2, “Module Installation and Configuration”)
Connect Sources and Signals
— Ensure that all
sources and signals are properly connected.
(Chapter 3, “Signal Installation”)
7
Power On LEDs, Fiberlink
— Turn on power to your
LED walls and Fiberlink connections.
8
Power On DX-700
— Turn on power to the DX-700
chassis. (Chapter 4, “Power-Up Initialization”)
Calibrate Touch Screen
— Adjust display brightness
and calibrate the Touch Screen. (Chapter 4, “Using
the Front Panel Display Adjust Menu”)
9
Run the Setup Wizard
— Use the
Setup Wizard
to
configure LED wall outputs and “groups.” (Chapter 4,
“Using the Setup Wizard”)
Run the Input Wizard
— Use the
Input Wizard
to
configure inputs, and assign them to LED outputs.
(Chapter 4, “Using the Input Wizard”)
10
Recall Presets
— Recall the desired preset, and
you’re ready to begin production. (Chapter 4, “Using
the Preset Management Menu”)
11
12
3
4
Fine Tune Inputs
— Use the
Input Management
Menu
to adjust brightness, contrast, color and more.
(Chapter 4, “Using the Input Management Menu”)
Fine Tune Displays
— Use the
Display Management
Menu
to adjust contrast, gamma, Fiberlink and more.
(Chapter 4, “Using the Display Management Menu”)
IMPORTANT
These three buttons do
not work from within
the Setup Wizard.
The following list summarizes the
overall DX-700 setup procedure. For
error-free installation, always refer to
the listed section in the User’s Guide.
Factory Reset
— The first time you use a DX-700,
or after a DX-700 returns from a show, perform a
Factory Reset. (Chapter 4, “Performing a Factory
Reset”)
IMPORTANT
Ensure that you set up all outputs and
configure all output groups.
IMPORTANT
Ensure that you save a preset after
you configure each input.
13


