background image

8

Step 4.


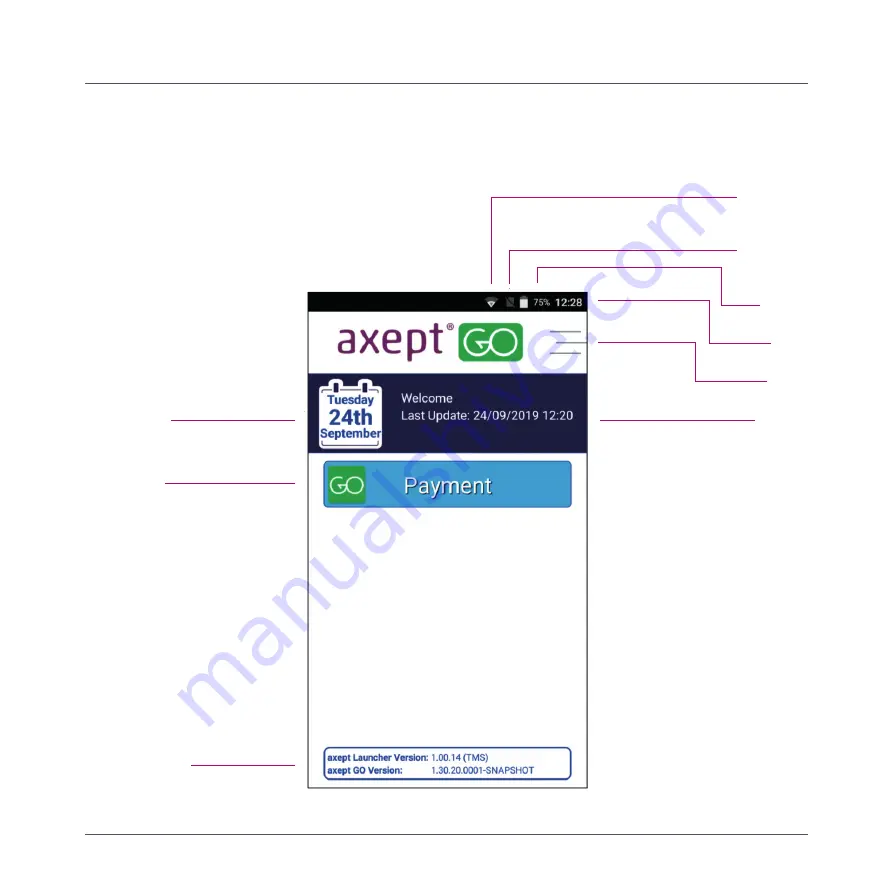
A920 Launcher.

When A920 completes the start-up process the 

‘Launcher’ will be displayed. The Launcher allows the 

user to configure items such as the Wi-Fi or cellular 

settings before loading the main application.

Day and date

Info bar

Menu

Time

Battery 

charge

Cellular

connection

WiFi 

connection

Load button

Current versions

A920

Содержание takepayments A920

Страница 1: ...We makeit easy Your A920 installation and user guide...

Страница 2: ...stalling receipt roll 7 A920 Launcher 8 Completing set up 9 Using cellular connection SIM 1 Access point Name APN set up 2 Selecting the cellular network Using WiFi Login on 16 Processing transactions...

Страница 3: ...S compliant for safe and secure card payments Wide variety of options Chip and PIN Apple Pay Android Pay swipe and contactless payments Serve more customers faster with faster printing than all other...

Страница 4: ...reader Forward facing camera scaner Volume down Charging port Volume up Power button Chip ICC card reader Card swipe Step 1 Terminal overview Here is a quick overview of the A920 terminal s external...

Страница 5: ...A920 5 Battery compartment Battery compartment release Volume down Charge point Battery SIM slot Serial number Camera scanner Receipt release catch Step 1...

Страница 6: ...tact support WiFi connection present example shows 75 signal strength Cellular connection present example shows 75 signal strength Cellular connection present no Internet connection available No cellu...

Страница 7: ...terminal s receipt compartment by carefully lifting the release catch Once open place the receipt roll provided into the open compartment with the receipt paper extending from underneath the roll lea...

Страница 8: ...Launcher will be displayed The Launcher allows the user to configure items such as the Wi Fi or cellular settings before loading the main application Day and date Info bar Menu Time Battery charge Ce...

Страница 9: ...s is made up of two main stages the first the configuration of the Access Point Name s APN used by the SIM and the second optional step is to manually choose the cellular network the SIM should initia...

Страница 10: ...ccess Point Name APN set up continued 4 Once all details have been added click the button to return to the A920 Launcher 3 Set the configuration items as per the advice from your SIM provider A920 Ste...

Страница 11: ...llular Settings 3 The terminal will then scan for available networks this process can take a few minutes 4 Once complete the terminal will display the available networks Select the network that you wi...

Страница 12: ...sful the Cellular Network Settings menu will be displayed and the connection shown in the header If the connection is unsuccessful please try again or choose another network band 6 Once connected pres...

Страница 13: ...always treats WiFi as the primary connection type where present with the cellular connection used as backup To configure the WiFi connection follow these steps Select the menu icon on the main A920 La...

Страница 14: ...ayed 5 The connection process will then start 6 After a moment the terminal will be complete the connection using DHCP and return to the Wi Fi menu showing a status of Connected against the chosen net...

Страница 15: ...Press the left arrow at the bottom of the screen to return to the A920 Launcher The A920 also allows the use of static IP details if this is required please refer to the full The A920 User Guide for...

Страница 16: ...supplied via email Select Save Credentials to store login details and the A920 will use them automatically in future After a moment the main A920 screen will be displayed 3 4 If the details entered d...

Страница 17: ...Alternatively a transaction can be initiated by the insertion of a payment card into the Chip ICC card reader at the base of the terminal 1 2 Enter the amount of the sale using the onscreen keypad The...

Страница 18: ...the A920 will read the card Please wait and do not remove the card whilst this is in progress 6 If the cashback feature has been enabled and a supporting debit card is presented the A920 will prompt f...

Страница 19: ...e button to continue 8 The A920 will then begin processing the transaction 10 The A920 will confirm the result of the transaction 9 On the Enter PIN screen pass the terminal to the cardholder and ask...

Страница 20: ...then print the cardholder copy of the receipt 11 13 The A920 then prints the merchant copy The A920 then asks for the card to be removed The A920 then prompts the merchant to remove the cardholder cop...

Страница 21: ...A920 A920 The A920 then returns to the main menu ready for the next transaction 15 Chip and PIN sale continued Step 7 21...

Страница 22: ...the transaction If a reference is not required press the Skip button 4 The A920 will prompt for the card to be presented Present the card to the contactless reader on the top of the terminal 2 Enter t...

Страница 23: ...transaction 7 The A920 then prompts the merchant to confirm whether a cardholder receipt is required If one is needed press YES If not needed press No 8 The merchant copy of the receipt is then printe...

Страница 24: ...24 A920 Step 7 9 The A920 returns to the main menu ready for the next transaction Contactless sale continued...

Страница 25: ...th Floor Highbank House Exchange Street Stockport SK3 0ET Authorised and regulated by the Financial Conduct Authority takepayments is officially licensed by MasterCard and Visa International as an Ind...

Отзывы: