background image

11

9

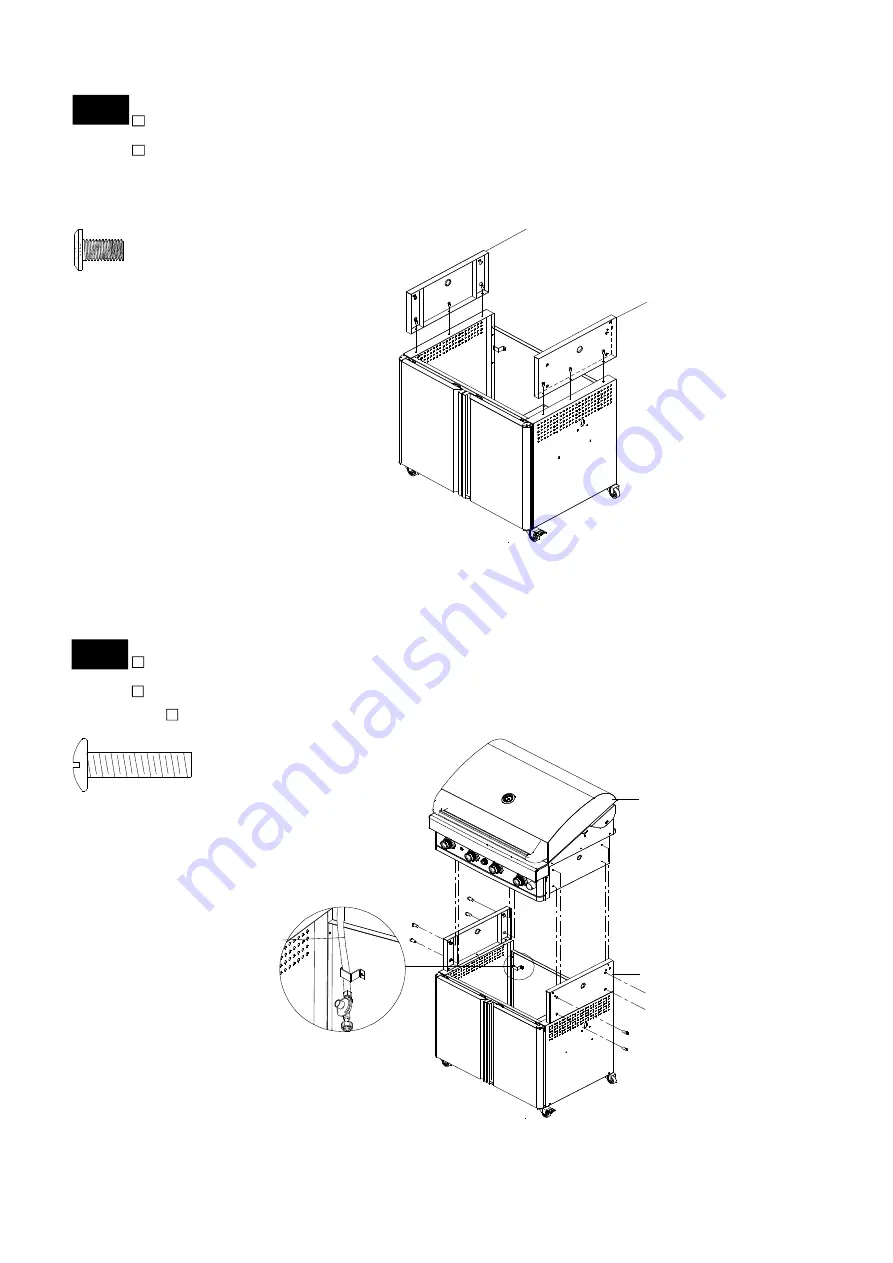
Install  Left/Right  Grill  Bowl  Trim  Panel

Install  the  Left  Grill  Bowl  Trim  Panel  on  the  top  of  the  Left  Cart  Side  Panel  using  3  Pan  Head  Screws
3/16"x3/8"  and  tighten  securely  as  shown.
Repeat  the  same  steps  for  the  Right  Grill  Bowl  Trim  Panel.

Pan  Head  Screw  3/16"x3/8"
Qty.  6
Part  #  S182G03061

10

Install  Grill  Head

With  the  help  of  your  assistants,  lift  the  Grill  Head  and  place  it  on  the  top  of  the  Grill  Bowl  Trim  Panels.
Make  sure  the  regulator  hose  sits  inside  the  hose  holder  as  shown.
Align  the  holes  on  the  Grill  Bowl  with  the  holes  on  the  Trim  Panels.  Insert  the  8  Phillips  Head  Screws

3/16"x1-5/8"  and  tighten  securely.

Phillips  Head  Screw  3/16"x1-5/8"
Qty.  8
Part  #  S112G03261

Grill Bowl Trim  Panel, Right

Grill Bowl Trim Panel,  Left

Regulator  Hose

Grill  Head

Grill  Bowl  Trim  Panel

Содержание UN2616ACT

Страница 1: ...FOR OUTDOORUSEONLY Never use your gas grill in a garage porch shed breezeway or any other enclosed area Never obstruct the flow of ventilation air around your gas grill housing Never disconnect the gas regulator or any gas fitting while your grill is lit A lit grill can ignite leaking gas and cause a fire or explosion which could result in property damage personal injury or death Ÿ Ÿ Ÿ Ÿ Ÿ Ÿ WARNI...

Страница 2: ...Guide Plate S182G03061 Pan Head Screw 3 16 x3 8 6 Install Cart Rear Panel S182G03061 Pan Head Screw 3 16 x3 8 1 LP Regulator Hose Holder P05515124L Wrench 1 Install Casters S182G03061 Pan Head Screw 3 16 x3 8 6 Install Cart Partition Panel Bracket and Cart Partition Panel UN3216ACT Only S182G03061 Pan Head Screw 3 16 x3 8 8 Install Tank Holder and Holder Assembly S182G03061 Pan Head Screw 3 16 x3 ...

Страница 3: ...Parts Diagram for Model UN2616ACT 3 29 28 25 1 6 8 23 21 19 16 15 14 10 12 11 2 3 18 13 5 9 7 27 26 4 20 22 24 16 17 ...

Страница 4: ...cket Left Lower P03313033F 1 13 Door Bracket Right Low er P03313034F 1 14 Door As s em bly Left P043050624 1 15 Door As s em bly Right P043060324 1 16 Door Hinge Y0550002 2 17 Door Magnet P05523056L 4 18 Door Guide Plate P05510137A 1 19 Cas ter Seat Left Front Right R ear P05327064H 2 20 Cas ter Seat R ight Front Left R ear P05327065H 2 21 Cas ter 2 w ithout Brake P05104008A 2 22 Cas ter 2 w ith B...

Страница 5: ...Parts Diagram for Model UN3216ACT 5 2 3 27 31 16 17 30 25 1 23 21 19 16 15 14 10 12 11 18 13 5 26 28 29 4 20 22 24 9 7 6 8 ...

Страница 6: ...ight Lower P03313034F 1 14 D oor As s em bly Left P0430 5061G 1 15 D oor As s em bly R ight P0430 6031G 1 16 D oor Hin ge Y055 0002 2 17 D oor Magnet P05523056L 4 18 D oor Guide Plate P05510137A 1 19 C as ter Seat Left Front R ight R ear P0532 7064H 2 20 C as ter Seat R ight Front Left R ear P0532 7065H 2 21 C as ter 2 w ithout Brake P05104008A 2 22 C as ter 2 w ith Brake P05104009A 2 23 C art Fro...

Страница 7: ...e aligned as shown Insert 4 Pan Head Screws 3 16 x3 8 Do not fully tighten the screws until the step 3 is fully completed Secure the Caster Seats from the underside of the Cart Bottom Panel using 8 Pan Head Screws 1 4 x3 8 Install the Left Lower and Right Lower Door Brackets onto Cart Side Panels using 4 Pan Head Screws 3 16 x3 8 and tighten securely Attach the Door Guide Plate to the Cart Bottom ...

Страница 8: ...s on the Bottom Panel securely Pan Head Screw 3 16 x3 8 Qty 7 Part S182G03061 Install Casters Turn the Cart upside down and place it on the flat ground as shown Install 4 Casters into the threaded holes on the Caster Seats Make sure the 2 Casters with brakes are installed at the front Turn the threaded stem by hand clockwise until it stops Tighten securely with the provided wrench 4 Wrench Qty 1 P...

Страница 9: ... Head Screw 3 16 x3 8 Qty 6 Part S182G03061 6 Install Tank Holder and Holder Assembly Attach Tank Holder to the Tank Holder Brackets Align the 4 holes on the Tank Holder with the 4 holes on the Tank Holder Brackets 2 holes on each bracket Insert 4 Pad Head Screws 3 16 x3 8 and tighten securely Attach the Tank Holder Assembly to the Cart Bottom Panel and make sure the strap is facing to the front A...

Страница 10: ... Pan Head Screws 3 16 x3 8 and tighten securely Note The Upper Door Bracket for the left side is marked with L The Upper Door Bracket for the right side is marked with R Install the left Door Align the hole on the upper edge of the Left Door with the nipple on the Left Upper Door Bracket Lift the Left Door upward for inserting the nipple and depressing the spring loaded Door Pin on the bottom of t...

Страница 11: ...061 10 Install Grill Head With the help of your assistants lift the Grill Head and place it on the top of the Grill Bowl Trim Panels Make sure the regulator hose sits inside the hose holder as shown Align the holes on the Grill Bowl with the holes on the Trim Panels Insert the 8 Phillips Head Screws 3 16 x1 5 8 and tighten securely Phillips Head Screw 3 16 x1 5 8 Qty 8 Part S112G03261 Grill Bowl T...

Страница 12: ...Attach Transformer to the Cart Rear Panel by inserting 4 stud bolts on the Transformer into the 4 key holes on the Cart Rear Panel Press the Transformer downwards until it rest firmly in place See Fig 1 Insert Transformer Plug into Transformer Socket and tighten securely See Fig 2 Pull out the Transformer Cord from the hole on the left side of Cart Rear Panel Connect the Transformer power supply c...

Страница 13: ... 8 to the front inside edge of Right Cart Side Panel as shown Tighten the screws only half way Install the Control Box to the Right Cart Side Panel by aligning the two keyholes in the Mounting Bracket with two screws Make sure the screw heads are engaged with keyhole slots pressing the Bracket downward until it rest in place firmly Double check the wire outlet of the Control Box is facing downward...

Отзывы: