background image

Natural Gas Safety Instructions

Y our Natural G as  G rill is  des igned to operate on

      N a tura l  G a s   only,   a t  a   pre s s ure   of  7"  wa te r
       column (W.C .) (1/4 psig or 1.75 kpa), regulated at
      the residential meter. C heck with your gas utility

company for local gas pressure and with your local

   municipa lity for building code requirements .  If
    your res idential gas  line pres s ure has  not been
    regula ted to 7" W .C ., conta ct your loca l ga s
       utility company for professional assistance.

T he gas  pres s ure R egulator s upplied with this
appliance mus t be us ed. T his  R egulator is  s et

   for an outlet pres s ure of 4" W.C .

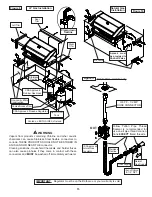
It is  recommended tha t a  S hut O ff  V a lve be

      ins ta lled  a t  the  ga s   s upply  s ource  outdoors .
      Ins ta ll  a t  a   point  a fter  the  ga s   pipe  exits   the
    outs ide wa ll a nd before the  Q uick  Dis connect
     Hos e, or ins tall it at the point  before the gas  line
       piping enters the ground. S ee
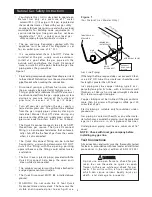
 F igure 1.

P ipe sealing compound or pipe thread tape resistant
to the action of  Natural G as must be used on all male
pipe threads when making the  connection.

Dis connect your gas  grill from fuel s ource when
the gas supply is being tested at high pressures.
This gas grill and its individual S hut Off Valve must
be disconnected from the gas supply pipe system
during any pres s ure tes ting of  that s ys tem at
pre s s ure   in  e x c e s s   of  1 /2   ps i  ( 3 . 5 k pa ) .

T urn off your gas  grill when the gas  s upply is
tested at low pressures. T he grill must be isolated
from the gas  s upply pipe s ys tem by clos ing its
individua l  Ma nua l  S hut  O ff  V a lve  during  a ny
pressure testing of the gas supply pipe system at
pres s ures  equal to or les s  than 1/2 ps i (3.5kpa).

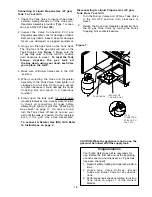
T he Quick Disconnect connects to a 3/8 inch NP T
thread from gas  s ource. T he Q uick Dis connect
fitting is  a hand operated device that automati-

       cally shuts off the the flow of gas from the source
       when it is  dis connected.

T he  Q uick  Dis connect  fitting  ca n  be  ins ta lled
horiz onta lly,   or  pointing  downwa rd.   DO   N O T

      ins ta ll  the   fitting  with  the   ope ning  pointing
    upwa rd beca us e the fitting could collect wa ter
      and debris .

T he Dus t C overs  (plas tic plugs ) provided with the
Q uick  D is conne ct  he lp  ke e p  the   ope n  e nds

       clean while dis connected.

T he  outdoor connector must be firmly attached to
a ridged permanent construction.

T he Quick Dis connect MUS T  B E  ins talled above

      ground.

W A R N IN G :   D o  not  route   the   12  foot  Q uic k
Disconnect Hose under a deck. T he hose must be
vis ible  a nd  ins pected  prior  to  ea ch  grill  us e.

F igure 1

(F or Natural G as Model O nly)

If the length of line required does  not exceed 50 feet,
us e a 5/8" O.D. tube. One s ize larger s hould be us ed
for lengths  greater than 50 feet.

G a s   piping  ma y  be  copper  tubing,   type  K   or  L ;
polyethylene  pla s tic  tube,   with  a   minimum  wa ll
thicknes s  of .062 inch; or s tandard weight (s chedule
40) s teel or wrought iron pipe.

C opper  tubing mus t be tin-lined if the gas  contains
more than 0.3 grams  of hydrogen s ulfide per 100
cubic feet of gas .

P las tic tubing is  s uitable only for outdoor, under-
ground us e.

G as  piping in contact with earth, or any other mate-
rial which may corrode the piping, mus t be protected
a ga ins t  c orros ion  in  a n  a pprov e d  ma nne r.

Underground  piping mus t have a minimum of 18"
cover.

All connections and joints must be thoroughly tested
for leaks in accordance with local codes and all listed
procedures in the la tes t edition of ANS I Z223. 1

4

G as  L ine P iping

Test Connections

DIS C ONNE C T

Do not us e an open flame to c hec k  for gas
leak s . B e s ure there are no s park s  or open
flames  in the area while y ou c hec k  for gas
leak s . T his  will res ult in a fire or ex plos ion
whic h c a n c a us e s erious  bodily  injury  or
dea th,   a nd  da ma ge  to  property .

DANGER

!

Included

QUICK

MALE
FITTING

TO NATURAL GAS
REGULATOR

NATURAL GAS  SUPPLY

INS

IDE  

WALL

OUT

SIDE 

WALL

LOCKING GAS
SHUT OFF VALVE

Additional
Hardware Not

NOTE : Check with local gas company before 

installing any gas line.

Содержание Turbo select G5STR

Страница 1: ...s care fully in this manual prior to grill operation Do this even if the grill was store assembled Failure to followtheseinstructionscould resultinseriousbodily injuryand orpropertydamage Thisgrillisintendedfor outdooruseonlyandisnotintendedtobeinstalledin oronrecreationalvehiclesorboats Note to Installer Leave this Owner s Manual with the consumer after delivery and or installation GrillInformati...

Страница 2: ......

Страница 3: ...a direct communication with the vapor space of the tank The tank supply system must be arranged for vapor withdrawal The LP gas tank used must have a collar to protect the tank valve 1 2 3 The Regulator and Hose assembly must be inspected before each use of the grill If there is excessive abrasion or wear or if the hose is cut it must be replaced prior to the grill being used again Keep the gas Re...

Страница 4: ...cted T he Quick Disconnect fitting can be installed horizontally or pointing downward DO NOT ins tall the fitting with the opening pointing upward because the fitting could collect water and debris The Dust Covers plastic plugs provided with the Quick Dis connect help keep the open ends clean while disconnected The outdoor connector must be firmly attached to a ridged permanent construction The Qu...

Страница 5: ...er Tubes This type of fire is known as a FLASH BACK and can cause serious damage to your grill and create an unsafe operating condition for the user Although an obstructed Burner Tube is not the only cause of FLASH BACK it is the most common cause To reduce the chance of FLASH BACK you must clean the Burner Tubes before assembling your grill and at least once a month in late summer or early fall w...

Страница 6: ...oor P late A B C D E R ef 4 8 1 2 2 Qty to use 1 4 x 1 P hillips Head S crew 1 4 x 3 4 P hillips Head S crew AA Batteries AAA Batteries 3 16 x 3 8 P hillips Head S crew Component 6 Actual S ize and Quantity of E ach Hardware P iece B 1 4 x 3 4 P hillips Head S crew x 8 A 1 4 x 1 P hillips Head S crew QTY 4 C AA B atteries QTY 1 D AAA B atteries QTY 2 E 3 16 x 3 8 P hillips Head S crew QTY 2 Barbeq...

Страница 7: ...upside down and it will provide a comfortable height work surface for grill assembly 44 58 61 60 57 59 55 56 54 52 53 51 34 31 36 45 46 67 68 49 9 12 50 26 28 30 33 32 29 27 35 24 23 39 25 40 20 19 21 18 38 37 13 16 17 41 43 42 22 37 14 11 10 15 2 7 8 3 6 1 5 4 62 63 64 66 65 67 69 70 71 72 73 74 76 75 79 78 77 ...

Страница 8: ...Seat Electric Ignitor 4 Port AABattery Grease Tray Heat Shield Side shelf Lid Storage Box Left Side Shelf Decoration Plate Right Side Shelf Electrode for Side Burner Side Burner Side Burner Body Pot Support Decoration Plate Side Burner Control Knob Side Burner Control Knob Seat Side Burner Gas Valve for Side Burner Regulator W Hose Tank Gauge Set Rear Panel Door Bracket Bottom Shelf Side Panel Lef...

Страница 9: ...side down and it will provide a comfortable height work surface for grill assembly 1 2 4 6 7 8 5 9 11 12 16 17 37 39 21 20 19 18 14 15 37 22 41 24 25 26 27 29 30 32 33 34 51 53 52 55 54 57 58 56 50 35 40 10 23 28 31 13 59 36 60 61 3 17 1 62 63 64 65 66 67 78 77 79 72 74 75 73 76 38 69 46 44 49 70 42 43 45 71 67 68 ...

Страница 10: ...ntrol Knob Seat Electric Ignitor AABattery Grease Tray Heat Shield Side shelf Lid Storage Box Left Side Shelf Decoration Plate Right Side Shelf Electrode for Side Burner Side Burner Side Burner Body Pot Support Decoration Plat SideBurner Control Knob Side Burner Control Knob Seat Side Burner Gas Valve for Side Burner Regulator W Hose Tank Gauge Set Rear Panel Door Bracket Bottom Shelf Side Panel L...

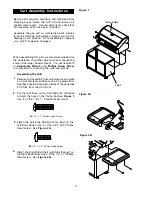
Страница 11: ... Wrench and Phillips Screw Driver not provided for securing the nuts and screws 1 Remove cart assembly from shipping box and place on a flat and level surface such as a garage floor Peel back approximately two inches of the protective PVC film from the Cart Door Put the Grill Bowl on the Cart Slide the Grill Bowl to align the hole on the Fixing bar See Figure 1 Use 4 of the 1 4 x 1 Phillips Head s...

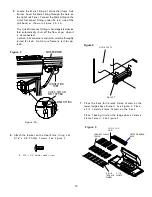
Страница 12: ...ghly tested for leaks Do Not use flame to test for gas leaks 6 Attach the Basket on the Door Plate Using 2 of 3 16 x 3 8 P hillips S crews S ee Figure 4 Figure 4 DOOR PLATE BASKET Figure 3 SIDEBURNER Figure 3A MALE FITTING CONNECTION TUBE QUICK DISCON NECT FITTING E 3 16 x 3 8 P hillips Head S crew 7 Place the R ack for C eramic Flame Tamers on the lower ledge above Burners S ee Figure 5 Place all...

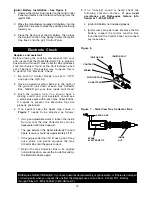
Страница 13: ...til the gap is correct Return the Gas Collector Box to its original horizontal position secure the inside Nut and try the Electrode Check again 5 If no clicking sound is heard check the following common causes If you need assistance call Barbeques Galore Info Center at 1 800 474 5587 Ignitor AA battery not installed properly Ignitor wires may be loose Remove the AA battery inspect the Ignitor Junc...

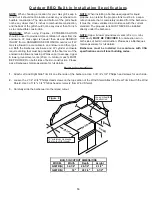
Страница 14: ... PROVIDED on both sides of built in construction Please ask a Barbeques Galore associate for full details NOTE When installing a barbecue equipped for liquid propane in an island the propane tank must be in a sepa rate enclosure that is completely isolated from the barbecue It must be cross ventilated in accordance with the current standard The propane tank MUST NEVER be installed directly under t...

Страница 15: ...an cause Stainless Steel flexible connectors to corrode THESE PRODUCTS SHOULD NOT BE STORED IN AN ISLAND OR NEAR THE connector Cleaning solutions Household Chemicals and Solder fluxes can also cause pinholes if they come in contact with these connectors and MUST be washed off immediately with water Stainless Flexline Left Trim Rear Trim Right Trim Non combustible Construction Vented on BOTH SIDES ...

Страница 16: ... level Replace the batteries 16 Fuel Gauge Display Installation LP Only IMPORTANT Before installing batteries be sure the gas tank is not mounted in the tank pull out tray 1 Attach the Tank Gauge Bracket on the Bottom Shelf Using 4 of 1 2 x 3 4 Phillips Head Screws to fixing the Tank Gauge 2 Rotate the Battery Cover on the Bottom of the tank Pull out Tray 3 Insert two AAA Batteries into Battery Bo...

Страница 17: ...the thumbscrew on the Bushing IMPORTANT Before rotisserie cooking you will need to remove the cooking grids and possibly the flame tamers and warming rack on your grill to rotisserie cook depending on the size of meat you will place on the rotisserie FORK BUSHING SKEWER THUMBSCREW MOTOR BRACKET AC MOTOR 17 Rotisserie Instruction 1 Attach the motor bracket on the outside of the right grill bowl pan...

Страница 18: ...s in the full OFF position turn clockwise to close To reset the Tank Gauge depress the gas tank all the way down using your hand each time you replace the tank 4 Make sure all Burner Valves are in the OFF position 5 When connecting the Hose and Regulator Assembly to the Tank Valve hand tighten nut clockwise to a full stop Do Not use a wrench to tighten because it could damage the Quick Coupling Nu...

Страница 19: ...t Do not call near the LP gas tank because your telephone is an electrical device and could create a spark resulting in fire and or explosion A strong gas smell or the hissing sound of gas indicates a serious problem with your gas grill or the LP gas tank Failure to immediately follow the steps listed below could result in a fire or explosion that could cause serious bodily injury death or prop er...

Страница 20: ... call Barbeques Galore at 1 800 474 5587 Turn gas off at source and turn the Control Knobs to OFF Wait at least five minutes for gas to clear then retry Check gas supply and connections Repeat lighting procedure If your grill still fails to operate properly turn the gas off at source turn the Control Knobs to OFF then check the following If the grill fails to light properly 1 Misalignment of Ignit...

Страница 21: ... with butcher string never use plastic or nylon string to secure any loose portions Once the food is secure insert the S kewer into the motor If needed remove the grill Cooking Grids Place a basting pan below the food to collect the juices and drippings as the food cooks It is normal for the S kewer to flex when larger cuts of meats are being cooked S tart motor and cook food with the Lid closed B...

Страница 22: ...tor box The edge of the collector box should be overlapping the Burner Port Replace Flame Tamers and the Cooking Grids Reconnect the gas source and observe the B u r n e r f l a m e f o r c o r r e c t o p e r a t i o n 8 9 11 10 CAUTION Be sure your grill is OFF and cool before cleaning 1 Turn all Control Knobs to the full OFF position 2 Turn the LP gas Tank Valve to the full OFF position 3 Detac...

Страница 23: ... ports Cleaning The Burner Tubes and Burner Ports To reduce the chance of FLASH BACK you must clean the Burner Tubes at least once a month in late summer or early fall when spiders are most active or when your grill has not been used for an extended period of time Turn all Control Knobs to the full OFF position Turn the LP gas Tank Valve to the full OFF position Detach the LP gas Hose and Regulato...

Страница 24: ...ber type brush and turn over to allow the burner heat to burn off any stuborn food residue The Ceramic Flame Tamers work equally well on either side Grease Tray Receptacle and Heat Shield To reduce the chance of fire the Grease Draining Tray Grease Receptacle and Heat Shield should be inspected before each grill use Remove grease a plastic spatula works well and wash Grease Tray and Receptacle wit...

Страница 25: ...extended cooking Medium to Low settings Most recipes specify medium to low settings including all smoking roasting baking and for cooking lean cuts such as fish NOTE Temperature settings will vary with the amount of wind and temperature outside your home Direct Cooking The direct cooking method can be used with the supplied Cooking Grids and food placed directly over the lit grill Burners Direct c...

Страница 26: ... Poultry skin is fatty so you should expect some flare ups when using this direct method To minimize flare ups try grilling poultry using the indirect method Place the poultry on one side of the grill with the opposing Burners on medium heat and lower the grill Lid Grilling times will vary based on the size of your poultry Grilling Pork Turn Burners on high and preheat your grill 3 to 5 minutes wi...

Страница 27: ... left or right side of your grill with the Burner lit on the opposite side and the grill Lid down In some instances you may want to grill vegetables and fruit directly over the heat using the supplied Cooking Grids Foods that work best with direct heat are relatively soft and require a short cooking time mushrooms zucchini tomatoes and skewered fruit such as apricots peaches pineapple strawberries...

Страница 28: ...ked Rare Medium Well done Medium Well done Approximate Cooking Times 18 minutes per pound 23 minutes per pound 27 minutes per pound 18 minutes per pound 23 minutes per pound 27 minutes per pound 30 33 minutes per pound 20 25 minutes per pound 25 minutes per pound 10 minutes per pound 20 25 per pound 30 minutes 18 23 per pound 15 minutes Guide to Slow Roasting and Baking Techniques BAKINGTECHNIQUES...

Страница 29: ...to Smoke Smoking gives food a distinctive delicious flavor You will find a variety of wood chips or pellets available for use in smoking grilled foods Pre soaking of wood chips may be required so read and follow the manufacturers instructions for preparation of smoking chips prior to use Guide to Smoking Note it is our experience that many smoking chip and pellet products do not actually produce a...

Страница 30: ...h it is possible to stir fry in other dishes a wok is your best tool Its high sides enable the cook to stir food without spillage Its construction allows you to cook quickly at high temperatures with instant control of heat which is essential for successful stir frying Food preparation Slice meat and poultry into long thin strips and cube fish fillets Remove all fat from meat and poultry and cut l...

Страница 31: ...serving time Preparing Burgers In another bowl combine ground beef with 2 tablespoons of reserved salsa mix well Shape mixture into six 1 2 inch thick burgers and place on the grill directly over medium heat with lid up Grill for 13 to 15 minutes or until no pink remains Turn burgers once halfway through grilling time Arrange the shredded lettuce on individual plates Top lettuce with a burger ched...

Страница 32: ...a delicious sauce for any grilled meat And for an appetizer spread the softened cloves over toasted slices o f f r e n c h b r e a d M a k e s 4 s e r v i n g s Preparation Combine ketchup pepper rosemary basil and garlic powder Coat both sides of steak with mixture Grill steak with lid up directly over medium heat for 6 minutes Turn steak and grill for 8 to 12 minutes more or until cooked as desi...

Страница 33: ... low flame until melted Brush mixture over both sides of halibut fish steaks Pour balance of mixture into small bowl Place clean cooking pan or foil on center of grill with both outer burners on medium Place fish on grill and close lid Cook indirectly for 8 to 12 minutes or just until fish begins to flake easily turning once and brushing as needed with remaining mixture Preparation Remove the head...

Страница 34: ...hicken and dry with paper towels Place chicken in plastic bag and into shallow dish then add marinade and seal bag Rotate chicken to coat well and chill up to 24 hours turning bag occasionally Preparing the Avocado Dressing Combine avocados tomato garlic chili peppers onions cilantro honey and lemon juice Toss well then cover and chill up to 2 hours Grilling the Chicken Remove the chicken from pla...

Страница 35: ...move dressing from cooked turkey slice and serve PIZZA ON THE GRILL You may never want to call out for pizza again Follow this pizza dough recipe or purchase ready made pizza doughfoundinyourgrocersrefrigeratedsection nextto the biscuits Slice and serve directly from the grill Serves 6 8 Ingredients 1 1 2 teaspoons dried yeast 1 cup lukewarm water 1 2 teaspoon sugar 3 tablespoons olive oil 3 cups ...

Страница 36: ...l Cut potatoes in half lengthwise Scoop out potato pulp serve separately or discard Be sure to leave 1 4 inch thick potato shell remaining Brush the inside of each potato shell with melted margarine Spoon 2 teaspoons picante sauce into each potato shell sprinkle with cheese and top with bacon Place prepared potato skins on grill directly over medium heat Close lid and cook for 8 to 10 minutes or u...

Отзывы: