background image

R55F Series Fiber-Optic Color Mark Sensors

A

B

C

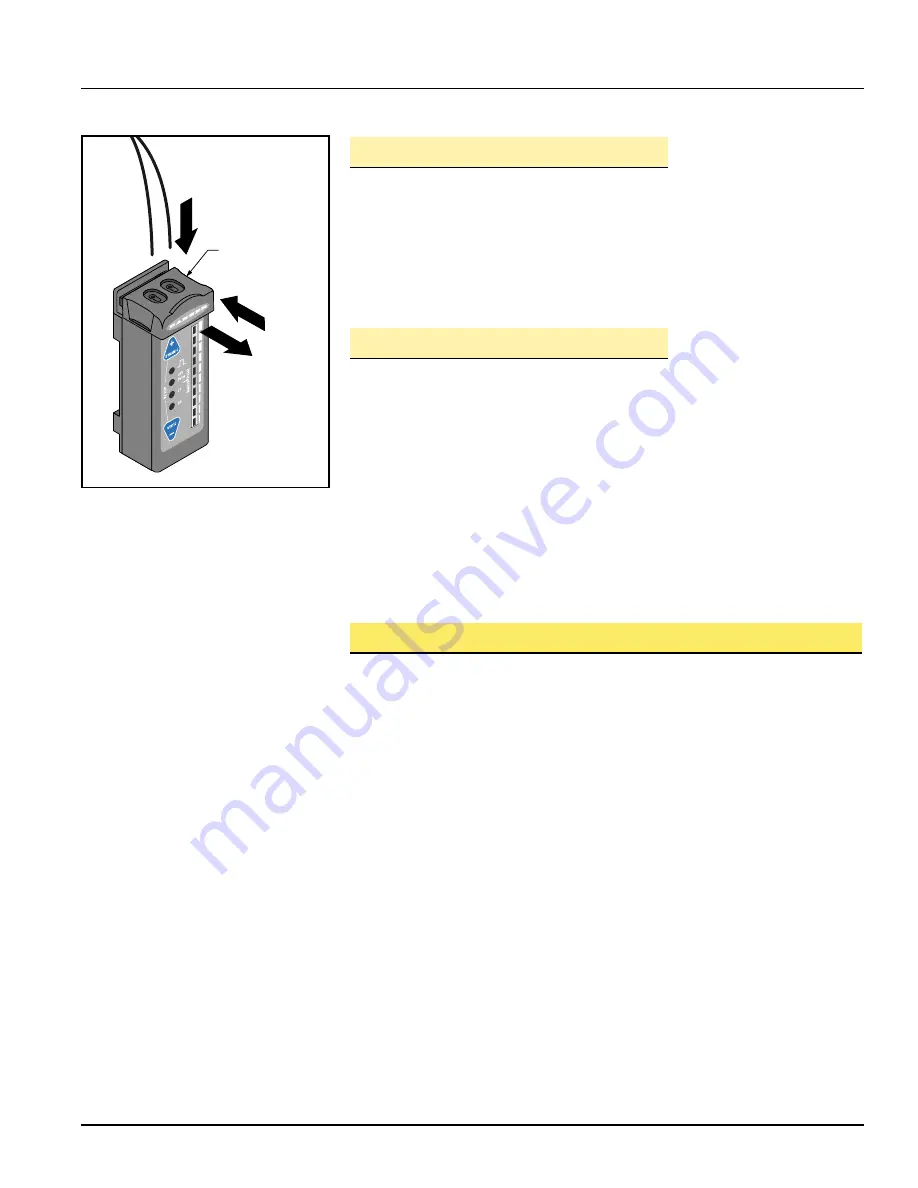
Fiber
Clip

Figure 1.  Installing fibers into the R55F

Series sensor 

Plastic fibers
shown; procedure
is identical for
glass fibers

Glass Fiber Installation Procedure: 

1) Check to see that a rubber o-ring is pre-installed on each fiber control end.

2) Slide the fiber clip to the open position (A).

3) Insert one fiber end into each port (B). Push firmly on the fiber ends to compress

the o-rings and align the grooves in the fiber ends with the slot in the fiber clip. 

4) Slide the fiber clip back into place, locking the fibers into position (C).

Plastic Fiber Installation Procedure:

NOTE: R55F sensors accept 0.75, 1.0, and 1.5 mm (0.03", 0.04", and 0.06") core

diameter plastic fibers.

1) Cut the “control ends” (sensor ends) of the plastic fiber(s) to the desired length

per the procedure which accompanies the fiber assembly.

2) If not already done, separate bifurcated fibers by approximately 2" from the control

ends.

3) Slide the fiber clip to the open position (A).

4) Insert the fiber ends into each port and push them in as far as they will go (B).

5) Slide the fiber clip back into place, locking the fibers into position (C).

Fiber Optic Mounting Considerations

Mount the sensing end of the fiber optic assembly so that the light image is totally
contained within the boundaries of the color mark to be sensed. The light image is
made smaller by moving the sensing tip closer to the surface of the material to be
sensed.

When sensing marks on shiny (specular) materials, such as metal, plastic or glossy
paper, mount the sensing tip of the fiber at approximately 15° from perpendicular to
the material surface to minimize strong direct reflections.

Isolate the fiber mounting from vibration. Also, maintain mechanical stability of the
surface to be sensed (e.g., stabilize web flutter at the sensing point).

Buy: www.ValinOnline.com | Phone 844-385-3099 | Email: [email protected]

Содержание R55F Series

Страница 1: ...or was developed to provide simplicity of operation and access to tight areas for color mark registration sensing applications The R55F is a technological advancement from earlier R55 models R55F sensors feature TEACH mode sensitivity adjustment by presenting the light and the dark sensing conditions to the sensor In addition sensitivity may be fine tuned at any time by simply clicking the or butt...

Страница 2: ...5FP 0 040 dia Fibers 60 mm 2 4 5 wire 2 m 6 5 cable R55FPQ 5 pin Euro style QD Visible Green 525 nm R55FPG 0 040 dia Fibers 28 mm 1 1 5 wire 2 m 6 5 cable R55FPGQ 5 pin Euro style QD Visible Blue 475 nm R55FPB 0 040 dia Fibers 28 mm 1 1 5 wire 2 m 6 5 cable R55FPBQ 5 pin Euro style QD Visible White 450 650 nm R55FPW 0 040 dia Fibers 28 mm 1 1 5 wire 2 m 6 5 cable R55FPWQ 5 pin Euro style QD Model ...

Страница 3: ...embly 2 If not already done separate bifurcated fibers by approximately 2 from the control ends 3 Slide the fiber clip to the open position A 4 Insert the fiber ends into each port and push them in as far as they will go B 5 Slide the fiber clip back into place locking the fibers into position C Fiber Optic Mounting Considerations Mount the sensing end of the fiber optic assembly so that the light...

Страница 4: ... the sensor is in RUN mode by clicking the and buttons Each click translates to 1 2 segment on the signal strength light bar For best sensing reliability the light and dark conditions should register equally distant from the switch point on the signal strength light bar Single Point TEACH The R55F sensor also may be taught a single specific target using an alternate Static TEACH procedure The sens...

Страница 5: ...ss and hold STATIC button until LO and DO indicators alternately flash then release button SETUP DO LO OFF Delay Switch Point DYNAMIC STATIC Press and Hold 2 seconds LO and DO Alternately flash green ON amber indicating ready to teach output ON condition Light Bar Goes OFF TEACH Condition to be Sensed Output ON state Present the output ON sensing condition and double click STATIC button SETUP DO L...

Страница 6: ...AMIC button while sampling light and dark sensing conditions SETUP DO LO OFF Delay Switch Point DYNAMIC STATIC Continue to Depress While Sensor Samples Light and Dark Conditions LO and DO Alternately flash green OFF Light Bar Remains OFF Release the DYNAMIC button when finished sampling light and dark sensing conditions SETUP DO LO OFF Delay Switch Point DYNAMIC STATIC Release Contrast accepted on...

Страница 7: ...tons until the signal strength light bar turns OFF 2 Click EITHER push button to toggle through the six possible settings indicated as follows SETUP DO LO OFF Delay Switch Point DYNAMIC STATIC Press and Hold Both Push Buttons Figure 3 SETUP mode Output Configuration Delay Indicator LO Indicator DO Indicator Light operate with no delay OFF ON OFF Light operate with 20 ms delay Flashing ON OFF Light...

Страница 8: ...acceptably low contrast and returns to re teach the Output ON condition Step 1 Remote Static Single Point TEACH The single point TEACH may also be performed using the remote wire Present the target and single click the remote wire Wait for at least 0 8 second then double click the remote wire If the TEACH is successful the sensor will flash the middle two LEDs of the bar graph and return to RUN mo...

Страница 9: ... buttons 0 8 sec Two pulses to Enter SETUP Sequential pulses to toggle between configuration choices T T T T etc 0 8 sec T T 0 8 sec Figure 8 SETUP mode T Pulse four times to enable or disable push button T T T T T T Figure 9 Push button lockout R55F Series Sensor Dimensions SETUP DO LO OFF Delay Switch Point DYNAMIC STATIC SETUP DO LO OFF Delay Switch Point DYNAMIC STATIC 35 0 mm 1 40 11 6 mm 0 4...

Страница 10: ...MA 6 Connections Power 2 m or 9 m PVC jacketed 5 conductor cable or 5 pin Euro style quick disconnect QD connector Fibers Fiber clip no tool required Operating Conditions Temperature 10 to 55 C 14 to 131 F Maximum Relative Humidity 90 at 50 C non condensing Application Notes Do not mount the fiber tip directly perpendicular to shiny surfaces position it at approximately a 15 angle in relation to t...

Страница 11: ... 5 mm 0 10 10 0 mm 0 40 7 5 mm 0 30 20 0 mm 0 79 35 0 mm 1 38 40 0 mm 1 58 3 5 mm 0 14 4x R2 5 0 10 4x 5 0 mm 0 20 29 5 mm 1 16 15 0 mm 0 59 7 2 mm 0 28 6 0 mm 0 24 35 0 mm 1 40 50 8 mm 2 00 65 0 mm 2 56 64 0 mm 2 52 50 8 mm 2 00 30 4 mm 1 20 Quick Disconnect QD Cables 5 Pin Euro MQDC1 506 MQDC1 515 MQDC1 530 MQDC1 506RA MQDC1 515RA MQDC1 530RA 2 m 6 5 5 m 15 9 m 30 2 m 6 5 5 m 15 9 m 30 Style Mod...

Страница 12: ...uitry necessary to allow their use in personnel safety applications A sensor failure or malfunction can cause either an energized or de energized sensor output condition Consult your current Banner Safety Products catalog for safety products which meet OSHA ANSI and IEC standards for personnel protection Euro Style Field Wireable Connectors Contacts Gold plated 4 pin models rated 250V ac dc max 4 ...

Отзывы: