background image

u

Do not connect the laminator to electrical power or attempt to operate it until you have read
these instructions completely.  Keep these instructions in a convenient location for future
reference.

u

Read all safety messages located in this instruction manual and on the laminator very care-
fully.

u

Always replace safety shield before operating your laminator.  If you service this
machine yourself, ensure that the safety shield is returned to the operating position
when service is completed.  Do this to protect all operators.  Operators may be
harmed if you do not follow this instruction.

u

Use caution and have someone help you when removing the feed table. The feed table
weighs approximately 15 pounds and removing it exposes hot and moving parts.   When the
table is  in the proper position the risk of injury to the operator is reduced.

u

Do not operate this laminator without all detachable units correctly installed.  There is risk of
injury if this product is operated without all of its parts in their proper positions.

u

Keep hands and clothing away from rollers.  The rollers are pinch points that can trap
body parts or clothing and cause serious injury.

u

Do not touch the RollerShoes™ or front rollers while the laminator heater power is on.  Turn
rollers and RollerShoes™ off and allow to cool completely before touching.

u

Do not use the laminator for other than its intended purpose.

u

Only operate this machine if you have been properly trained and authorized to do so.  Contact
the manufacturer for training information at 909-296-9780.

III. Electrical Safeguards...

u

Never override or attempt to defeat electrical or mechanical safety interlock  devices.

u

Disconnect power  supply before servicing your laminator.  This laminator uses 

double

 pole/neutral fusing

.

u

A readily accessible disconnect device should be incorporated in the fixed  wiring.

u

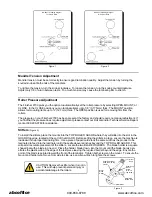
The machine has been manufactured without a plug on the power cord.  This
unit must be connected directly to a power main.  Connection to the main should be accom-
plished by an experienced electrician.  Care must be exercised to properly identify the neutral
wire in the power cord.  The neutral power cord wire is color coded blue.  The neutral of the
power main should be identified using a suitable voltmeter.

u

The laminator should only be operated from the type of power source indicated in these
OPERATING INSTRUCTIONS and on the serial label located on the rear panel of the unit.

u

Do not leave the laminator power on for extended periods while not in use.  Open the panel
breaker at the end of the day as a precaution against a possible fire hazard.

II. For your Safety...

3

abcoffice

800-658-8788

www.abcoffice.com

Содержание BA-FS27

Страница 1: ...OPERATING INSTRUCTIONS FINISHER 2700 Model No BA FS27 Banner American Products Inc abcoffice 800 658 8788 www abcoffice com ...

Страница 2: ...Film 5 Mandrel Tension Adjustment 6 Roller Pressure Adjustment 6 Slitters 6 VI Thermal Laminating 7 VII Pressure Sensitive Laminating 7 8 VIII Coating Mount Board 8 IX Mounting Laminating 8 9 X Maintenance Service 9 10 Cleaning Rubber Rollers 9 Cleaning RollerShoes 10 Removing Wrap arounds 10 XI Trouble shooting 10 11 XII Laminating Mounting Do s Don ts 11 XIII Warranty Return Policy 12 abcoffice ...

Страница 3: ...ergency Stop Button Feed Table Lower Idler Bar Right Control Panel see below Left Control Panel see below Motor HEATED ROLLERS MOTOR CONTROL FANS LEFT CONTROL PANEL RIGHT CONTROL PANEL TEMPERATURE CONTROL TOP HEAT SHOE TOP HEAT LCD DISPLAY FOR BOTTOM HEAT SHOE BOTTOM HEAT I Get to Know Your Laminator 1 1 0 1 0 1 0 1 0 1 0 LCD DISPLAY FOR abcoffice 800 658 8788 www abcoffice com ...

Страница 4: ...wo positions for mounting 3 16 and 1 2 The rear pressure adjustment handle has one mount position for both board thicknesses From the CLOSE position turn the handle clockwise To Close the Rollers Pull out the pin and turn the handle counter clockwise until it will not turn any farther and the pin locks into place Front Rear to OPEN turn clockwise to CLOSE turn counter clockwise MOUNT 3 16 1 2 PIN ...

Страница 5: ...eater power is on Turn rollers and RollerShoes off and allow to cool completely before touching u Do not use the laminator for other than its intended purpose u Only operate this machine if you have been properly trained and authorized to do so Contact the manufacturer for training information at 909 296 9780 III Electrical Safeguards u Never override or attempt to defeat electrical or mechanical ...

Страница 6: ... ping damage Damage should be brought immediately to the attention of the delivering carrier Appropriate Location Your Finisher 2700 must be placed in a clean well lit area with ample space on all four sides of the laminator If you are using the stand designed expressly for the Finisher 2700 make sure all four wheels of the laminator are locked and resting squarely on the floor to prevent movement...

Страница 7: ...gures 1 2 1 Feed the film from the top roll behind the upper idler roller rod and drape over both RollerShoes Be sure that the shiny side of the film is against the shoes 2 To thread the lower roll first remove the two red knobs on each side of the idler slide mechanism Slide the idler roller rod toward you 3 Feed the film from the bottom roll under and behind the lower idler roller rod Push the i...

Страница 8: ...ot in the GUARD top edge located at the end of the GUARD Before setting the slitters in place ensure the machine is loaded with the proper laminating film Use a piece of paper card stock the same width as the product to be laminated to feed into the laminator until it has exited several inches beyond the TOP ROLLER GUARD This will permit accurate placement of the slitters Locate the two BLADE HOLD...

Страница 9: ... and run another test Repeat this step until you obtain desired results 7 Feed the print to be laminated slowly and evenly into the laminator smoothing it as the rollers pull it through 8 You may laminate subsequent prints now leaving ample space between prints for trimming 9 Once your last print has completely exited the laminator turn the MOTOR CONTROL AND FAN switches OFF and use the trimmer on...

Страница 10: ...ating tempera ture is reached 5 Set the temperature to approximately 200 F depending upon the type of adhesive used The Finisher 2700 will take approximately 10 minutes to reach operating temperature The roller and shoe temperatures are indicated on the LCD displays on the control panel 6 Feed the uncoated mount board into the laminator behind a leader board The leader board will prevent the compr...

Страница 11: ...nd FAN switches OFF and use the trimmer on the rear of the laminator to remove the mounted and laminated prints X Maintenance Service Always use caution when servicing your laminator Precautions Disconnect the power supply and open the panel breaker be fore attempting to service or repair the laminator Any maintenance or service should be performed only by those having appropriate technical traini...

Страница 12: ...se a film wrap around especially when using thin film gauges Follow the procedure below to remove wrap arounds 1 Turn the HEATED ROLLERS and the TOP BOTTOM HEAT switches OFF Allow the laminator to cool 2 Cut the film where it comes off the top and bottom supply rolls 3 Select the OPEN position on the right side of your laminator and pull the film out of the unit that has become wrapped around the ...

Страница 13: ...efore laminating valuable items Feed the print through slowly and evenly smoothing it as it is pulled into the laminator Operate the laminator with two rolls of the same width laminating film to avoid excessive adhesive transfer to the rollers If laminator is not in current use lower the heat setting or turn laminator off To avoid damaging the rollers the heated rollers should be turned off for mo...

Страница 14: ... does not cover damage to the machine that occurs as a result of misuse or improper handling or damage to prints Return Policy If your laminator is not operating properly first review the Operating Instructions and the troubleshooting guide If the malfunction cannot be corrected contact your local dealer for instructions Be sure to have your machine serial number and date of purchase handy If the ...

Отзывы: