manualshive.com logo in svg
background image

45

Complete connections

When you set the television up on its own,

simply connect the aerial and connect the

television to the mains.

However, if you are going to connect

speakers, an audio system or any other

equipment to the television, do not connect it

to the mains yet!

When connections are complete and the

cables have been secured as described on this

page, switch on the mains switch on the front

of the television. A tiny, red light appears

above the screen. The system is in standby

mode and ready to be used. If your television

is set up on its own, you can now tune in

programs as explained in the chapter ‘First-

time setup of your television’ on page 30.

For further information about how to connect

equipment to your television, refer to the

chapter ‘The socket panel’ on page 46.
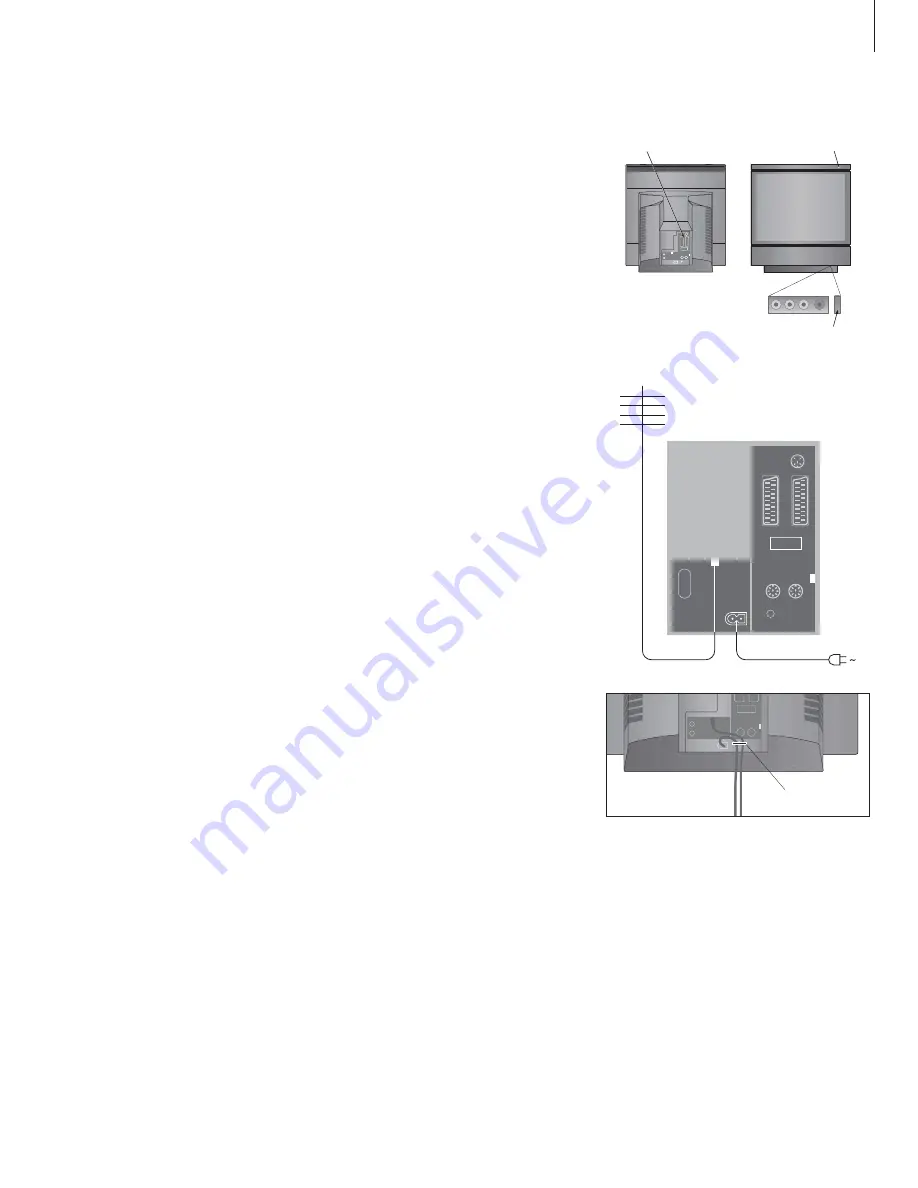
Aerial connection

Using an aerial cable, connect your external

aerial (or a cable TV network) to the socket

marked TV on the television’s rear socket

panel.

If your television is equipped with the built-in

system modulator, you will notice that the TV

socket shown in the illustration is occupied, and

that there is a second, unoccupied TV socket

located just below a socket marked LINK. Connect

your external TV aerial to this TV socket instead.

Mains connection

Using the mains cable supplied, connect one

end to the socket marked ~ on the rear of the

television, then plug the other end into a wall

socket.

Your television was designed to be left in

standby mode when not in use. Therefore, to

facilitate remote control operation, it is

essential that you leave the mains switch on

(indicated by the red standby light on the

front).

The supplied mains lead and plug are specially

designed for the television, and should be

handled with care. Avoid bending, twisting or

subjecting the cables to pressure or impact. If

you change the plug or in any way damage

the mains lead, it will affect the TV picture

adversely! 

IMPORTANT! You must fasten the mains cable and

the external aerial cable to the television using the

cable band (A). If this is not done, the lead can be

tugged free of the socket.

A

Socket panel

Standby indicator

Mains switch 

BeoVision MX 4200

Содержание BeoVision MX 4200

Страница 1: ...BeoVision MX 4200 Guide...

Страница 2: ...n retailer to deliver install and set up your product However the information required to install and set up the product is included in the Guide and on the CD rom This might be useful if you move you...

Страница 3: ...ut using your television beyond daily use such as how to operate timed play and timed standby functions the pincode system and a connected BeoCord V 8000 video tape recorder Tuning and preference sett...

Страница 4: ...elect programs or teletext pages or enter data in on screen menus Enter information in on screen menus Press ss or tt while e g TV is on to select a program Group you have created Accept and store ins...

Страница 5: ...V MENU ss tt GO EXIT Displayed information and menus Information about the selected source is shown at the top of the screen On screen menus allow you to adjust settings PROGRAM GROUPS TUNING TIMER RE...

Страница 6: ...6...

Страница 7: ...nced operations on page 17 Watch TV 8 Select a TV program Bring up a TV list Adjust the picture format Turn the television Adjust sound 10 Adjust or mute the sound Change sound type or language Change...

Страница 8: ...andby Pressing 0 swaps between the current and previous TV programs Bring up a TV list All your TV programs appear on a list which you can bring up on the screen The list contains program numbers and...

Страница 9: ...called up It provides you with an overview of all your available TV programs NEWS DR2 TV2 EUROSPRT ZDF RTL7 BBC CNN group select GO Group list TV programs selected for a Group also appear in the progr...

Страница 10: ...mute the sound Press either end of the button to bring the sound back Prolonged listening at high volume can cause hearing damages Change sound type or language The names of the various types of soun...

Страница 11: ...are active Press repeatedly to display SPEAKER on Beo4 Press to adjust the balance between the left and right speakers Press to select a speaker combination Press to remove SPEAKER from the Beo4 displ...

Страница 12: ...g up a program list Press or to find a desired program Press GO to switch to another teletext service To stop subpages from turning Press STOP to stop subpages from turning or move the cursor to HALT...

Страница 13: ...and press GO Press EXIT to leave teletext If you would like available teletext subtitles to appear automatically for a particular program store the teletext subtitles page as MEMO page 9 To delete a...

Страница 14: ...Group Step up or down through the programs in that particular Group Use the number buttons to enter the number of the program you want to see Move left or right to switch to another Group and press GO...

Страница 15: ...Groups refer to the chapter Set top box operation on page 22 Press TV to switch on the television Press MENU to bring up the TV SETUP menu PROGRAM GROUPS is already highlighted Press GO to bring up th...

Страница 16: ...16...

Страница 17: ...pincode system 20 Activate the pincode system Change or delete your pincode Use your pincode If you have forgotten your pincode Set top box operation 22 Set top Box Controller menu Universal Beo4 ope...

Страница 18: ...d Press GO to bring up the TIMER ON OFF menu Press ss or tt to reveal ON Press GO to store the setting For further information about how to switch the Play Timer on or off for a connected Bang Olufsen...

Страница 19: ...s Select TIMER INDEX from the TIMER SETUP menu to bring up your list of Timer settings The first Timer setting in the list is already highlighted Press or to move the cursor to a Timer setting you wis...

Страница 20: ...the last digit is found Re enter your code to confirm it and press GO again If the two codes are not identical the input fields are cleared and you must enter the code again To change or delete your...

Страница 21: ...e If you have forgotten your pincode Contact a Bang Olufsen retailer to receive a five digit Master Code When the television prompts you for your pincode press and hold ss to bring up the MASTERCODE m...

Страница 22: ...ram Groups on page 14 Set top box operation Set top Box Controller menu Some of the buttons on your set top box remote control are not immediately available on Beo4 To find out which Beo4 buttons acti...

Страница 23: ...es or step in program lists Exits menus or returns to a previous menu Exits menus enters or exits different modes such as radio Use the coloured buttons as indicated in the menus of your set top box W...

Страница 24: ...1 STB NEWS edit move accept GO 0315 A STB NEWS character next accept GO BBC1 NEW STB NEWS accept GO NEW STB NEWS accept GO 0100 STB NEWS number next accept GO PROGRAM GROUPS TIMER RECORDING PLAY TIMER...

Страница 25: ...P menu PROGRAM GROUPS is highlighted already Press GO to bring up the PROGRAM GROUPS menu Press the green button to name your Group and follow the instructions shown below on the menu or for character...

Страница 26: ...a third time to rewind or fast forward through the tape or press and hold ss or tt for 2 seconds to rewind or fast forward through the tape Press GO to start or resume playback Press or to step forwa...

Страница 27: ...or setting a timed recording START TIME is highlighted Use the number buttons or ss or tt to enter information for your timed recording stop time date different program number if necessary and activat...

Страница 28: ...28...

Страница 29: ...page 43 First time setup of your television 30 Select menu language Store all programs and settings Register extra equipment before auto tuning Determine the centre position Edit tuned TV programs 32...

Страница 30: ...itch on the television The language menu appears Press or to move between the displayed languages if necessary Press GO to store your choice Select menu language The first time you switch on your tele...

Страница 31: ...cles preventing the television from turning and press GO to start adjustment again Once adjustment is complete the text ADJUSTMENT OK appears followed by the STAND POSITIONS menu To store a stand posi...

Страница 32: ...ck into the list If it changes places with another program this program is moved out of the list and can be placed elsewhere When you have moved the relevant programs press to back up through all menu...

Страница 33: ...ters in the name you choose If necessary repeat the procedure and name other programs When you have named the relevant programs press GO to accept your edited list or press EXIT to exit all menus Name...

Страница 34: ...hen you have deleted the relevant programs press EXIT to exit all menus Delete tuned programs Once the automatic tuning of programs is completed you can delete your unwanted tuned TV programs EDIT TV...

Страница 35: ...ing up the extra TV MANUAL TUNING menu move to EXTRA and press GO Now fine tune if relevant or select type of sound decoder input and TV system if relevant When you have finished editing press GO to a...

Страница 36: ...O to bring up the AUTO TUNING menu Press tt to start auto tuning Once auto tuning is completed the EDIT PROGRAMS menu appears You can then rearrange the program order delete programs or rename them Re...

Страница 37: ...rs You can then rearrange the program order delete programs or rename them The cursor highlights the first new program of those just added to the list Add new TV programs You can add a new program or...

Страница 38: ...nu To store a stand position for when you switch the television on press ss or tt to turn the television and place it according to your viewing position To store a stand position for when the televisi...

Страница 39: ...CLOCK menu Press ss or tt to see your choices for each item Press or to move through menu items It is only necessary to enter the time manually if SYNCHRONISE is set to NO Press GO to store your cloc...

Страница 40: ...IONS menu and press to highlight PICTURE Press GO to bring up the PICTURE menu BRIGHTNESS is already highlighted Press ss or tt to adjust BRIGHTNESS Press or to move through menu items Press ss or tt...

Страница 41: ...t Press ss or tt to adjust the values or choose a setting Press or to move through menu items Press EXIT to store your settings until you switch off the television Press GO to store your settings perm...

Страница 42: ...u Use and to move to your language choice Press GO to make your choice Press to back up through previous menus or press EXIT to exit all menus directly Select on screen menu language You can select th...

Страница 43: ...your television Guidelines are included on the next page Connect the cables and additional equipment as described on the following pages Set up your television 44 Place your television in your home Co...

Страница 44: ...n Leave such operations to qualified service personnel Always place your television on a firm and stable surface If placed on a soft heavy carpet it must be duly protected against overturning If your...

Страница 45: ...uipped with the built in system modulator you will notice that the TV socket shown in the illustration is occupied and that there is a second unoccupied TV socket located just below a socket marked LI...

Страница 46: ...coder The socket may be used for an AV 2 Expander instead which gives the opportunity to connect a decoder or other non Bang Olufsen video equipment at the same time STAND For connection of a motorise...

Страница 47: ...that no streaks or traces of the cleaning fluid are left on the screen Cleaning the Beo4 Wipe the Beo4 remote control with a soft lint free firmly wrung cloth Changing the Beo4 batteries When BATTERY...

Страница 48: ...deotape The close up socket panel Switch the mains on or off If you wish to switch off the television completely you can do it by pressing the mains switch next to the close up socket panel on the rig...

Страница 49: ...ct the Camcorder and switch the television on When you start playback on your Camcorder the television automatically registers the signal and you can see the pictures from the Camcorder on the screen...

Страница 50: ...and socket panel 48 Connect the television 45 Connect speakers 46 Decoder CD rom p 3 Extra video equipment 46 CD rom p 3 Headphones 48 Link connections CD rom p 11 Link systems throughout your home CD...

Страница 51: ...p 22 Subtitles Subtitles from teletext 13 Teletext Activate subtitles from teletext 13 Basic teletext functions 12 Store favourite teletext pages 13 Timed recording via teletext 26 Timer Make your tel...

Страница 52: ...52...

Страница 53: ...53...

Страница 54: ...rive to make our products easy and comfortable to operate Therefore we hope that you will take the time to tell us about your experiences with your Bang Olufsen product Anything which you consider imp...

Страница 55: ...This product fulfils the conditions stated in the EEU directives 89 336 and 73 23...

Страница 56: ...www bang olufsen com...

Отзывы: