B&K Reference 30 Скачать руководство пользователя страница 70

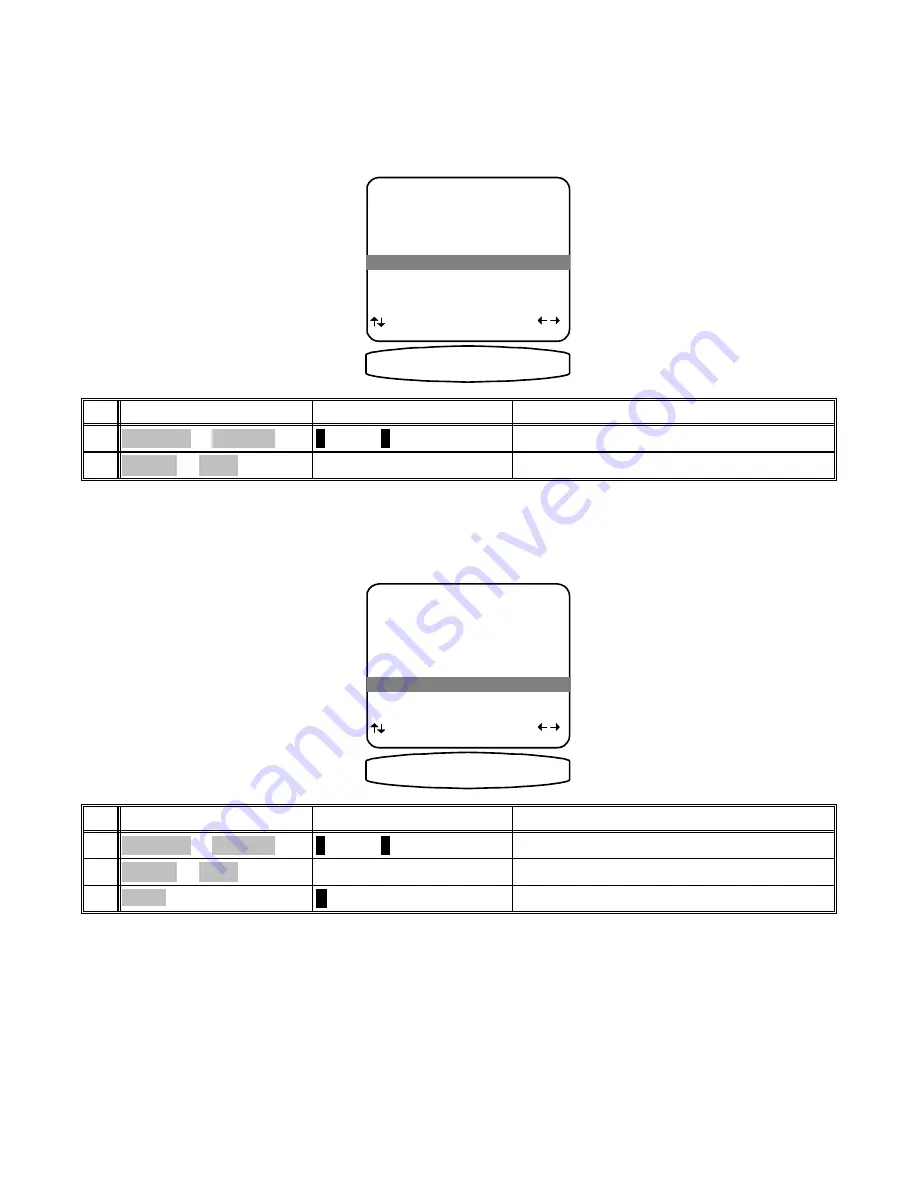
Link Zone 2 (B) input to Zone 1 (A) input selection - Zone 2 (B) input source selection may be linked with Zone
1 (A) source selections. In operation, whenever a source selection is detected (remote, front panel or RS-232) on
Zone 1 (A), source linkage will cause the source to be selected on both zones. Independent source selection is
still available with Zone 2 (B) remote control, but any Zone 1 (A) source selection supersedes the previous Zone 2
(B) selection.

  ADVANCED ZONE B SETTINGS
1  Level Control              Variable
2  Fixed Level                  +15 dB
3  Zone ID                             2
4  V2 Output                       Tape
5  Link Input  to Zone A        No
6  Link Power to Zone A       No

     next item              adjust
         MENU advanced setup

5  Link Input  to Zone A        No

=% /,1. 65&

12

set to Yes or No

VOLUME KNOB

ˆ

(REW) or

‡

(FF)

2

move to Link Input to Zone A

 (UP) or 


(DOWN)

­

(PAUSE) or 


†

(STOP)

1

Action

From Front Panel

From Remote

Link Zone 2 (B) power to Zone 1 (A) power - Zone 2 (B) power On/Off may be linked to Zone 1 (A). In operation,
whenever power is set to On in Zone 1 (A) the power linkage feature will cause power to be set accordingly on
Zone 2 (B). Zone 2 (B) Independent power on/off is still operational with the Zone 2 (B) remote control, but any
Zone 1 (A) power command supersedes the previous Zone 2 (B) power on/off.

  ADVANCED ZONE B SETTINGS
1  Level Control              Variable
2  Fixed Level                  +15 dB
3  Zone ID                             2
4  V2 Output                       Tape
5  Link Input  to Zone A        No
6  Link Power to Zone A       No

     next item              adjust
         MENU advanced setup

6  Link Power to Zone A       No

=% /,1. 3:5

12

return to ADVANCED SYSTEM SETUP

 MENU

MENU

3

set to Yes or No

VOLUME KNOB

ˆ

(REW) or

‡

(FF)

2

move to Link Power to Zone A

 (UP) or 


(DOWN)

­

(PAUSE) or 


†

(STOP)

1

Action

From Front Panel

From Remote

67

p/n 12857 Rev. 0717A

Содержание Reference 30

Страница 1: ...B K Components Ltd Reference 30 A V System Controller Owner s Manual p n 12857 Rev 0717A...

Страница 2: ...Right Surround dB 5 Right Surr Back dB 6 Left Surr Back dB 7 Left Surround dB 8 Subwoofer dB next item adjust MENU setup speakers SETUP SPEAKER SIZE 1 Front 2 Center 3 Surround 4 Surround Back 5 Subw...

Страница 3: ...stments 48 Adjusting the Volume 47 AM FM Tuner 47 Choosing a source 46 Sleep 46 Power On Off 46 Operation 45 Memory Backup 43 Presets 39 Inputs 36 Display 33 Room Equalization 29 Crossovers LFE 28 Spe...

Страница 4: ...larged View 78 Returning Equipment 77 A V System Controller Specifications 76 Troubleshooting 75 Factory Reset 73 RS 232 Control Port 73 DSP Usage 71 Security Options 70 Setup Control Out 4 70 Setup C...

Страница 5: ...sound and coherent acoustics logos are trademarks of DTS Technology LLC All rights reserved Manufactured under license from Lucasfilm Ltd U S patent numbers 5 043 970 5 189 703 and or 5 222 059 Europe...

Страница 6: ...on its top cover The processor is equipped with raised feet to provide ventilation reduce acoustic feedback and provide protection against scratching the surface the unit is resting on We advise agai...

Страница 7: ...e optical inputs and one optical output Control Outputs four 12 VDC 50 mA outputs for turning on amplifiers and controlling external systems such as a projection screen or B K amplifier IR inputs outp...

Страница 8: ...dified using a process called compression to squeeze more information into limited space DTS squeezes 5 1 channels into the space normally required for two uncompressed channels while Dolby Digital sq...

Страница 9: ...hannel is often referred to as 5 1 channels Dolby Digital is a digital format only It must be delivered to your processor over a coaxial or optical digital cable As of the writing of this manual Dolby...

Страница 10: ...but your processor can produce sound in one mono to seven channels see Mode Operation Re Equalization restores the correct tonal balance for watching a movie soundtrack in a small home theater Timbre...

Страница 11: ...ocessor capable of decoding the surround formats described above Zone A zone is usually a room that has speakers installed in it Your processor includes a full preamp processor for Zone 1 A plus an ad...

Страница 12: ...modes Steps through the audio video sources Steps through the audio modes Enter exit menu system 3 Main power switch Removes all power to the processor Normal operation of the processor requires the...

Страница 13: ...how the input to the S PDIF digital receiver is 96kHz 24 bit data 96 24 or an analog input that is being sampled using 96kHz 24bits Finally there is an indicator to show processed audio is sourced fro...

Страница 14: ...from another room This input is typically used in place of an emitter attached to the front panel 6 RS 232 input Computer interface applications 7 Serial number The serial number of your unit is loca...

Страница 15: ...tors and external amplifiers 16 Zone 1 A outputs Variable level outputs to your video monitors 17 Optical Digital inputs Optical digital inputs are used to connect digital audio signals from your sour...

Страница 16: ...the length of the cable for each component s connection and describe how it should be routed or draw your routing scheme below your list You may want to label each cable with a name or number at both...

Страница 17: ...puts If connecting a cassette deck or other audio only recorder then omit the video connections LINE INPUTS Left audio input from VCR output Composite video input from VCR output S Video input from VC...

Страница 18: ...for the other TV DBS component source device using component video input IN 2 Attach one end of a video interconnect cable to the red component video output OUT on the processor then attach the other...

Страница 19: ...cally select between the connected PCM DTS bitstreams and the converted AC 3 RF Dolby Digital signal Other AC 3 RF to Dolby Digital decoders may not make this switch automatically Connect the laser di...

Страница 20: ...lifier input Connect to the Left Front power amplifier input Connect to the Right Front power amplifier input FRONT SUB CENTER Connect to Zone 1 A composite video monitor input Connect to the Surround...

Страница 21: ...ur speakers to your external amplifier s as shown below 18 p n 12857 Rev 0717A C FRONT LEFT L SURROUND LEFT SURROUND RIGHT FRONT RIGHT CENTER PLUS MINUS PLUS MINUS PLUS MINUS FRONT LEFT FRONT RIGHT R...

Страница 22: ...tc in Zone 2 B Control 3 Z1 Z2 On 12 VDC when Zone 1 A Zone 2 B or both zones are turned on Off 0 VDC when both zones are off Control 4 REMOTE It will repeat a received 38 kHz modulated IR signal The...

Страница 23: ...igital DVDs No this is required only for Dolby Digital laser discs Do I need an AC 3 RF demodulator B K DT 1 or equivalent to playback DTS laser discs No this is required only for Dolby Digital laser...

Страница 24: ...e inputs manually when you change sources This can normally be done via the monitor s or VCR s remote control or the supplied universal remote Some monitors or VCRs may require you to physically disco...

Страница 25: ...ENTER remote or front panel Some menu selections cause another menu to be activated Use the UP DOWN ARROWS to move to the desired menu line Pressing SEL or ENTER will activate the next menu NUMERIC KE...

Страница 26: ...e lost If you perform this setup correctly the processor will know that you have no center channel speaker and send this information to your front left and right speakers along with the normal front l...

Страница 27: ...Front Front Bass to SW Front Hi Pass to Front Small THX Subwoofer None Subwoofer Yes THX Subwoofer Ultra Front setting Set the size for your center C speaker SETUP SPEAKER SIZE 1 Front Small THX 2 Cen...

Страница 28: ...und Surround Bass to SW Surround Hi Pass to Surround Surround Bass to SW Surround Hi Pass to Surround Small THX Surround Bass is Surround Hi Pass to Front Surround Full to Front Surround Bass to SW Su...

Страница 29: ...f your home theater speaker system For example selecting the Front Large and Subwoofer Yes THX options bass from the front left and front right channels will go ONLY to the front left and front right...

Страница 30: ...directional cues available during the playback of movie or music Measure the distance in feet to your speakers and set each speaker location setting to this distance Your processor will electronically...

Страница 31: ...with out the aid of an SPL meter you may do it by ear and adjust each speaker for equal volume You may wish to go through the speakers several times to get a reasonable result Also note that the VOLUM...

Страница 32: ...PAUSE or STOP 3 activate SETUP CROSSOVERS LFE ENTER SEL or ENTER 2 move to Crossovers LFE UP or DOWN PAUSE or STOP 1 Action From Front Panel From Remote Set the high pass filters slope A crossover do...

Страница 33: ...you are in SETUP CROSSOVERS LFE and that your remote is in B K mode Moving to Peak Limiter and pressing SEL or ENTER activates a noise test tone which will aid in adjusting the level to the point at w...

Страница 34: ...ENU setup speakers 5 LFE Level 0 0 dB 9 adjust level to desired value VOLUME KNOB REW or FF 2 move to LFE Level UP or DOWN PAUSE or STOP 1 Action From Front Panel From Remote Set DTS LFE 1 channel mod...

Страница 35: ...ct subwoofer phase adjustment is the one which allows the loudest listening level SETUP CROSSOVERS LFE 1 Crossover 80 0 Hz THX 2 High Pass 12 0 dB THX 3 Low Pass 24 0 dB THX 4 Peak Limiter 0 0 dB 5 LF...

Страница 36: ...Test Tone 100 0 Hz Off Notch 100 0 Hz 0 0 dB Notch Width 97 6 102 4 Hz Bass 100 0 Hz 0 0 dB Treble 10 0 kHz 0 0 dB next item adjust MENU setup system 7 67 721 2 100 0 Hz activate SETUP EQUALIZATION EN...

Страница 37: ...other EQ settings and is engaged at all times regardless of the EQ selection SETUP ROOM EQUALIZATION Test Tone 100 0 Hz Off Notch 100 0 Hz 0 0 dB Notch Width 97 6 102 4 Hz Bass 100 0 Hz 0 0 dB Treble...

Страница 38: ...P ROOM EQUALIZATION Test Tone 100 0 Hz Off Notch 100 0 Hz 0 0 dB Notch Width 97 6 102 4 Hz Bass 100 0 Hz 0 0 dB Treble 10 0 kHz 0 0 dB next item adjust MENU setup system 127FK 100 0 Hz return to SETUP...

Страница 39: ...R 2 move to Displays UP or DOWN PAUSE or STOP 1 Action From Front Panel From Remote Set the intensity of the front panel display SETUP DISPLAYS 1 Front Panel Bright 2 Overlay Opaque Bright 3 Backround...

Страница 40: ...t between composite video and S VIDEO In MANUAL mode your processor will always send both composite video and S VIDEO to your Zone 1 A monitor When your processor first detects video on a selected sou...

Страница 41: ...itor However if you are viewing letterbox material on a 16 9 widescreen monitor this information will be cut off Selecting the 16 9 monitor aspect ratio will position the status display within the let...

Страница 42: ...rom Front Panel From Remote Select input SETUP DVD INPUT 1 Favorite Mode Surround 2 Favorite Speakers 7 3 Level 0 0 dB 4 Name DVD 5 Component Video 2 6 DVD Audio Input No next item adjust MENU setup s...

Страница 43: ...a different mode you can still change it during normal system operation SETUP DVD INPUT 1 Favorite Mode Surround 2 Favorite Speakers 7 3 Level 0 0 dB 4 Name DVD 5 Component Video 2 6 DVD Audio Input N...

Страница 44: ...s in volume as you change from one source to another This is for your convenience only and need not be performed unless you wish to You may use a SPL meter or your ear to adjust the levels Note that t...

Страница 45: ...diting ENTER SEL or ENTER 14 continue changing characters repeat 10 12 repeat 10 12 13 move to new character position VOLUME KNOB REW or FF 12 change blinking character UP or DOWN PAUSE or STOP 11 mov...

Страница 46: ...item adjust MENU setup system 9 9 12 6 DVD Audio Input No return to SETUP SYSTEM MENU MENU 20 continue for each input source repeat 1 16 repeat 1 16 19 select Yes or No for use with source VOLUME KNOB...

Страница 47: ...n then change before confirming the preset save You may wish to defeat this automatic naming so that any custom names that you have entered will not get erased each time you save a minor change to a p...

Страница 48: ...NU 1 Zone 1 Operation 2 Zone 2 Operation 3 Zone 1 Favorite Presets 4 Zone 2 Favorite Presets 5 System Setup 6 Memory Backup Restore next item SEL select MENU exit menu system 6 Memory Backup Restore M...

Страница 49: ...ur processor will be idle for extended periods of time or during periods of power line fluctuations Your processor will not lose its memory while the main power switch is off 3 6 7 BK Powering Up Plea...

Страница 50: ...E monitor TAPE will appear on Zone 1 A out SOURCE step quickly to TAPE TAPE press twice wait a few seconds while processor analyzes selected source select desired source or TUNER source will appear on...

Страница 51: ...pt in the SETUP SPEAKER LEVELS and SETUP Source INPUT menus TEMPORARY LEVEL ADJUSTMENTS Occasionally you may find that a you can t hear the dialog very well in a particular movie or a movie has too mu...

Страница 52: ...peakers with the needed corrections to volume and down mixing applied automatically 49 p n 12857 Rev 0717A Mono Select 0 Headphone Select 1 M SUB M SUB M SUB M SUB M SUB M Select 2 SUB M L SUB R L SUB...

Страница 53: ...n only be chosen for the input designated as the DVD Audio input in the setup menu While no DVD Audio input is assigned factory default the DVD Audio mode is inactive Special Considerations After sele...

Страница 54: ...is full range If you use small front speakers it is recommended that you turn down the volume before engaging LtRt mode Note while in LtRt the equalizer feature of your unit is not available and disa...

Страница 55: ...see EQUALIZATION EQ bypassed disabled fixed response fixed response fixed response 3 Theater bypassed disabled fixed response fixed response fixed response 2 Loudness bypassed disabled Bass and Trebl...

Страница 56: ...separate LFE 1 channel available on Dolby Digital and DTS material it has no effect on the reproduction of normal bass from the front center or surround channels Select DTS LFE MODE Music if your DTS...

Страница 57: ...nt best results during movies may be realized using the THX audio listening mode see AUDIO MODES THX ZONE Z Use the Z zone function via the remote control Your processor comes equipped with a fully in...

Страница 58: ...ode Surround Center 0 0 Spkrs 7 Rear 0 0 Eq 0 Off Sub 0 0 0 9 10 preset SEL confirm MENU cancel 9 recall preset ENTER SEL or ENTER 2 review settings for recall PRESET step favorite preset number or 10...

Страница 59: ...Sub 0 0 character adjust 0 9 10 recall SAVE preset MENU cancel 6285 9 return to main menu MENU MENU 4 adjust and or edit Zone 1 parameters as desired SOURCE MODE and or UP or DOWN select function VOLU...

Страница 60: ...e ZONE 2 B As with Zone 1 A operation you may also recall save presets and operate your processor s Zone 2 B via the menu system via the remote or from the front panel If using the remote be sure it i...

Страница 61: ...URCE and or UP or DOWN select function VOLUME KNOB adjust parameter source then B K VOLUME or VOLUME 3 activate ZONE 2 OPERATION ENTER SEL or ENTER 2 move to Zone 2 Operation UP or DOWN PAUSE or STOP...

Страница 62: ...matically added to the favorite preset list If using the remote be sure it is in B K mode and you are in the MAIN MENUS MAIN MENU 1 Zone 1 Operation 2 Zone 2 Operation 3 Zone 1 Favorite Presets 4 Zone...

Страница 63: ...m to get to a Dolby Digital or DTS 5 1 channel soundtrack If you ever need to call B K regarding a problem with your processor be sure to note the status display before calling DVD Surround 7 EQ Varia...

Страница 64: ...System Setup 6 Memory Backup Restore next item SEL select MENU exit menu system 5 System Setup SETUP SYSTEM 1 Speakers 2 Displays 3 Inputs 4 Presets 5 Advanced next item SEL select MENU main menu 5 Ad...

Страница 65: ...rom your remote includes a Product Code identifying the manufacturer and Zone product ID code from 1 to 16 The product ID code allows multiple B K products to be controlled from the same remote Your p...

Страница 66: ...DVD etc except when the current selection is V1 When V1 is selected as the source the Zone 1 A output is V1 and the V1 output is off This prevents feedback when the V1 inputs and outputs are connecte...

Страница 67: ...xed into the front speakers ADVANCED ZONE A SETTINGS 1 Max Level 15 dB 2 Zone ID 1 3 On Sreen Display Enabled 4 V1 Output Tape 5 Surround Modes Auto System will choose surround mode based on user inpu...

Страница 68: ...ont Panel From Remote Zone 2 B Max Fixed or Variable Level Z2 max level allows you to set a maximum volume level for Zone 2 B This is very useful if you are using speakers that can t handle the maximu...

Страница 69: ...desired value VOLUME KNOB REW or FF 2 move to Zone ID UP or DOWN PAUSE or STOP 1 Action From Front Panel From Remote Set V2 line output usage V2 output is normally set up as a tape loop The V2 and Zo...

Страница 70: ...F 2 move to Link Input to Zone A UP or DOWN PAUSE or STOP 1 Action From Front Panel From Remote Link Zone 2 B power to Zone 1 A power Zone 2 B power On Off may be linked to Zone 1 A In operation whene...

Страница 71: ...UP or DOWN PAUSE or STOP 5 activate Line 1 ENTER SEL or ENTER 4 move to Power On Line 1 UP or DOWN PAUSE or STOP 3 activate ADVANCED POWER ON TITLES ENTER SEL or ENTER 2 move to Power On Titles UP or...

Страница 72: ...TROL OUT SETTINGS MENU MENU 6 set control out 1 for other sources repeat 3 4 repeat 3 4 5 select desired control operation VOLUME KNOB REW or FF 4 move to desired source UP or DOWN PAUSE or STOP 3 act...

Страница 73: ...SAT Zone A B 8 Tape Zone A B next item adjust MENU control out setup 1 TUNER Zone A B 781 5 return to CONTROL OUT SETTINGS MENU MENU 6 set control out 3 for other sources repeat 3 4 repeat 3 4 5 sele...

Страница 74: ...er to SETUP Advanced Systems Settings will appear as line 6 in SETUP MENUS Make sure your processor is on and the remote is in B K mode ADVANCED SYSTEM SETUP 1 Zone 1 Setup A 2 Zone 2 Setup B 3 Power...

Страница 75: ...es DO NOT ALLOW FRONT PANEL OPERATION VOLUME KNOB REW or FF 2 move to Front Locked UP or DOWN PAUSE or STOP 1 Action From Front Panel From Remote IR Locked Locking the IR remote control will only allo...

Страница 76: ...on your processor For further information concerning RS 232 operation see BKC DIP for the computer interface protocol and the AVR307 and Reference 30 device specific appendix s RS 232 port setup ADVAN...

Страница 77: ...e RS 232 echo RS 232 PORT SETUP 1 Port Enable 2 Baud Rate 9600 3 Echo Enable 4 Update Enable 5 Receive ID 0 6 Transmit ID 0 next item SEL select MENU advanced setup 3 Echo Enable 2 1 select Enable or...

Страница 78: ...ect MENU advanced setup 6 Transmit ID 0 75 160 7 return to MAIN MENU MENU MENU 5 return to SYSTEM SETUP MENU MENU 4 return to ADVANCED SYSTEM SETUP MENU MENU 3 select desired transmit ID VOLUME KNOB R...

Страница 79: ...mode 4 Check speaker setup 5 Speakers phase wrong Surround sound does not sound correct 1 Check all connectors and repair as necessary 2 Check ground of outlet Have it checked by qualified serviceman...

Страница 80: ...Frequency Range 87 5 107 9 MHz Frequency Range AM section Tuner Specifications FM Section Tuner Specifications 6 12 or 24 dB Oct Low Pass Crossover Slope 6 or 12 dB Oct High Pass Crossover Slope Adju...

Страница 81: ...defect in material or workmanship of the unit during the terms of this warranty or thereafter Some States do not allow the exclusion or limitation of incidental or consequential damages and the forego...

Страница 82: ...REAR PANEL ENLARGED VIEW 79 p n 12857 Rev 0717A...

Страница 83: ...el 2 Preset Names Auto When saving a preset system generates a name next item adjust MENU setup system MEMORY BACKUP AND RESTORE 1 Memory Operation Backup Save ALL memory settings in EEPROM SEL prefor...

Страница 84: ...B K Components Ltd 2100 Old Union Road Buffalo New York 14227 716 656 0023 www bkcomp com 81 p n 12857 Rev 0717A...

Отзывы: