background image

settings


cnd 


Page 38 


setup menu 


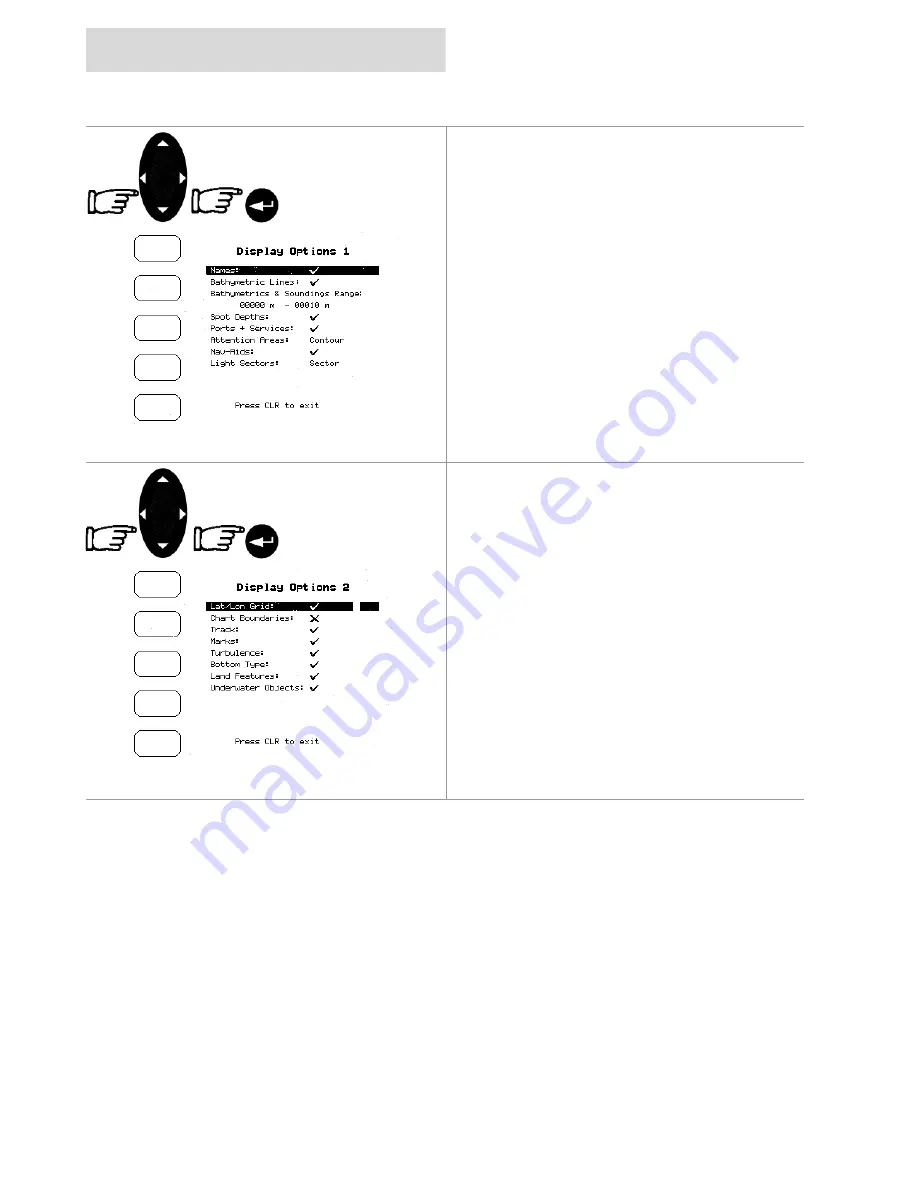
To set the Display Options 1 

Use the 

CURSOR

 keypad to select a sub menu 

or to change the value of a setti ng, and press 
the 

ENTER

 key to select. 

It should be noted that these Display Option 
settings are stored when the 

CND

 is turned off.


To set the Display Options 2 

Use the 

CURSOR

 keypad to select a sub menu 

or to change the value of a setti ng, and press 
the 

ENTER

 key to select. 

It should be noted that these Display Option 
settings are stored when the 

CND

 is turned off.


Содержание h1000 CND

Страница 1: ...MANUAL h1000 CND Chartplotter HB 1000C 02 English WARNING Use of solvent based or chemical cleaners on displays will result in damage and invalidate your warranty...

Страница 2: ...ronic chart display Features The Central Navigation Display CND is a fully functioned colour Chart Plotter which can be used either as a stand alone system or integrated into an instrument system Dayl...

Страница 3: ...will not occur in a particular installation If this equipment does cause harmful interference the user is encouraged to try to correct the interference by relocating the equipment or connecting the e...

Страница 4: ...bearing 10 Steer 10 Deleting a Destination 10 Navigating on a route 11 Adding a Waypoint 11 Creating a route 11 Deleting a waypoint 11 Moving Waypoint 12 Inserting a Waypoint 12 Editing Waypoints 13 F...

Страница 5: ...ng a Waypoint from the list 32 Viewing Waypoint Marks in a Route list 32 Finding a Waypoint Mark on the chart 33 Marks 34 Adding a Mark 34 Converting a MARK to a Waypoint 34 Deleting a Mark 34 Man Ove...

Страница 6: ...menu 42 Memory Menu 42 Saving a File 42 User C CARD menu 43 Loading a File 43 Deleting a File 43 Sort the User C CARD Directory 43 Reading the User C CARD 43 Selecting slot 43 Formatting User C CARD 4...

Страница 7: ...etails of a smaller area by changing the chart scale and zooming in on your display Press the ZOOM key to change the scale and display a wider view The CURSOR keypad moves the cursor about on the disp...

Страница 8: ...page is displayed reminding you that the chart plotter is only an aid to navigation and should be used in conjunction with normal navigational practices Pressing any key will then display the cartogra...

Страница 9: ...then gently move it to the bottom position 2 to hold it in the slot 3 Removing the card Press the C CARD gently inward 1 and move it upwards 2 until you hear a click the C CARD will then eject out of...

Страница 10: ...the cursor on the Direct Target symbol and the Cursor information box will contain the Latitude Longitude the distance and the bearing from your boat s position Steer Pressing the STEER Softkey will d...

Страница 11: ...the Waypoint name and Latitude Longitude Note Waypoints may be added by uploading data from a PC refer to Page 27 Advanced Features Uploading waypoints from a PC Creating a route Repeat the Adding a W...

Страница 12: ...ing the Waypoint to the new position is shown To place the Waypoint in the new position press the ACCEPT Softkey Inserting a Waypoint Place the cursor on the route leg and press the INSERT Softkey The...

Страница 13: ...he characters then press the ACCEPT Softkey To change the Symbol use the CURSOR keypad to select the Icon and press the ENTER key If the Coordinates field is selected press the ENTER key and then use...

Страница 14: ...cial pop up window is displayed This feature called Quick Info identifies the symbol and displays the information about Nav Aids To expand information about that object press the EXPAND Softkey Pressi...

Страница 15: ...rt Information When viewing the chart of a port or harbour you will see a Port Info icon placing the cursor on the symbol will display the available information The Port Info symbol is visible only if...

Страница 16: ...vailable for all countries where such information exists on the paper chart You will also see accurately positioned symbols that show where many useful facilities are located Getting Tidal Information...

Страница 17: ...e graph dips below the horizontal line i e the times when you will be in danger of grounding Pressing the NEXT DAY or PREV DAY Softkeys displays future or past tides Pressing the SETDATE softkey and e...

Страница 18: ...ons list is shown of the available services Select the facility using the CURSOR keypad and then press the ENTER key Displayed is a list of ports nearest up to 10 in which this facility is present Cho...

Страница 19: ...y to display a list of all ports stored on the C CARD Use the CURSOR keypad to select the port and the ZOOM key to select next previous page Pressing the FIND Softkey to locate the selected port on th...

Страница 20: ...e is displayed Repeat the operation to refine the search or move through the list with the CURSOR keypad Pressing the FIND Softkey locates the selected port on the chart Note A Warning message is show...

Страница 21: ...The find will be from the cursor position if the fix position is not suitable Using the CURSOR keypad select Tide Stations and press the START Softkey to display a list of nearest Tide Stations up to...

Страница 22: ...the other instruments on your system Using the information available various other parameters can be calculated and displayed Press the PAGE key to enter the Data Pages Speed Depth The Speed and Dept...

Страница 23: ...s are divided into three pages accessed by repeatedly pressing the NAV Softkey To scroll between pages press the NAV Softkey Wind The Wind displays are divided into three pages accessed by repeatedly...

Страница 24: ...getting started cnd Page 24 data pages Multi Function The Multifunction displays are divided into two pages accessed by repeatedly pressing the MULTI Softkey...

Страница 25: ...cnd getting started Page 25 data pages Data Logs The Data Logging pages are divided into four pages accessed by repeatedly pressing the DATA LOGS Softkey...

Страница 26: ...satellites currently in view with their identification numbers These numbers correspond to the bar graph Where a satellite is blacked it is being used by the CND for positional information The data bo...

Страница 27: ...ONS Softkey displays the Road Page Options Pressing the XTE Softkey displays the XTE Page XTE Page The XTE Cross Track Error page displays the distance from the current position to the closest positio...

Страница 28: ...D can store up to 10 individual routes only one can be selected as the current route Only the currently selected route can be navigated to or edited Press the SETUP key Selecting a route Using the CUR...

Страница 29: ...elect window use the CURSOR keypad to select the colour press the ACCEPT Softkey to confirm The route appears on the screen in the selected colour You can select a different colour for each route Reve...

Страница 30: ...he up and down CURSOR keypad to select another page Press the CLR key to exit from Route Data Report page Changing Speed Fuel values In the Route Report screen pressing the SPEED Softkey displays the...

Страница 31: ...the Waypoints Marks in the route and the fuel required Route Report from the chart Place the cursor on an existing Waypoint or route leg and press the REPORT Softkey to display the same Route Data Rep...

Страница 32: ...en press the DELETE Softkey OR When the delete box appears press the ENTER key to Delete Selected Point or using the CURSOR keypad to select Delete All Points then press the ENTER key Viewing Waypoint...

Страница 33: ...return to the Route page Finding a Waypoint Mark on the chart Press the FIND Softkey Select Find User Point and press ENTER A window appears to insert the Name by using the CURSOR keypad Press the AC...

Страница 34: ...ftkey a window to confirm the conversion is displayed Deleting a Mark Place the cursor on an existing Mark press the DELETE Softkey a window to confirm the deletion is displayed Man Over Board Press a...

Страница 35: ...d Anchor Drag Alarm Triggers when the boat exits from the anchor circle The radius is set in the Alarm Value HDOP Alarm This specifies the minimum quality of satellite signal to receive an accurate po...

Страница 36: ...enu and press the ENTER key to select To set the Language Use the CURSOR keypad to select language and press ENTER to reveal the sub menu Highlight the desired language and then press the ENTER key To...

Страница 37: ...gs menu and press the ENTER key to confirm changes Selecting Chart Plotter settings Use the CURSOR keypad to scroll to the Chart Plotter Settings menu and press the ENTER key to select Use the CURSOR...

Страница 38: ...the ENTER key to select It should be noted that these Display Option settings are stored when the CND is turned off To set the Display Options 2 Use the CURSOR keypad to select a sub menu or to change...

Страница 39: ...actly on the chart where it should be From the Plotter Setup menu select Position Offset and press the ENTER key Manually adjust the offset by the amount required to place your boat accurately on the...

Страница 40: ...ey to toggle between on and off Note It is not possible to use the track storing if you are not receiving a valid fix Selecting Active Track Use the CURSOR keypad to scroll to Current Track and pressi...

Страница 41: ...ute which gives a total maximum Tracking period of over 11 hours The default setting is 10 sec Selecting Vector Vector feature displays a vector line protruding from the boat showing where the boat wi...

Страница 42: ...e Saving a File A window is opened to insert the file name and the type of data to save Choose the type of data to save by pressing the related Softkey Use the CURSOR keypad to choose the file name At...

Страница 43: ...er C CARD Directory The contents of the C CARD is displayed when you enter this mode It is possible to sort the file directory This is possible in three different modes select the SORT BY Softkey then...

Страница 44: ...CARD must be formatted before use This operation prepares the User C CARD to receive and store information Pressing the FORMAT Softkey will display a box to advise that all data will be lost Pressing...

Страница 45: ...ment Interface NMEA 0183 ver 2 3 Display mm inch LCD colour TFT transflective active area 142mm 5 6 Display Resolution 320 x 240 pixels Cartography C MAPNT Temperature range 10 60 degrees Celsius Memo...

Страница 46: ...appropriate caps Panel mounting Screw the bolts supplied into the fittings on the back of the CND A hole must be cut in the panel using the template supplied Fit the CND into the hole you have cut and...

Страница 47: ...XTE ZDA and ZTG Pin Colour Signal Red 1 12 Vdc Black 0 Vdc NMEA OUTPUT GND Blue NMEA OUTPUT Green NMEA INPUT White UNUSED Yellow NMEA INPUT Screen SCREEN Use cable Part No BGM 023006 With this connect...

Страница 48: ...e when your boat reaches this circle the alarm sounds The default setting is Off Arrival Time The estimated time of day you will reach your destination based on your current speed and track from GPS A...

Страница 49: ...sents the direction to follow Bottom Type Turns On Off the displaying of Bottom Type type colour and other qualities of seabed The default setting is On Buoy A floating object moored to the sea bottom...

Страница 50: ...rent temperatures and prevalent winds Date Format Sets your preferred date between MMMM DD YYYY month day year and DD MMMM YYYY day month year Datum The Latitude and Longitude lines printed on any map...

Страница 51: ...rt and the softkeys GPS Global Positioning System GPS is a satellite based navigation system operated by the US Department of Defence It gives the navigator a position 24 hours a day 365 days a year u...

Страница 52: ...screen labels menus and options information to be displayed This does not affect the map information The default setting is English Latitude The angular distance North or South of the equator measure...

Страница 53: ...orth upwards Track Up the map is shown with the boat s current heading upwards The default setting is North Up If Track Up is selected a window is opened to insert the Resolution angle Mark Reference...

Страница 54: ...de Selects whether areas not covered by the electronic charts on the C CARD can be viewed If set to On then the user can zoom in to view Marks routes tracks and boat s position anywhere in the world d...

Страница 55: ...f the available services is shown on the screen Position Correction Allows the user to correct for any position inaccuracy due to datum shifts or poor survey data This can sometimes occur in areas whe...

Страница 56: ...reen immediately adjacent to the keys Speed The current velocity at which you are travelling relative to a ground location Speed Units Sets the speed unit among Kts knots Mph miles per hour Kph kilome...

Страница 57: ...eturn to the previous menu Time Reference Sets UTC or Local Time The default setting is UTC Track A very useful feature of the CND is the ability to store and display exactly where the boat has been T...

Страница 58: ...makes up a route WGS 84 World Geodetic System 1984 Coordinate System or Datum developed by the Defence Mapping Agency DMA Zoom In Shows more detail in a smaller area Zoom Out Shows a wider but less d...

Страница 59: ...a and that the CND has been correctly wired If after 15 minutes the CND does not get a fix turn it Off and On again The chartplotter does not turn Off If after a PWR pressure for at least 3 seconds th...

Страница 60: ...shall not be responsible for any such costs including but not limited to 3 1 Boat slipping or lifting 3 2 Freight shipping charge 3 3 Engineer s travelling time and expenses 3 4 Installation labour co...

Страница 61: ...it is suitable for any particular use or 7 2 That it conforms to any particular quality standards 8 Transfer This Warranty is not transferable 9 Consequential Loss B G shall not be liable for any dama...

Отзывы: