


INSTALLATION INSTRUCTIONS
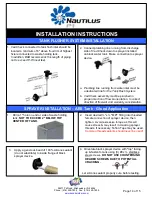
SPRAYER INSTALLATION
Rotational Molded Tank
– Spin Weld Application
1. Drill a 1" hole on end or side of waste holding
tank,
NOT TO EXCEED 2" BELOW TOP
CENTER OF TANK.
2. With a router that spins at over 20,000 rpm,
insert white/clear sprayer device into special
tool/chuck making sure it is well seated. Insert
sprayer into 1" hole in tank.
3. Spin with chuck drive & stop when plastic
begins to melt and hold for 5 seconds with light
pressure to ensure bond.
DO NOT USE SEALANT ON SPIN WELD
SPRAYER!
4. Insert desired ½" x ½" MPT fitting into threaded
female connection, then tighten. Avoid
excessive torque as this will cause stress & may
result in cracking sprayer threads. If necessary,
Teflon Tape may be used.
Common thread
sealants should never be used!
TESTING WATER SYSTEM
Follow RVIA Standards and Guidelines when pressure testing water distribution systems. Damage to the
Nautilus System as a result of not following RVIA Standard 7.7.2 (Water Distribution System Testing)
voids all warranty consideration!
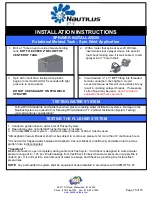
TESTING THE FLUSHER SYSTEM
1. Connect a garden hose to water inlet of Flusher System.
2. Open dump valve on tank that Flusher Sprayer is installed.
3. Turn water
ON
to test system
– minimum water pressure of 40 psi must be used.
*Atmospheric Vacuum Breaker shall not be subject to continuous pressure for more than 12 continuous hours.
*It is normal for trapped water between Atmospheric Vacuum Breaker (Vac/Check) and water inlet to exit as
garden hose is disconnected.
**Important**
Make sure faucet is open completely during entire tank flush cycle. Vac/Check is designed to work at water
pressure range of 8
– 125 psi. Water leakage from Vac/Check is likely when water pressure in supply line is
under 8 psi. It is normal for a small amount of water to escape Vac/Check as plumbing line for tank flush
pressurizes.
NOTE:
Any parts added to system shall be equivalent of and installed in accordance with IAPMO TSC 27.
58471 Fir Road, Mishawaka, IN 46544
Phone: (574) 259-7838 Fax: (574) 259-7939
www.bandbmolders.com
Page 15 of 15
INSTALLATION INSTRUCTIONS
Содержание Nautilus P1
Страница 1: ......


