


A351, A355
PNEUMATIC TOOL
www.BAND-IT-IDEX.com
Document # P35087 Rev. I
© Copyright
BAND-IT-IDEX, Inc. 2021
All rights reserved
Page 9 of 19
BAND-IT-IDEX, Inc.
A Unit of IDEX Corporation
4799 Dahlia Street
Denver, CO 80216-3070 USA
P: 1-800-525-0758
F: 1-800-624-3925
Operating
Manual
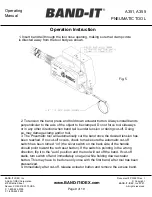
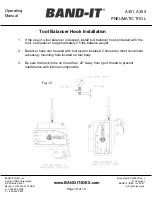
Operation Instruction
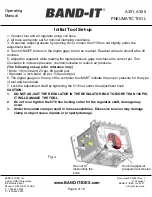
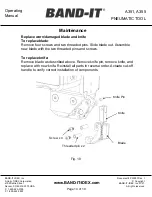
1. Insert band tail through the tool nose opening, making sure that clamp circle
is directed away from the tool body as shown.
2. To tension the band, press and hold down actuator button. Always install bands
perpendicular to the axis of the object to be clamped. Do not force tool sideways
or in any other direction when band tail is under tension or during cut-off. Doing
so, may damage clamp and/or tool.
3. The Pneumatic tool will automatically cut the band once the desired tension has
been reached. If no cut-off occurs, check to make sure the automatic cut-off
switch has been turned “on” (the silver switch on the back side of the handle
should point toward the red reset button). If the switch is pointing in the wrong
direction, flip it to the “auto” position and the tool will cut off the band. If cut-off
stalls, turn switch off and immediately on again while holding down actuator
button. This may have to be done only once with the first band, after tool has been
pressurized.
4. Immediately after cut-off, release actuator button and remove the excess band.
Fig. 5


