background image

11

FUEL AND FUEL VALVE OPERATION

Fuel filling

The capacity of the fuel tank is 1.4L (.40 qt .)  Unscrew the gas cap by turning it 

counter clockwise and carefully fill the tank with unleaded gasoline through the 

opening.  DO NOT MIX GAS AND OIL TOGETHER, THIS IS A 4-STROKE ENGINE. 

Replace the gas cap by carefully aligning the threads on the cap and the tank and 

turning the cap clock wise.  Wipe any spilled fuel from the dirt bike using a cloth 

and dispose of the cloth properly.  DO NOT SMOKE OR REFUEL THE VEHICLE 

NEAR OPEN FLAMES OR NEAR HEATING UNITS.  ONLY REFUEL THE VEHICLE 

IN OPEN AREAS TO REDUCE THE LIKELIHOOD OF THE BUILD UP OF GASOLINE 

FUMES. 

FUEL VALVE OPERATION

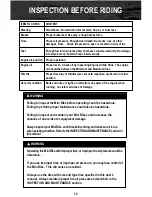
ON:  With the handle of the fuel valve to “ON” position, the fuel supply will flow to 

the carburetor.  In this position the engine is able to start and run.

OFF:  With the handle of the fuel valve to “OFF” position, the fuel supply is cut off 

to the carburetor.   In this position the mini bike will not start and will not run.

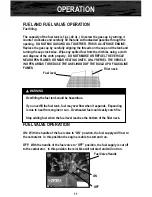
Fuel level

Filler neck


WARNING

Overfilling the fuel tank could be hazardous.

If you overfill the fuel tank, fuel may overflow when it expands.  Expanding 

is due to heat from engine or sun.  Overheated fuel could easily catch fire.

Stop adding fuel when the fuel level reaches the bottom of the filler neck.

OPERATION

OFF

ON

Fuel Valve Handle

Содержание DB30 Mini Bike

Страница 1: ...rnment acts and regulations pertaining to owning and operating an off road vehicle Minimum Age Requirement 16 Weight capacity 150 lbs Rev G 052108 DB30 Mini Bike Read this manual carefully It contains...

Страница 2: ...90 days Warranty is void if Frame is bent or broken due to abuse Wheels are bent or broken Fender bent or broken due to abuse Any sign of impact accident jumping spin outs or roll over BAJA INC is not...

Страница 3: ...read carefully before operating the vehicle All operators should obtain review and follow provincial and municipal government acts and regulations pertaining to owning and operating an off road vehicl...

Страница 4: ...AND STOPPING 13 INSPECTION AND MAINTENANCE 14 Checking Oil 14 Changing Oil 15 Check up of Spark Plug 15 Checking and cleaning Air Filter 16 Adjusting Throttle Cable 17 Adjusting Carburetor 17 Adjustme...

Страница 5: ...another user or owner All information illustrations photographs and specifications contained in this manual are based on the latest product information available at the time of publication Due to imp...

Страница 6: ...Driving at high speeds is the cause of many accidents do not drive at a speed that the actual situation does not permit safety ITEM TO CHECK CONTENT Steering Smoothness No restriction of movement No p...

Страница 7: ...the latest product information available at the time of publication Due to improvements or other changes there will be some discrepancies in this manual We reserve the right to make product changes a...

Страница 8: ...e shield Wear proper clothing when you ride The proper clothes can protect you from injury Wear a good pair of gloves strong boots that are over the ankle long pants and a long sleeve shirt WARNING Op...

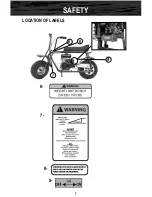
Страница 9: ...3 1 4 2 5 1 2 3 4 5 LOCATION OF LABELS safety...

Страница 10: ...SAFETY LOCATION OF LABELS 6 7 7 6 9 9 8 8...

Страница 11: ...Brake type Disc Capacity of gasoline tank 1 4L 0 36 gal Capacity of oil tank 0 45L 0 40 qt Starting method Recoil pull start Bore a stroke 52mm x 46mm PTO shaft rotation Counter clockwise Horsepower...

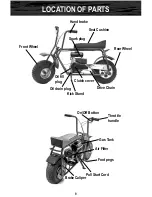
Страница 12: ...Air Filter Gas Tank Foot pegs Throttle handle On Off Button Brake Caliper Front Wheel Kick Stand Rear Wheel Seat Cushion Hand brake Clutch cover Drive Chain Spark plug Oil drain plug Oil fill plug LO...

Страница 13: ...ausing mini bike to move forward When the switch is turned to off position the engine will not start If the engine is running and the Off button is pushed the engine will turn off When the switch is t...

Страница 14: ...L THE VEHICLE IN OPEN AREAS TO REDUCE THE LIKELIHOOD OF THE BUILD UP OF GASOLINE FUMES FUEL VALVE OPERATION ON With the handle of the fuel valve to ON position the fuel supply will flow to the carbure...

Страница 15: ...the intended trip Fuel hose connected securely No damage to fuel tank or cap Fuel tank cap closed securely Engine stop switch Proper operation Engine oil Proper level Check oil by inspecting Engine Oi...

Страница 16: ...utton located on right hand grip Depress button until engine comes to a complete stop 3 Set fuel valve lever the fuel tank valve handle to OFF position CAUTION Unnecessarily increasing RPM s to a high...

Страница 17: ...e lubricating oil is an important factor affecting the performance and service life of the engine Please refer to the chart for the correct grade of engine oil based on the environmental conditions in...

Страница 18: ...fill the engine with the proper amount of oil and recheck the amount of oil in the engine by using the oil gauge plug Check up of Spark Plug 1 Remove the cap of spark plug and screw off the spark plug...

Страница 19: ...dirt resulting in a shorter service life of the engine Water should be prevented from entering into the filter when washing the vehicle The filter element shall be cleaned gently without twisting to p...

Страница 20: ...ne and check for the operating movement again Repeat the adjustment if necessary until the desired operating movement is obtained Adjusting the Carburetor Adjusting procedures of idling speed 1 Suppor...

Страница 21: ...adjustment turn rear adjusting bolt clockwise to loosen and counter clockwise to tighten brake tension 3 Brake pads should be replaced by a qualified service technician once brake shoes are worn 4 Br...

Страница 22: ...ent is needed loosen 4 bolts under engine 2 Move engine forward to tighten chain or backward to loosen chain 3 Tighten bolts under engine Torque bolts to 25 ft lbs 4 Repetitively check tension of chai...

Страница 23: ...ir blow through holes to remove any dust and or particles 4 Oil Clutch bearing with a few drops of 30W motor oil NOTE Make sure oil does not get inside clutch itself 5 Push mini bike forward without s...

Страница 24: ...by washing with clean water 2 After the cleaned vehicle is air dried grease the chain and run the engine at idling speed for a few minutes 3 Prior to driving carefully check the braking system repeate...

Страница 25: ...he carburetor maintains its normal performance after the storage 3 Take out the spark plug pour about 15 20ml 5 68 oz of clean engine oil into the cylinder step down on the kick lever repetitively sev...

Страница 26: ...d anti rust oil from the fuel tank followed by filling it with fresh gasoline therein 3 Prior to driving all the required check ups must be made It is better to drive it at a low speed in an open area...

Страница 27: ...Check X Engine Oil Change X X Air Filter Check X Air Filter Clean X X Air Filter Change X Carburetor Sediment cup Clean X Spark Plug Check Adjust X Spark Plug Replace X Idle Speed Check Adjust X Valve...

Страница 28: ...epair faulty components as necessary 1 Filter element s clogged Check air filter clean or replace 2 Choke lever may be not fully open Check choke lever 2 Bad fuel engine stored without treating or dra...

Страница 29: ...26 Engine Switch Transistor Magneto Ignition Coil Spark Plug B1 B1 ELECTRICAL SCHEMATIC...

Страница 30: ...d retain all receipts covering maintenance on your vehicle You may not be denied a warranty claim solely because of your failure to ensure the performance of all scheduled maintenance or lack of maint...

Страница 31: ...a replacement part is used and an authorized dealer determines it is defective or causes a failure of a warranted part your claim for repair to bring your vehicle into compliance with applicable stan...

Страница 32: ...istributor is not liable to any person for incidental consequential or special damages of any description whether arising out of express or implied warranty or any other contract negligence or other t...

Страница 33: ...Baja INC P O Box 61150 Phoenix AZ 85082 Tel 602 443 9180 Toll Free 888 863 BAJA 2252...

Отзывы: