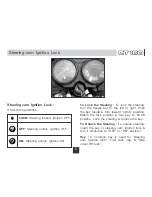
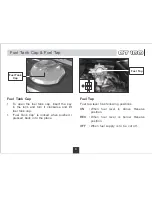
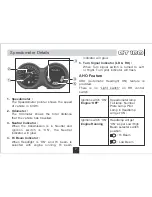
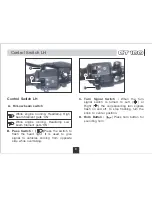
background image

Location  of  Parts

4

Silencer 

EVAP compatible

Fuel Tank

Brake Pedal 

Engine Oil Level

Window

Grab Handle 

Rear Shock 

absorber 

Kick Lever

Speedometer 

Tail Lamp

Brake Lever

Содержание CT 100

Страница 1: ...ise you to avail all these services at any of our Vehicle Dealers or Authorised Service Centers as per the schedule contained in this booklet Your CT 100 comes with a warranty of 2 Years or 30 000 Kms...

Страница 2: ...with the caution Warning This indicates that a potential hazard or injury to you or other persons to the vehicle can happen if advice provided is not followed Description 1 Technical Specifications 1...

Страница 3: ...UR3AC Spark Plug Gap 0 7 to 0 8 mm Starting Aid Kick Transmission 4 Speed Constant Mesh Gear Shifting Pattern All down Lubrication Forced Lubrication Front Brake Drum Brake Rear Brake Drum Brake Fuel...

Страница 4: ...d Lamp 35 35W Tail Lamp Stop Lamp 10 5W Turn Signal Lamp 10W Horn 12V 2A Neutral Indicator Lamp 3W Turn Signal Indicator 3W Hi Beam Indicator Lamp 3W Speedometer Lamp 3W x 2 nos Battery 12V 2 5 Ah Veh...

Страница 5: ...ter the motorcycle They are the unique alpha numeric codes to identify your particular vehicle from others of the same model and type Engine Number Location On LH Side Crankcase Near Gear Change Lever...

Страница 6: ...Location of Parts 4 Silencer EVAP compatible Fuel Tank Brake Pedal Engine Oil Level Window Grab Handle Rear Shock absorber Kick Lever Speedometer Tail Lamp Brake Lever...

Страница 7: ...ion Lock the steering remove the key To Unlock the Steering To unlock steering insert the key in steering cum ignition lock turn it clockwise to OFF or ON position Key A common key is used for Steerin...

Страница 8: ...and turn it clockwise and lift fuel tank cap Fuel Tank Cap is locked when pushed pressed back into the place Fuel Tap Fuel tap lever has following positions ON When fuel level is above Reserve positi...

Страница 9: ...N and Hi beam is selected with engine running Hi beam indicator will glow 5 Turn Signal Indicator LH RH When Turn signal switch is turned to Left or Right Turn pilot indicator will flash 4 5 3 1 2 AHO...

Страница 10: ...top flashing turn the knob to center position D Horn Button Press horn button for sounding horn B Pass Switch Press the switch to flash the head light It is used to give signal to vehicles coming from...

Страница 11: ...d on Side cover from hole provided on Fuel Tank Slide the Side Cover forward towards the engine from location B to release slot provided on rear side of Side cover from bracket with rubber cap provide...

Страница 12: ...e cover backward towards Tail lamp Match Lug A provided on front side of Side cover with hole provided on Fuel Tank and press Side cover inside Match the lock plate of Side cover properly with bracket...

Страница 13: ...level in each cell between upper and lower level lines by adding distilled water Tool Kit Location It is located inside Side Cover LH near battery A rubber strap is provided to hold the Tool kit CAUT...

Страница 14: ...iding motorcycle be sure to check following items Please give proper importance to these checks and perform all of them before riding motorcycle If any irregularities are found during these checks ref...

Страница 15: ...kick lever all the way down for 5 6 times Then release the clutch lever This practice ensures lubrication of clutch components for their longer life Starting The Engine Turn the fuel tap knob to or p...

Страница 16: ...When cornering use brakes judiciously do not de clutch Reduce your speed before you get into the corner For emergency braking disregard downshifting and concentrate on applying brakes as hard as possi...

Страница 17: ...ng Running IN Proper running in is important for the better life trouble free performance of the vehicle During first 2000 kms running in period do not exceed following speed limits Always keep the sp...

Страница 18: ...r say 100 km Fill the tank full again in same fuel filling station probably with same fuel dispenser Divide kilometer run fuel quantity filled Optimum shifting speeds for best mileage 1st gear 0 Km hr...

Страница 19: ...ot apply direct water jet on painted electrical electronic parts Do not obstruct engine cooling by adding mud protection sheet from front Safe Riding Tips Always wear Helmet while driving or riding Yo...

Страница 20: ...ngine O H 1000 ml Recommended Engine Oil Always insist on Bajaj Genuine Engine Oil for optimum engine performance and to avail warranty benefits It is a specially formulated oil for Bajaj motorcycles...

Страница 21: ...Keep appropriate tyre pressure as mentioned below to increase life of the tyre for better fuel consumption Note Incase the motorcycle is fitted with imported tyres compliance to respective indian sta...

Страница 22: ...dvised to get it charged immediately Environment care must be taken to dispose off used battery It is always recommended to hand over the same to Authorised battery Bajaj dealer for proper disposal Ho...

Страница 23: ...ode carefully Spark Plug Make Spark Plug Gap CHAMPION PRZ9HC BOSCH UR3AC 0 7 0 8 mm Spark Plug Details Drive Chain Slackness Chain top edge to be kept between the two marks during chain slackness adju...

Страница 24: ...leaned lubricated as per periodic maintenance schedule Drive Chain Non sealed type Non sealed type chain should be removed cleaned by Nylon brush Kerosene diesel in chain cleaning stand It should be l...

Страница 25: ...Customer ID to Dealer ASC workshop When you are at Dealership ASC workshop for Free Service you will receive the Unique Coupon Number UCN through SMS in your mobile Please inform the UCN to Dealer ASC...

Страница 26: ...electrical Parts Use caustic free detergent for washing 2 Engine oil Bajaj DTSi 10000 oil C R R Top R Top R Top R BGO DTSi 10W30 for Up Up Up 100cc models BGO DTSi 20W50 for Models above 125cc 3 Engi...

Страница 27: ...aning CL CL CL 13 Carburettor rubber duct C R C R 14 Fuel pipe C R C C C R C C R 15 Valve tappet clearance C A C A C A C A C A C A C A C A 16 Non Sealed drive chain CL L A CL L A CL L A CL L A CL L A...

Страница 28: ...tor 23 Brake fluid level top up replace C A R C A R Use recommended brake fluid DOT3 DOT4 24 Disc brake assly Check functionality C C C C leakage or any other damage 25 All cables rear brake pedal fre...

Страница 29: ...ing stem bearing C CL L R C CL C CL C CL Check replace if Cap steering bearing Plastic L R L R L R Damaged Use HP Lithon RR3 grease for lubrication 32 Main stand side stand pin CL L CL L CL L CL L Use...

Страница 30: ...4 EVAP drain tube cleaning CL CL CL CL CL CL CL CL As applicable to model More frequent cleaning may be required while driving in dusty environment C Check A Adjust CL Clean R Replace T Tighten L Lubr...

Страница 31: ...metal surfaces to prevent rusting Avoid getting oil on rubber parts or brake liners Cover entire vehicle neatly Make sure that storage area is well ventilated free from any source of flames or spark...

Страница 32: ...30...

Страница 33: ...Customer s Signature To be filled in by the dealer Delivery Certificate 31 Imp Do not detach this page from Owner s Manual...

Страница 34: ...te of purchase as applicable and should be claimed on them directly by the customer Bajaj Auto Limited shall not be Liable to replace them though their dealer will give full assistance in preferring s...

Страница 35: ...erval of 10 000 kms engine oil level top up at 5000 kms 6 Replacing mandatory periodic parts such as air filter oil filter etc as per periodic maintenance schedule Part C Further this warranty is NOT...

Страница 36: ...tyres loud silencers etc and which in the sole judgement of the Bajaj Auto Limited affects its performance and reliability 12 Vehicles which are not being serviced at recommended dealers as per the s...

Страница 37: ...OWNER AND ADDRESS TYPE OF VEHICLE REG NO FRAME NO ENGINE NO Code For Remarks LL Low electrolyte level AE Electrical system needs attention IR Insufficient running of vehicle CB Cover broken BC Broken...

Страница 38: ...of claim ________________________________________________Battery Type _________________ Serial No __________________________________________________Date of Fitment ________________ TO BE FILLED IN BY...

Отзывы: