5
Note: The following page is for vehicles with battery’s containing separate electrolyte pack.
Preparing the battery:
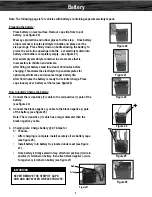
· Place battery on level surface. Remove cap strip from top of
battery. (see figure 20)
. Wear eye protection and rubber gloves for this step. once battery
strip is removed, locate electrolyte in bottle and place over the
six openings. Press firmly down on bottle allowing the battery to
pierce the six in-line openings in bottle. Let electrolyte drain into
battery until bottle is completely empty. (see figure 21)
· Discard empty electrolyte container in a waste area that is
inaccessible to children and animals.
· After filling let battery stand for at least 30 minutes before
charging. This allows the electrolyte to penetrate plates for
optimum performance and ensures longer battery life.
· After 30 minutes the battery is ready for its initial charge. Place
caps loosely over battery cell holes (see figure22)
How to Initially Charge the battery:
1. Connect the red positive (+) cable to the red positive (+) pole of the
battery.
(see figure 24)
2. Connect the black negative (-) cable to the black negative (-) pole
of the battery. (see figure 25)
Note: The red positive (+) cable has a larger diameter than the
black negative y cable.
3. Charging rate: Charge battery @ 0.7 Amps for
5 ~ 10 hours.
• After charging is complete, install securely all six battery caps
(see figure 26)
• Install battery into battery tray located under seat (see figure
27).
•
Once battery is firmly seated in tray, attach red positive (+) wire to
positive (+) terminal on battery, then attach black negative (-) wire
to negative (-) terminal on battery (see figure 27)
Figure 20
Figure 21
Figure 22
Battery
WARNING
NeVeR ReMoVe THe STRIP oF CAPS
NoR ADD ANy WATeR oR eLeCTRoLyTe.
Figure 27
Red +
Green -
Figure 25
Figure 24
Figure 26


