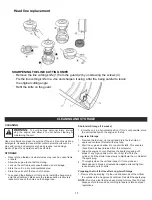
background image

Place the machine on a flat stable surface, with the fuel tank cap facing upwards.  

Clean the fuel tank cap and the surrounding area to avoid any dirt from entering the 

tank during refilling. 

Carefully open the fuel tank cap to allow the pressure inside to decrease gradually. 
Unscrew the tank cap and remove it.

Pour in the fuel carefully, avoid spilling.

Screw the tank cap on firmly by hand.

Draining fuel 

Hold a collection container beneath the fuel drain bolt.

Unscrew the tank cap and remove it.

- Allow the fuel to run out completely.

- Screw the tank cap on firmly by hand.

WARNING! Always close the fuel tank cap firmly. 

WARNING! Immediately clean all traces of fuel which may have dripped on the 

machine or the ground and do not start the engine until the petrol fumes have 

dissipated. 

10

Filling with fuel


Danger of injury! 

Fuel is explosive! 

- Turn off and cool the motor down before filling the tank with fuel.

- You must observe all safety instructions relating to handing fuel.

Risk of device damage! 

The device is supplied without motor or gearbox oil. 
Before operating, you must fill it with fuel. 

WARNING! Take care of the emission of exhaust gases. Always shut off engine 

before fueling. Never add fuel to a machine with a running or hot engine. Take care 

of fire! 

WARNING! Never smoke whilst refueling and avoid inhaling the petrol fumes. 

WARNING! Carefully open the tank top as pressure could have formed inside. 

Содержание WB31GTF

Страница 1: ...WB31GTF WB31BCF 2019 05 CUSTOMERSERVICE BADGERPOWERPRODUCTS COM WB31GTF WB31BCF...

Страница 2: ...trucUona Failure to do so can raault In Hrlous 111Jury to tha operatorand or bptandara IMPORTANT SAFETY INSTRUCTIONS READ ALL INSTRUCTIONS BEFORE OPERATING WARNING When using the unit all safety instr...

Страница 3: ...rts Do not touch or try to atop moving perta Do nottouch the engine gear houalng or mumer Theae parts gat axtrwmely hotfrom operation IIY1In aftertile unit is tumed orr Do notopereta the unit faslar t...

Страница 4: ...RP BLADE WARNING There is a sharp blade on not touch the line cutting blade DO NOT USE METAL BLADES WARNING To prevent serious injury do SAFETY ALERT SYMBOL Indicates danger warning or caution May be...

Страница 5: ...Throttle Control Shaft Housing Shaft Housing Coupler Coupler Cutting Head Cutting Head Cutting Head Shield Cutting Head Shield Air Filter Cover Spark Plug Air Filter Cover Spark Plug 5 Fuel tank Fuel...

Страница 6: ...apead 100 mln 9800 mln with cutting lllta hment no loed All apecifications a111 ballad on the latsst product information available atthe time of printing We lliiiEirv the right IDmeke chang atany time...

Страница 7: ...ever use the machine without the guard assembled 4 Assembly and disassembly of the cutting head 4 1 Assembly and disassembly of the cutting head a Assembly Block rotation of the shaft 1 with a proper...

Страница 8: ...blade outer flange shield and nut according to priority as below picture Note the blade rotation direction needs be same as below picture Use screw driver to hold flange and tighten nut counter clock...

Страница 9: ...s are complete That all screws are securely fastened That all moving parts move smoothly Fuel Recommended fuels Normal petrol Lead free max 5 bioethanol Important Only use containers designed and appr...

Страница 10: ...ank cap firmly WARNING Immediately clean all traces of fuel which may have dripped on the machine or the ground and do not start the engine until the petrol fumes have dissipated 10 Filling with fuel...

Страница 11: ...heck that all safety devices are in proper condition Once the machine has been set up properly start the engine as follow 1 Press the fuel pump more than 10 times Danger of injury Do not operate the d...

Страница 12: ...order not to lose control of the machine during startup as following picture 4 Pull the starter grip slowly for 10 15 cm until you feel some resistance then tug it a few times until you hear the engin...

Страница 13: ...the round with engine at top speed the line will be released automatically and the knife cut off the excess length 13 r immediately e t t u c h s u r b e h t e s a e l e r n e h t t l e b y t e f a s...

Страница 14: ...connection cable safely on footpaths and on areas which have already been mown 3 When the engine has been switched off the cutter continues running for several seconds therefore do not get close to t...

Страница 15: ...Always re cleaned the nylon spool or if required replace the nylon spool with a new one Always have the nylon spool re cleaned or replaced by a customer service centre STORAGE At the end of each worki...

Страница 16: ...ours Clean the air filter IMPORTANT Cleaning the air filter is essential to guarantee the efficiency and duration of the machine Do not work with a damaged filter or without a filter as this could per...

Страница 17: ...n a horizontal position If this is not possible store the unit vertically with the engine at the top Long term Storage 1 Remove the fuel cap tip the unit and drain the fuel into an approved container...

Страница 18: ...ot enough line is extended There is oil cleaner or lubricant in the cutting head Clean and thoroughly dry the cutting head If further assistance is required contact an authorized service dealer THE CU...

Страница 19: ...NOTES 19...

Страница 20: ...ossessions and territories except those sold through Badger s authorized channels of export distribution Badger reserves the right to change or improve the design of any Badger Product without assumin...

Отзывы: