4
Removing or Replacing the Needle
It is not necessary to completely disassemble the
needle assembly.
1) Remove the handle (50-033) from the back of
the airbrush.
2) Turn the needle chuck (51-010) counter-clock-
wise.
3) Draw the needle out and wipe it clean. (If stuck,
see step 7).
4) Care should be taken that the needle point is not
bent. A bent needle will damage the tip and
cause a rough spray pattern. If bent or damaged
replace needle.
5) Slowly glide the needle into the airbrush while
holding the trigger (50-019) in place, until the
needle stops. Do not apply pressure or force the
needle.
6) Once the needle is in position, tighten the needle
chuck (51-010), replace handle (50-033).
7) If in step 3 the needle is stuck in the airbrush,
carefully grasp the end of the needle with a pair
of pliers and twist in a counter-clockwise direc-
tion to release the needle and remove.
8) Inspect the hardened paint, which causes the
needle to bind. If there is a residual stain on the
needle, it can be polished off using a pink eraser.
Hold the needle flat on a worktable. Run the pink
eraser slowly by rolling it towards yourself and
repeat the process. Be careful not to be bend the
tip. Remove all eraser particles by running the
needle between your thumb and forefinger.
Repeat steps 4 through 6.
Spray regulator should be cleaned using a soft bris-
tle brush. Insert into the cavity of the spray regula-
tor and rotate until the paint is removed.
A bent needle will prevent you from airbrushing a
fine line and will cause an erratic direction of spray.
A bent needle does not always have to be discard-
ed. Place the needle on a firm surface at the angle
of the tip. Straighten the bent needle by running
your fingernail across it on a firm surface while you
turn the needle slowly. Run your fingernail from the
body of the needle outwards toward the tip.
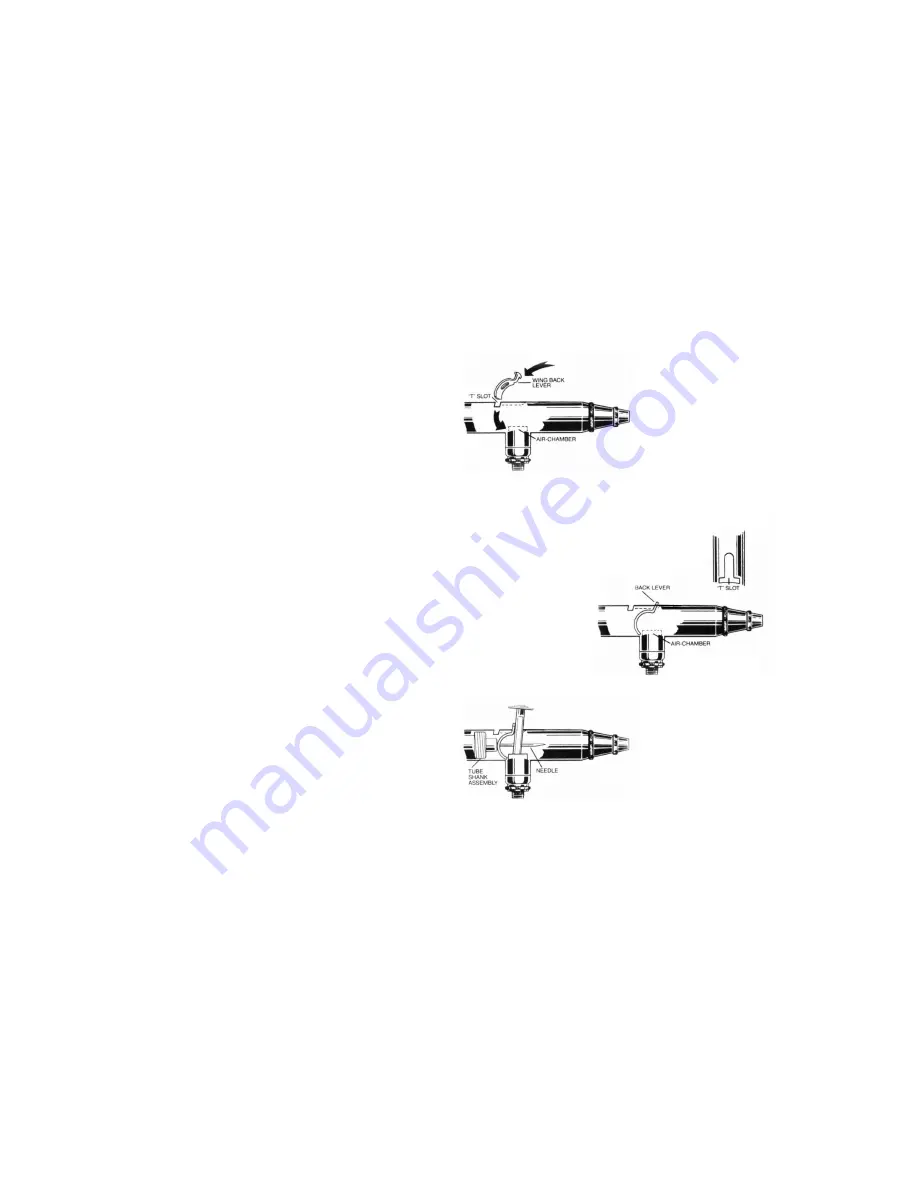
1). Remove handle,
loosen the needle
chuck (51-010), with-
draw needle. Remove
trigger (50-019),
unscrew tube shank
(50-030) assembly.
Removing the Tube Shank Assembly, Trigger and
Back Lever
3). To rein-
sert trigger, pull back
on winged back lever
and insert trigger
into place. Make
sure the trigger is
properly seated.
After inserting trigger, insert needle by gently pushing
forward with index finger until needle stops at the paint
tip, tighten needle chuck (51-010), and replace handle
(50-033).
2). Insert winged back lever (50-042) into
“T” slot at top of airbrush body and move
forward (fig 1). Make sure back lever is
behind the air chamber
(as shown in fig 2).
Screw in tube shank and
entire assembly.
TOP VIEW
Figure 1
Figure 2
TRIGGER TENSION
Your Model 150
™
airbrush has been set with
maximum trigger tension which should be suitable
for most users. If less return spring back pressure is
desired, the spring screw (50-031) can be partially
unscrewed to lessen the spring pressure. Do not
unscrew the entire tube shank (50-030) assembly to
release pressure on the Model 150
™
. If the tube
shank is not seated firmly in the body of the
airbrush, it may spin when trying to loosen the needle
chuck.
Prepare the object to be painted, masking off any
area that should not be painted (be sure object is
clean and free of dust, grease, etc.). Small objects
such as models, etc. should be hung or placed on a
pedestal so all areas to be sprayed can be easily
reached (a stand may be fashioned from an
ordinary wire coat hanger or bottle etc.). Hold the
PAINTING PROCEDURE FOR THREE DIMENSIONAL OBJECTS
tip of the airbrush about 4 to 6 inches from the
surface. Use short strokes, moving the airbrush
constantly at a steady rate parallel to the surface.
Don’t spray too heavily. Apply a light coat, let dry,
then apply another coat and continue until the
desired coverage is achieved.


