background image

Page 5 - 1

MAINTENANCE

Read all of this manual to become thoroughly familiar with this vehicle. Pay particular attention to all Notices, Cautions, Warnings, and Dangers.

5

TITLE

PAGE NO.

VEHICLE CLEANING AND CARE ............................................................................. 5-3

Vehicle Cleaning ........................................................................................................................... 5-3

ROUTINE MANITENANCE ........................................................................................ 5-4

LIFTING THE VEHCILE ............................................................................................. 5-4

LIGHT BULB REPLACEMENT .................................................................................. 5-5

Headlight Bulb Replacement ........................................................................................................ 5-5

Taillight Bulb Replacement............................................................................................................ 5-5

WHEELS AND TIRES ................................................................................................ 5-5

Tire Repair..................................................................................................................................... 5-5

Wheel Installation.......................................................................................................................... 5-6

Unidirectional Tires ....................................................................................................................... 5-6

Wheel alignment ........................................................................................................................... 5-6

BRAKES .................................................................................................................... 5-8

Master Cylinder ............................................................................................................................. 5-8

Bleeding Brake System................................................................................................................. 5-8

Parking Brake Adjustment............................................................................................................. 5-9

POWERTRAIN ........................................................................................................... 5-9

AXLES...................................................................................................................... 5-10

Front and Rear Axles .................................................................................................................. 5-10

Checking the Lubricant Level...................................................................................................... 5-10

BATTERY CHARGING AND MAINTENANCE ......................................................... 5-11

Safety .......................................................................................................................................... 5-11

Battery Disposal .......................................................................................................................... 5-11

Battery......................................................................................................................................... 5-11

Battery Maintenance ................................................................................................................... 5-11

At Each Charging Cycle .............................................................................................................. 5-11

Monthly........................................................................................................................................ 5-11

Temperature Affects Battery Capacity......................................................................................... 5-12

Electrolyte Level and Water ........................................................................................................ 5-12

Cleaning Batteries....................................................................................................................... 5-14

Battery Removal and Installation ................................................................................................ 5-14

Prolonged Storage ...................................................................................................................... 5-15

Battery Charging ......................................................................................................................... 5-15

BATTERY TROUBLESHOOTING ............................................................................ 5-16

HYDROMETER ........................................................................................................ 5-16

Содержание RECOIL iS

Страница 1: ...RECOIL iS OWNER S MANUAL 630505 ISSUED AUGUST 2012 REVISED SEPTEMBER 2012 ...

Страница 2: ...ed Most of the service procedures in this guide can be accomplished using common automotive hand tools Contact your service representative on servicing the vehicle in accordance with the Periodic Service Schedule Repair or replacement parts are available through your BAD BOY BUGGIES retailer The following information is needed when contacting us concerning service or parts for your vehicle Vehicle...

Страница 3: ...engineering and design changes to products in this manual without obligation to include these changes on units sold previously The information contained in this manual may be revised periodically by BB Buggies Inc and therefore is subject to change without notice BB Buggies Inc DISCLAIMS LIABILITY FOR ERRORS IN THIS MANUAL and SPECIFICALLY DISCLAIMS LIABILITY FOR INCIDENTAL AND CONSEQUEN TIAL DAMA...

Страница 4: ... batteries must be clean fully charged and disconnected from any source of electrical drain The battery charger and the controller are both sources of electrical drain Unplug the battery charger DC plug from the vehicle receptacle The battery charger may be left connected to the vehicle to maintain a full charge on the bat teries provided the charger is plugged into an active electrical source If ...

Страница 5: ...this manual to become thoroughly familiar with this vehicle Pay particular attention to all Notices Cautions Warnings and Dangers SECTION PAGE NO SAFETY 1 1 GENERAL SPECIFICATIONS 2 1 INTRODUCTION 3 1 OPERATING PROCEDURES 4 1 MAINTENANCE 5 1 ...

Страница 6: ...Page iv TABLE OF CONTENTS Read all of this manual to become thoroughly familiar with this vehicle Pay particular attention to all Notices Cautions Warnings and Dangers Notes ...

Страница 7: ...roughly familiar with this vehicle Pay particular attention to all Notices Cautions Warnings and Dangers 1 TITLE PAGE NO GENERAL 1 2 NOTICES CAUTIONS WARNINGS AND DANGERS 1 2 GENERAL OPERATION 1 3 MAINTENANCE 1 3 VENTILATION 1 4 LABELS AND PICTOGRAMS 1 5 ...

Страница 8: ...l customers to adhere to this SAFETY RESTRICTION in connection with the use of all products new and used the Distributor or Dealer has rea son to believe may be operated in personal transportation applications Information on FMVSS 571 500 can be obtained at Title 49 of the Code of Federal Regulations section 571 500 or through the Internet at the website for the U S Department of Transportation at...

Страница 9: ...ENANCE ALWAYS Maintain the vehicle in accordance with the manufacturer s periodic service schedule Ensure that repairs are performed by those that are trained and qualified to do so Follow the manufacturer s maintenance procedures for the vehicle Be sure to disable the vehicle before perform ing any maintenance Disabling includes removing the key from the key switch and removal of a battery wire I...

Страница 10: ...cycle of batteries and is explosive in concentrations as low as 4 Because hydrogen gas is lighter than air it will collect in the ceiling of buildings necessitating proper ventilation Five air exchanges per hour is considered the minimum requirement NEVER charge a vehicle in an area that is subject to flame or spark Pay particular attention to natural gas or propane gas water heaters and furnaces ...

Страница 11: ...ll expel electrolyte and result in component damage 1 quart 1 liter Clear Water 2 Teaspoons 10 ml Sodium Bicarbonate Baking Soda Plastic Spray Bottle Spray top and sides of batteries with a solution of baking soda and water Allow the solution to set for at least three minutes use a soft bristle brush or cloth to wipe the tops of the batteries in order to remove any residue that could cause the bat...

Страница 12: ...d batteries are recyclable Return batteries to distributor manufacturer or lead smelter for recycling For neutralized spills place residue in acid resistant containers with absorbent material sand or earth and dispose of in accordance with local state and federal regulations for acid and lead compounds Contact local and or state environmental regarding disposal information 630393 630394 630395 Exc...

Страница 13: ... to become thoroughly familiar with this vehicle Pay particular attention to all Notices Cautions Warnings and Dangers 2 TITLE PAGE NO RECOIL IS VEHICLE SPECIFICATIONS 2 2 RECOIL IS VEHICLE DIMENSIONS 2 3 TURNING DIAMETER AND INCLINE INFORMATION 2 4 ...

Страница 14: ...n cm Vehicle load capacity lb kg Wheel Base in cm Gross Axle Weight Rating F lb kg Gnd Clearance Frame in cm Gross Axle Weight Rating R lb kg Gnd Clearance Differential in cm Outside Clearance Circle ft m Vehicle Power Speed Low Level Ground mph kph Power Source 72 Volts DC Speed High Level Ground mph kph Motor Type 72 Volts AC Speed Reverse mph kph Horsepower kW hp kW Steering Suspension Electric...

Страница 15: ...articular attention to all Notices Cautions Warnings and Dangers 2 VEHICLE DIMENSIONS Maximum Recommended Side Tilt 25 or 14 Max Maximum Recommended Ramp Grade 25 or 14 Max 76 5 194 3 cm 112 284 5 cm 113 287 cm 70 177 8 cm 52 5 133 5 cm 42 5 107 9 cm front wheels 42 5 107 9 cm rear wheels 47 5 120 7 cm ...

Страница 16: ...Page 2 4 SPECIFICATIONS Read all of this manual to become thoroughly familiar with this vehicle Pay particular attention to all Notices Cautions Warnings and Dangers Notes 2 ...

Страница 17: ...RATOR CONTROLS 3 2 Key Switch Direction Selector 3 2 Accelerator Pedal 3 2 Brake Pedal 3 2 Park Brake 3 2 Differential Lock 3 2 FEATURES 3 3 State of Charge Meter 3 3 Headlight 3 3 Winch Switch 3 3 12 Volt Power Outlet 3 3 Charger Receptacle 3 4 Electric Lift Switch 3 4 Winch Remote Receptacle 3 4 Truck Bed Latch 3 4 Truck Bed 3 4 Tail Lights 3 4 Rear Seat Load Deck 3 5 Side Net 3 5 ...

Страница 18: ...position the direction selector must be set to neu tral The switch should always be left in FWD when vehicle is unat tended 3 Accelerator Pedal With the key switch ON depressing the accelerator pedal starts the electric motor When the pedal is released the motor will stop and the vehicle will slow down To stop the vehicle more quickly depress the brake pedal 4 Brake Pedal Depress the brake pedal t...

Страница 19: ... the dash panel to the right of the brake light The switch has two positions ON and OFF In the ON posi tion the headlights and all dash panel lights will be on the OFF position will turn off the lights 4 Max Range Max Speed Two position switch located in the dash panel The Max Range setting limits the top speed of the vehicle to 16 MPH saving battery power to extend the range of the vehicle when o...

Страница 20: ...el in the cowl 8 Charger Receptacle The polarized charger receptacle for the electric battery pack is located in the seat wrap panel below the seat on the driver side Always check to be sure the receptacle is free from dirt and debris before connecting the charger cord 10 Truck Bed Latch Located at the front of the manual lift truck bed To release the latch ing mechanism pull the handle upward the...

Страница 21: ...en driving over rough terrain 14 Side Nets Side nets are a standard safety feature provided with the vehicle and must be properly secured before operating vehicle 15 Rear Seat Load Deck if equipped The rear facing seat is designed for two occupants one on each side of the seat The load deck is created by unfolding the bottom of the rear facing seat The seat load deck is limited to a maximum of 400...

Страница 22: ...Page 3 6 INTRODUCTION Read all of this manual to become thoroughly familiar with this vehicle Pay particular attention to all Notices Cautions Warnings and Dangers Notes 3 ...

Страница 23: ...NO VIN AND SERIAL NUMBER LOCATION 4 2 BEFORE INITIAL USE 4 2 PORTABLE CHARGER 4 3 Using the Charger 4 4 OPERATING THE VEHICLE 4 5 COMMON SENSE OPERATION 4 5 ENVIRONMENTAL CONCERNS 4 6 STARTING AND DRIVING 4 6 Starting On A Hill 4 7 COASTING 4 7 TOP AND WINDSHIELD 4 7 TOWING A TRAILER 4 7 TERRAIN 4 8 DUMP BED 4 8 REAR FACING SEAT LOAD DECK 4 8 WINCH 4 9 Winch Application 4 9 ...

Страница 24: ... speed when driving up or down a hill Use service brake to control speed when traveling down an incline A sudden stop or change of direction may result in loss of control To prevent loss of control do not move the vehicle direction selector while the vehicle is in motion Moving the direction selector may result in a sudden slowing of the vehicle Slow down before and during turns All turns should b...

Страница 25: ...er charge a vehicle in an area that is subject to flame or spark Pay particular attention to natural gas or propane water heaters and furnaces PORTABLE CHARGER Use charger ONLY on 72 volt battery systems Other usage may cause personal injury and dam age Lead acid batteries may generate explosive hydrogen gas during normal operation Keep sparks flames and smoking materials away from batteries Provi...

Страница 26: ... DC cord through the steering wheel when charging serves as a good reminder to store the cord out of the way when finished with charging The DC plug can be damaged by driving over or catching the cord on the vehicle when driving away An ungrounded electrical device may become a physical hazard that could result in an electrical shock or electrocution Using the Charger Before using the charger read...

Страница 27: ...xceeds 14 25 grade To reduce the possibility of severe injury or death resulting from improper vehicle operation the following warnings must be observed Refer to GENERAL SPECIFICATIONS for seating capacity Depressing accelerator pedal may cause inadvertent vehicle movement Turn the key to the OFF position whenever the vehicle is parked To prevent inadvertent movement when the vehicle is to be left...

Страница 28: ... As a responsible user practice respect for all wildlife and their habitat Respect private property and comply with all local laws and regulations governing the use of light duty utility vehicles To prevent severe injury or death while driving be aware of the following environmental hazards Steep slopes Tree stumps overhanging limbs and logs Streams Water over 12 inches deep Bogs marshes and swamp...

Страница 29: ...quipped The top does not provide protection from roll over or falling objects The windshield does not provide protection from tree limbs or flying objects Remove windshield and store securely for trailering this vehicle the windshield is not designed to withstand highway speeds The sun top and windshield provide some protection from the elements however they will not keep the operator and passenge...

Страница 30: ...r safe operation of the vehicle The dump bed is limited to a maximum load of 500 lbs 226 Kg The load must be positioned in the bed as far forward as possible it s center of gravity must not be higher than 12 30 5 cm above the bed floor and securely fastened down Failure to follow these instructions could cause personal injury damage to the vehicle and or cause the vehicle to tip over Operate the v...

Страница 31: ... occupants If attaching the winch to a dead tree a section could fall When pulling vehicle with winch pull straight only Do not permit the cable to contact the side of the drum Do not pull vehicle at an angle If the vehicle is pulled at an angle it could turn over causing severe injury or death to anyone in the area The winch cable could also become overstressed and break causing severe injury or ...

Страница 32: ...on the winch drum in order to prevent inadvertent operation When operating winch take up slack slowly Stop winch before cable becomes tight and inspect all winching connec tions Check winch attachment hook attachment nylon sling if required and load attachment Do not pull at an angle This will cause the wire cable to pile up on one end of the winch This may jam the winch causing damage to the cabl...

Страница 33: ...Page 4 11 Notes Read all of this manual to become thoroughly familiar with this vehicle Pay particular attention to all Notices Cautions Warnings and Dangers OPERATION 4 ...

Страница 34: ...Page 4 12 OPERATION Read all of this manual to become thoroughly familiar with this vehicle Pay particular attention to all Notices Cautions Warnings and Dangers Notes 4 ...

Страница 35: ...Installation 5 6 Unidirectional Tires 5 6 Wheel alignment 5 6 BRAKES 5 8 Master Cylinder 5 8 Bleeding Brake System 5 8 Parking Brake Adjustment 5 9 POWERTRAIN 5 9 AXLES 5 10 Front and Rear Axles 5 10 Checking the Lubricant Level 5 10 BATTERY CHARGING AND MAINTENANCE 5 11 Safety 5 11 Battery Disposal 5 11 Battery 5 11 Battery Maintenance 5 11 At Each Charging Cycle 5 11 Monthly 5 11 Temperature Aff...

Страница 36: ... to become thoroughly familiar with this vehicle Pay particular attention to all Notices Cautions Warnings and Dangers Page 5 2 5 Using A Hydrometer 5 17 PERIODIC SERVICE SCHEDULE 5 18 CAPACITIES AND REPLACEMENT PARTS 5 19 HARDWARE 5 19 ...

Страница 37: ... commercial plastic pol ish or Plexus plastic cleaner available from the service parts department Normal cleaning of vinyl seats and plastic or rubber trim requires the use of a mild soap solution applied with a sponge or soft brush and wipe with a damp cloth Removal of oil tar asphalt shoe polish etc will require the use of a commercially available vinyl rubber cleaner The painted surfaces of the...

Страница 38: ...fting process When lifting the vehicle position the jacks and jack stands at the areas indicated Remove payload from vehicle before lifting No person s should be in or on the vehicle while lift ing To raise the entire vehicle install the wheel chocks in front and behind each front wheel Center the jack under the rear axle tube next to differential housing or under the skid plate Raise the vehicle ...

Страница 39: ...t will have to be replaced WHEELS AND TIRES A tire explosion can cause severe injury or death Never exceed the inflation pressure rating on the tire sidewall To reduce the possibility of tire explosion pressurize tire with small amounts of air applied inter mittently to seat beads Due to the low volume of the small tires overinflation can occur in sec onds Never exceed the tire manufacturer s reco...

Страница 40: ... when installing lug nuts This will assure even seating of the wheel against the hub With the valve stem to the outside mount the wheel onto the hub with lug nuts Finger tighten the lug nuts 1 in a cross sequence pattern Tighten the lug nuts to 50 to 85 ft lbs 68 to 115 Nm torque in 20 ft lbs 27 Nm increments following the cross sequence pattern Unidirectional Tires Unidirectional tires may be ide...

Страница 41: ...heck the measurement at the front and at the rear of the front tires if the 1 4 toe out has been achieved tighten the lock nut 1 on each tie rod Rear The rear tie rods have jam nuts 4 at each end one end has the standard right hand threads and the other end has left hand threads Loosen the jam nuts 4 on both tie rods turn the center tube 5 with an open end wrench to adjust the length of each tie r...

Страница 42: ...an cloth to wipe off the master cylinder reservoir and wheel cylinder bleeder valves Clean each fitting before opening to prevent contaminating the system 2 Open the master cylinder reservoir and top off with standard automotive DOT 3 brake fluid Never return brake fluid to the original container or reuse brake fluid due to the possibility of con tamination by dirt grease moisture Contaminated bra...

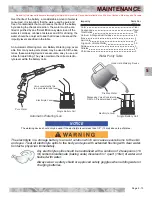
Страница 43: ...ompressed air To reduce the possibility of causing an electrical arc which could result in a battery explosion turn off all electrical loads from the battery before removing battery wires Wrap wrenches with vinyl tape to reduce the possibility of a dropped wrench shorting out a battery which could result in an explosion The electrolyte in a battery is an acid solution which can cause severe burns ...

Страница 44: ...on of hydrogen gas is explosive Be sure that the key switch is off and all electrical accessories are turned off before starting work on the vehicle Never disconnect a circuit under load at a battery terminal Batteries are heavy Use proper lifting techniques when moving them Always lift the battery with a commercially available battery lifting device Use care not to tip batteries when removing or ...

Страница 45: ...tely except that its capacity is diminished Capacity describes the time that a battery can continue to provide its design amperes from a full charge A battery has a maximum life therefore good maintenance is designed to maximize the available life and reduce the factors that can reduce the life of the battery Battery Maintenance Tool List Qty Tool List Qty Insulated Wrench 9 16 1 Battery Carrier 1...

Страница 46: ...evel is important since any portion of the plates exposed to air will be ruined beyond repair Also avoid filling with too much water which will result in electrolyte being forced out of the battery due to gassing and a decrease in volume of the electrolyte that results from the charging cycle DO NOT overfill batteries The charging cycle will expel electrolyte and result in component damage If the ...

Страница 47: ... the battery cells The watering device should only be used if the electrolyte level is less than 1 2 13 mm above top of plates The electrolyte in a storage battery is an acid solution which can cause severe burns to the skin and eyes Treat all electrolyte spills to the body and eyes with extended flushing with clear water Contact a physician immediately Any electrolyte spills should be neutralized...

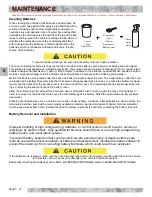
Страница 48: ...attery for clean ing remove the rivets from the access cover in the cowl and lift the cover The remaining batteries are accessed by rais ing an removing the seat bottom and the battery cover Allow the solution to set for at least three minutes use a soft bristle brush or cloth to wipe the tops of the batteries in order to remove any residue that could cause the self discharge of the battery Rinse ...

Страница 49: ...ged into an active electrical source If power to the electrical source is disconnected or interrupted the battery charger will continue to check the charge on the battery pack this will draw power from the battery pack and eventually drain the batteries if power is not restored in a timely manner Battery Charging The battery charger is designed to fully charge the battery set If the batteries are ...

Страница 50: ...charge discharge cycles After the maturing phase the older a battery gets the lower the capacity The only way to determine the capacity of a battery is to perform a load test using a discharge machine following manufacturer s recommendations A cost effective way to identify a poorly performing battery is to use a hydrometer to identify a battery in a set with a lower than normal specific gravity O...

Страница 51: ...w 80 F 27 C Adjust the reading to conform with the electrolyte temperature e g if the reading indicates a specific gravity of 1 250 and the electrolyte temperature is 90 F 32 C add four points 004 to the 1 250 which gives a corrected reading of 1 254 Similarly if the tem perature was 70 F 21 C subtract four points 004 from the 1 250 to give a corrected reading of 1 246 5 Test each cell and note th...

Страница 52: ...ging add only enough water to cover any exposed plates and fill after charging C A C A C A C A Brakes check fluid level in master cylinder 3000 mi 5000 km Brakes smooth operation of pedal stopping distance Park Brake does brake hold on a hill C A C A C A C A Accelerator smooth operation Wiring loose connections broken or missing insulation Charger Receptacle inspect and clean receptacle at each ch...

Страница 53: ...T 3 REPLACEMENT PART NUMBERS Headlight Bulb LED Headlight Bulb ATC type Fuse 10 Amp ATC type Fuse 15 Amp ATC type Fuse 20 Amp 619100 619101 35212G07 35212G01 35212G02 ALL TORQUE FIGURES ARE IN FT LBS Nm BOLT SIZE Grade 2 1 4 5 16 3 8 7 16 1 2 9 16 5 8 3 4 7 8 1 Unless otherwise noted in text tighten all hardware in accordance with this chart This chart specifies lubricated torque figures Fasteners...

Страница 54: ...Page 5 20 MAINTENANCE Read all of this manual to become thoroughly familiar with this vehicle Pay particular attention to all Notices Cautions Warnings and Dangers Notes 5 ...

Страница 55: ......

Страница 56: ... For parts and repair contact your local dealer To locate a local dealer please go online to our website www BADBOYBUGGIES COM 2011 E Z GO Division of Textron Inc This manual may not be reproduced in whole or in part without the express permission of E Z GO Division of Textron Inc Technical Communications Department ...

Отзывы: