Backyard Safari 54303 Скачать руководство пользователя страница 8

Owner’s Manual Play Set


                                                                                                                                                                                                                                Rev12/13/12 

APPENDIX A 


Information on Playground Surfacing Materials:


The following information is from the 

United States Consumer Product Safety Commission’s 

Information Sheet for playground surfacing material; 

also see the following website for additional 

information: 

www.cpsc.gov/cpscpub/pubs/323.html

.    


X3.  SECTION 4 OF THE CONSUMER PRODUCT SAFETY COMMISSION’S OUTDOOR HOME PLAYGROUND SAFETY 

HANDBOOK


X3.1 

Select Protective Surfacing

—One of the most important things you can do to reduce the likelihood of 

serious head injuries is to install shock-absorbing protective surfacing under and around your play equipment. The 
protective surfacing should be applied to a depth that is suitable for the equipment height in accordance with ASTM 
Specification 

F 1292

. There are different types of surfacing to choose from; whichever product you select, follow these 

guidelines: 

 
X3.1.1 

Loose-Fill Materials: 

X3.1.1.1 Maintain a minimum depth of 9 inches of loose-fill materials such as wood mulch/chips, engineered 

wood fiber (EWF), or shredded/recycled rubber mulch for equipment up to 8 feet high; and 9 inches of sand or pea 
gravel for equipment up to 5 feet high. NOTE: An initial fill level of 12 inches will compress to about a 9-inch depth of 
surfacing overtime. The surfacing will also compact, displace, and settle, and should be periodically refilled to maintain at 
least a 9-inch depth. 

 X3.1.2 Use a minimum of 6 inches of protective surfacing for play equipment less than 4 feet in height. If 

maintained properly, this should be adequate. (At depths less than 6 inches, the protective material is too easily 
displaced or compacted.) NOTE: Do not install home playground equipment over concrete, asphalt, or any other hard 
surface. A fall onto a hard surface can result in serious injury to the equipment user. Grass and dirt are not considered 
protective surfacing because wear and environmental factors can reduce their shock absorbing effectiveness. Carpeting 
and thin mats are generally not adequate protective surfacing. Ground level equipment such as a sandbox, activity wall, 
playhouse or other equipment that has no elevated play surface – does not need any protective surfacing. 

X3.1.3 Use containment, such as digging out around the perimeter and/or lining the perimeter with landscape 

edging. Don’t forget to account for water drainage. 

X3.1.3.1 Check and maintain the depth of the loose-fill surfacing material. To maintain the right amount of loose-

fill materials, mark the correct level on play equipment support posts. That way you can easily see when to replenish 
and/or redistribute the surfacing. 

X3.1.3.2 

Do not

 install loose-fill surfacing over hard surfaces such as concrete or asphalt. 

X3.1.4 

Poured-In-Place Surfaces or Pre-Manufactured Rubber Tiles 

— You may be interested in using surfacing 

other than loose-fill materials – like rubber tiles or poured-in-place surfaces.  

X3.1.4.1 Installations of these surfaces generally require a professional and are not “do-it-yourself” projects. 
X3.1.4.2 Review surface specification before purchasing this type of surfacing. Ask the installer/manufacturer for 

a report showing that the product has been tested to the following safety standard: ASTM 

F 1292

 Standard Specification 

for Impact Attenuation of Surfacing Materials within the Use Zone of Playground Equipment. This report should show the 
specific height for which the surface is intended to protect against serious head injury. This height should be equal to or 
greater than the fall height – vertical distance between a designated play surface (elevated surface for standing, sitting, or 
climbing) and the protective surfacing below – of your play equipment.  

X3.1.4.3 Check the protective surfacing frequently for wear.  
X3.1.5 

Placement

 — Proper placement and maintenance of protective surfacing is essential. Be sure to:  

X3.1.5.1 Extend surfacing at least 6 feet from the equipment in all directions.  
X3.1.5.2 For to-fro swings, extend protective surfacing in front of and behind the swing to a distance equal to 

twice the height of the top bar from which the swing is suspended. 


9


This information has been extracted from the CPSC publications “Playground Surfacing — Technical 

Information Guide” and “Handbook for Public Playground Safety.” Copies of these reports can be obtained by sending a 
postcard to the: Office of Public Affairs, U.S. Consumer Product Safety Commission, Washington, D.C., 20207 or call the 
toll-free hotline: 1-800-638-2772. 


Meijer.com

Содержание Safari 54303

Страница 1: ...etsonline com you will also find any updates on assembly instructions and information to order replacement parts Save this assembly manual for future reference in the event that you need to order replacement parts Owner s Manual Frequently Asked Questions Assembly Instructions Warranty Information SAFARI Wooden Play Set Model 54303 INS 54303 A SAFARI ENG 8 26 13 Meijer com ...

Страница 2: ...IAL ATTENTION TO THE IMPORTANT TIPS AND SAFETY INFORMATION AFTER YOU HAVE READ THE ASSEMBLY MANUAL YOU WILL BE ABLE TO DECIDE IF YOU NEED PROFESSIONAL HELP TO COMPLETE THE ASSEMBLY OF THE STRUCTURE SEPARATE AND IDENTIFY ALL PARTS TO MAKE SURE THAT YOU HAVE ALL OF THE PARTS LISTED IF YOU CAN T FIND ALL OF THE PARTS CHECK THE PACKING MATERIAL SMALL PARTS MAY HAVE FALLEN INTO IT DURING SHIPMENT IF YO...

Страница 3: ...or safety violations that could result in serious injury This manual contains helpful information concerning Assembly Preparation Installation Procedure and Required Maintenance Always keep the safety of your children in mind as your play structure is being built and as your children play on the set Before your children play on the set please review the Operation Instructions with them to help ens...

Страница 4: ...kelihood of serious burns A slide that faces north will receive the least direct sunlight 9 Separate active and quiet activities from each other For example locate sandboxes away from swings or use a guardrail or barrier to separate the sandbox from the movement of the swings Suggested Playground Surfacing Do not install home playground equipment over concrete asphalt packed earth grass carpet or ...

Страница 5: ...capacity is outlined in the Basic Setup Dimensions section of instruction manual The maximum fall height and recommended play area is also available in the Basic Setup Dimensions section of the manual for the specific unit 2 On site adult supervision is required 3 Instruct children not to walk close to in front of behind or between moving swings or other moving playground equipment 4 Instruct chil...

Страница 6: ...ments of 16 CFR 1303 Check all wood members for deterioration and splinters Sand down splinters and replace deteriorating wood members Reinstall any plastic parts such as swing seats or any other items that were removed for the cold season Rake and check depth of loose fill protective surfacing materials to prevent compaction and to maintain appropriate depth Replace as necessary Twice a month dur...

Страница 7: ...ough spots on your playset Please note this is a requirement of your warranty Assembling and maintaining the playset on a level location is very important As your children play your playset will slowly dig its way into the soil and it is very important that it settles evenly Make sure the playset is level and true one each year or at the beginning of each play season Disposal Instructions When the...

Страница 8: ... no elevated play surface does not need any protective surfacing X3 1 3 Use containment such as digging out around the perimeter and or lining the perimeter with landscape edging Don t forget to account for water drainage X3 1 3 1 Check and maintain the depth of the loose fill surfacing material To maintain the right amount of loose fill materials mark the correct level on play equipment support p...

Страница 9: ... is subject to revision at any time by the responsible technical committee and must be reviewed every five years and if not revised either approved or withdrawn Your comments are invited either for revision of this standard or for additional standards and should be addressed to ASTM Headquarters Your comments will receive careful consideration at a meeting of the responsible technical committee wh...

Страница 10: ...re information 8 What is the best way to get started assembling the playset Backyard Discovery recommends taking all the parts out of the boxes and arranging them by part number before you begin any assembly This will not only allow faster assembly but will also identify any parts that may be missing or damaged so they can be replaced before assembly If parts are missing or need replacement go to ...

Страница 11: ...Rubber Mallet Optional Ladder Phillips Screw Driver Drill Attachments Phillips Head 3 16 5 16 1 8 3 8 Drill Bits Tools Required for Installation These are the tools that are generally required for assembly of our outdoor products These tools are not included with the outdoor product purchase Meijer com ...

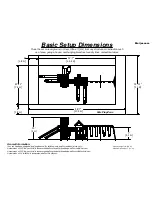
Страница 12: ... 7 2 1 m General Information Your set has been designed and engineered for children only and for residential use only A maximum of 150 lbs per child is recommended for play activities designed for individual use A maximum of 120 lbs per child is recommended for play activities designed for multiple child use A maximum of 14 children is recommended for this playset 58 7 17 9 m 23 11 7 3 m 35 11 11 ...

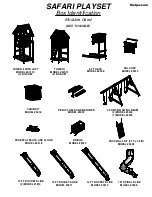
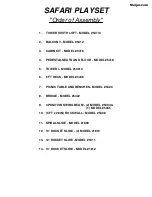
Страница 13: ...ODEL 5418 TOWER I MODEL 54013 2 BOX SET 6 FT DECK MODEL 5406 PICNIC TABLE AND BENCHES MODEL 5420 BRIDGE MODEL 5422 4 POSITION SWING BEAM 2 MODEL 5404 1 MODEL 5405 ROCKWALL KIT 5 FT x 28 IN MODEL 5408 7 FT SPIRAL SLIDE MODEL 1808 10 FT ROCKET SLIDE 2 MODEL 1810 12 FT ROCKET SLIDE MODEL 1811 14 FT ROCKET SLIDE MODEL 1812 BALCONY MODEL 5412 Meijer com ...

Страница 14: ...ts flush to the tube or member and place caps over exposed bolts snug to the nut 8 Pay close attention to the ITEMS NEEDED FOR EACH STEP They can be a valuable aid when sorting your wood and hardware Assembly will be made easier if items are sorted by step 9 Pay close attention to make sure you are using the correct hardware in each step Using incorrect hardware may result in improper assembly 10 ...

Страница 15: ...ER I MODEL 54013 6 6 FT DECK MODEL 5406 7 PICNIC TABLE AND BENCHES MODEL 5420 8 BRIDGE MODEL 5422 9 4 POSITION SWING BEAM 2 MODEL 5404 1 MODEL 5405 10 5 FT x 28 IN ROCKWALL MODEL 5408 11 SPIRAL SLIDE MODEL 1808 12 10 ROCKET SLIDE 2 MODEL 1810 13 12 ROCKET SLIDE MODEL 1811 14 14 ROCKET SLIDE MODEL 1812 2 BALCONY MODEL 5412 Meijer com ...

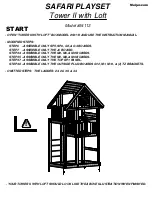
Страница 16: ...ASSEMBLE ONLY THE M2 M8 M9 BOARDS STEP 37 ASSEMBLE ONLY THE TOP RP1 PANEL STEP 40 ASSEMBLE ONLY THE OUTSIDE PLUG BOARDS G12 M1 M13 2 TZ BRACKETS OMITTED STEPS THE LADDER 24 26 39 43 START 1 2 3 4 5 6 7 8 9 10 11 12 13 14 15 13 12 11 10 9 8 7 6 5 4 3 2 1 1 2 3 4 5 6 7 8 9 10 11 12 13 14 15 16 17 18 19 20 21 22 23 22 21 20 19 18 17 16 15 14 13 12 11 10 9 8 7 6 5 4 3 2 1 YOUR TOWER II WITH LOFT SHOUL...

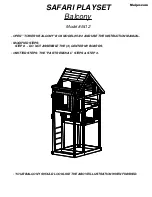
Страница 17: ...WER II BALCONY BOX MODEL 5412 AND USE THE INSTRUCTION MANUAL MODIFIED STEPS STEP 8 DO NOT ASSEMBLE THE 3 CENTER M1 BOARDS OMITTED STEPS THE PART REMOVAL STEPS STEP 3 YOUR BALCONY SHOULD LOOK LIKE THE ABOVE ILLUSTRATION WHEN FINISHED Meijer com ...

Страница 18: ...el 5416 OPEN CABIN KIT BOX MODEL 5416 AND USE THE INSTRUCTION MANUAL BUILD CABIN KIT FOR TOWER II LOCATED AFTER THE TOWER I INSTRUCTIONS IN THE MANUAL YOUR CABIN KIT SHOULD LOOK LIKE THE ABOVE ILLUSTRATION WHEN FINISHED Meijer com ...

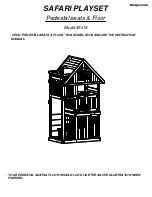
Страница 19: ...RI PLAYSET Pedestal seats Floor Model 5418 OPEN PEDESTAL SEATS FLOOR BOX MODEL 5418 AND USE THE INSTRUCTION MANUAL YOUR PEDESTAL SEATS FLOOR SHOULD LOOK LIKE THE ABOVE ILLUSTRATION WHEN FINISHED Meijer com ...

Страница 20: ...ECK SIDE ONLY STEP 17 DO NOT ASSEMBLE THE LOWEST R2 BOARD ON THE DECK SIDE ONLY STEP 21 DO NOT ASSEMBLE THE M1 M13 BOARDS ON THE LEFT SIDE OF THE DECK SIDE ONLY STEP 22 DO NOT ASSEMBLE THE LEFT MOST M13 BOARD ON THE DECK SIDE ONLY OMITTED STEPS 19 23 24 26 27 PLACE YOUR TOWER I APPROXIMATELY 52 AWAY FROM TOWER II TO ALLOW EASY ASSEMBLY OF BRIDGE COMPONENT MAKE SURE YOUR TOWERS ARE ORIENTED AS SHOW...

Страница 21: ... MODEL 5406 AND USE THE INSTRUCTION MANUAL MODIFIED STEPS STEPS 22 23 24 ADD A PLUG TO THE LADDER REAR SIDE OF DECK FRONT SIDE DOES NOT REQUIRE A PLUG OMITTED STEPS 1 2 3 5 26 27 YOUR 6 FOOT DECK SHOULD LOOK LIKE THE ABOVE ILLUSTRATION WHEN FINISHED Meijer com ...

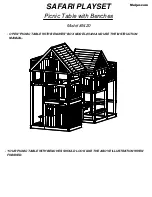
Страница 22: ...SET Picnic Table with Benches Model 5420 OPEN PICNIC TABLE WITH BENCHES BOX MODEL 5420 AND USE THE INSTRUCTION MANUAL YOUR PICNIC TABLE WITH BENCHES SHOULD LOOK LIKE THE ABOVE ILLUSTRATION WHEN FINISHED Meijer com ...

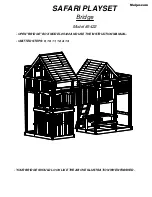
Страница 23: ...SAFARI PLAYSET Bridge Model 5422 OPEN BRIDGE BOX MODEL 5422 AND USE THE INSTRUCTION MANUAL OMITTED STEPS 9 10 11 12 13 YOUR BRIDGE SHOULD LOOK LIKE THE ABOVE ILLUSTRATION WHEN FINISHED Meijer com ...

Страница 24: ...Swing Beam Model 5405 OPEN 2 2 POSITION SWING BEAM BOX MODEL 5404 1 4 POSITION SWING BEAM BOX MODEL 5405 AND USE THE INSTRUCTION MANUALS YOUR 4 POSITION SWING BEAM SHOULD LOOK LIKE THE ABOVE ILLUSTRATION WHEN FINISHED Meijer com ...

Страница 25: ...SAFARI PLAYSET 5 x 28 Rockwall Model 5408 OPEN 5 x 28 ROCKWALL BOX MODEL 5408 AND USE THE INSTRUCTION MANUAL YOUR 5 x 28 ROCKWALL SHOULD LOOK LIKE THE ABOVE ILLUSTRATION WHEN FINISHED Meijer com ...

Страница 26: ...PLAYSET 7 Spiral Slide Model 1808 OPEN 7 FT SPIRAL SLIDE BOX MODEL 1808 AND USE THE INSTRUCTION MANUAL OMITTED STEPS 1 2 YOUR 7 FT SPIRAL SLIDE SHOULD LOOK LIKE THE ABOVE ILLUSTRATION WHEN FINISHED Meijer com ...

Страница 27: ...1812 OPEN 14 ROCKET SLIDE BOX MODEL 1811 AND USE THE INSTRUCTION MANUAL OMITTED STEPS 1 2 REPEAT PROCESS TO ATTACH 10 12 ROCKET SLIDES FINISHED YOUR 10 12 14 ROCKET SLIDES SHOULD LOOK LIKE THE ABOVE ILLUSTRATION WHEN FINISHED 1812 1810 1810 1811 Meijer com ...

Страница 28: ...s stated in the applicable Assembly Manual Acts of nature including but not limited to wind storms hail floods excessive water exposure Improper installation including but not limited to installation on uneven unlevel or soft ground Minor twisting warping checking or any other natural occurring properties of wood that do not affect performance or integrity Backyard Discovery products have been des...

Отзывы: