BaByliss ST495E Скачать руководство пользователя страница 5

8

9

USE

Warning: hot surfaces! Do not let your fingers touch the metal parts of the appliance. 

When in use, take care to keep the appliance from coming into contact with scalp, 

face, ears and neck.

Avoid directing steam toward face or neck.

•  Carefully untangle hair. Secure top sections of hair with clips to start working on 

bottom sections of hair first.

• Plug in the appliance and switch on.

• Set the desired temperature using the temperature setting selector (+ and - buttons). 

We recommend using a lower temperature for fine, bleached and/or damaged hair, 

and a higher temperature for curly, thick and/or difficult-to-style hair. As each hair type 

is different, we recommend that you start with the lowest heat setting first. You can 

gradually increase the heat setting with each successive use, if needed. Refer to the 

table below as a guide:

Temperature

Hair type

150 – 170 °C

Green LED - Yellow LED

Fine, bleached and/or 

damaged hair

170 – 210 °C

Yellow LED - Red LED

Normal, coloured and/or 

wavy hair

210 – 230 °C

Red LED

Thick and/or very curly hair

• The 

LED 

indicator light blinks until the selected temperature has been reached. 

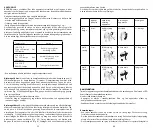
To straighten hair: We recommend you activate the steam function using the steam 

function button (1). The steam function LED indicator (2) lights up. The steam feature 

is instant, you can start straightening your hair right away. Take up a section about 5 

cm wide and place it between the 2 heating plates, near the roots of your hair. Close 

the appliance and keep the plates closed by using your other hand, while taking care 

not to touch the plates with your hands. Slowly slide the appliance down the whole 

section of hair from the roots to the tips (Fig. 2). Repeat several times if necessary and 

repeat this step around the head.

• Let the hair cool down before you comb it. 

• After use, switch off and unplug the appliance. • Allow the unit to cool before storing.

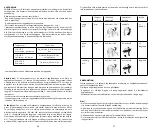
To curl the hair: you must first deactivate the steam function to properly curl your 

hair. We also recommend that you curl your hair without first straightening it. Take 

up a section about 2 to 4 cm wide and place it between the 2 heating plates, near the 

roots of your hair. Turn the appliance 180° or 360° inwards or outwards, depending on 

the desired effect (Fig. 3). Slowly slide the straightener in a continuous fashion down 

the entire section of hair, from the roots to the tips, using your other hand to keep 

the plates firmly closed around the hair (Fig. 4-5). Remove the straightener and twist 

the section with your fingers so that it falls into its natural position (Fig. 6). Repeat if 

necessary. You may wish to set the curls using a light misting of hairspray. 

Several curling methods are available depending on the desired type of curl. Refer to 

the table below for more details.

section 

thickness

turns around the 

appliance

appliance 

position

movement

wave 

ripple

4cm

half turn - 180°

180°

vertical

quicker

loose curl 


3 cm

full turn - 360°

360°

horizontal

slower

tight curl 


2 cm

full turn - 360°

360°

horizontal

slow

STEAM FUNCTION

Turn on the appliance and activate the steam function using the steam function 

button. The steam function LED indicator lights up.

If no steam comes out: 

•  the appliance may have switched to standby mode. Open or close the appliance 

plates; the steam function will be reactivated. 

• the water tank may be empty (to fill the tank, see above).

Notes:

•  The first time you use the appliance, you may notice a slight odour: this is quite 

normal and it will disappear the next time you use it.

•  Each time you use the appliance, you may see some steam. This can be caused by 

sebum evaporation or traces of hair products (rinse-free treatments, hairspray, etc.).

• It is possible to use a heat protection spray for optimal protection of the hair. 

•  It is quite normal to hear a slight noise, similar to a crackle: this is the characteristic 

noise of the ion generator. 

Содержание ST495E

Страница 1: ...ST495E Fabriqu en Chine Made in China C167b...

Страница 2: ...vibles 8 pour augmenter l efficacit du lissage gr ce une r partition uniforme de la m che de cheveux sur les plaques chauffantes Embouts amovibles 9 pour r aliser le lissage ou le bouclage avec pr cis...

Страница 3: ...rm es en s aidant de l autre main tout en prenant soin de ne pas toucher les plaques de la main Faire glisser l appareil lentement sur toute la longueur de la m che des racines aux pointes Fig 2 R p t...

Страница 4: ...tened hair Micro steam protects each hair fibre while allowing hair to be perfectly straightened from the root resulting in bouncier softer and shinier hair The straightener s steel casing provides lo...

Страница 5: ...the appliance Allow the unit to cool before storing To curl the hair you must first deactivate the steam function to properly curl your hair We also recommend that you curl your hair without first str...

Страница 6: ...halter Dampffunktion 1 LED Kontrollleuchten zur Anzeige der Dampffunktion 2 Temperaturregler 3 5 Stufen 150 C 170 C 190 C 210 C 230 C LED Kontrollleuchten 4 zur Anzeige der gew hlten Temperaturstufe I...

Страница 7: ...u ber hren Das Ger t langsam von den Wurzeln in Richtung Spitzen an der Str hne entlang gleiten lassen Abb 2 DenVorgang bei Bedarf mehrmals wiederholen und das gesamte Haar auf dieseWeise bearbeiten D...

Страница 8: ...dankzij de microstoom die de haarvezels omhult voor een stevige bescherming en prachtig haar nog soepeler zachter en glanzender Krullen blijven lang in model dankzij de stalen afwerking van de stijlt...

Страница 9: ...n gesloten met uw andere hand Zorg ervoor dat u de platen niet met uw hand aanraakt Laat het apparaat langzaam over de hele lok glijden vanaf de wortels tot aan de punten Fig 2 Herhaal deze handeling...

Страница 10: ...iaio del lisciacapelli che fornisce uno scorrimento senza eguali sui capelli CONSULTARE PRIMA LE ISTRUZIONI PER LA SICUREZZA CARATTERISTICHE DEL PRODOTTO Piastre professionali BaByliss Diamond Ceramic...

Страница 11: ...uire operando sul resto dei capelli Lasciare raffreddare i capelli e pettinare Dopo l utilizzo spegnere e scollegare l apparecchio Lasciare raffreddare completamente l apparecchio Per arricciare i cap...

Страница 12: ...ias al acabado en acero del alisador que ofrece un deslizamiento extraordinario por el cabello CONSULTAR PREVIAMENTE LAS MEDIDAS DE SEGURIDAD CARACTER STICAS DEL PRODUCTO Placas profesionales BaByliss...

Страница 13: ...ayud ndose con la otra mano teniendo cuidado de no tocar las placas con la mano Deslizar el aparato lentamente sobre toda la extensi n del mech n de las ra ces a las puntas Fig 2 Repetir la operaci n...

Страница 14: ...nda mais flex veis suaves e brilhantes Carac is resistentes gra as ao acabamento em a o do alisador que permite ao alisador deslizar perfeitamente pelos seus cabelos CONSULTE COM ANTECED NCIA AS INDIC...

Страница 15: ...que a entre as 2 placas aquecedoras perto da raiz dos cabelos Feche o aparelho e mantenha as placas fechadas com a outra m o tendo cuidado para n o tocar nas placas Deslize o aparelho lentamente por t...

Страница 16: ...fekt glatning eller perfekte kr ller Perfekt glatning helt fra roden takket v re mikrodampen der omhyller h rfiberen for en st rre og optimal beskyttelse af h ret endnu smidigere endnu bl dere og endn...

Страница 17: ...og afslut med at rede det Sluk efter brug for apparatet og tag stikket ud af kontakten Lad apparatet k le af inden det l gges p plads Kr lning af h ret Det er vigtigt at deaktivere dampfunktionen for...

Страница 18: ...PRODUKTEGENSKAPER BaByliss Diamond Ceramic plattor f r professionellt bruk 39 mm x 100 mm ngfunktion Knapp f r ngfunktion 1 Lampa f r ngfunktion 2 Temperaturv ljare 3 5 niv er 150 C 170 C 190 C 210 C...

Страница 19: ...dra ur v ggkontakten efter anv ndning L t apparaten svalna innan du st ller undan den Locka h ret Det r viktigt att inaktivera ngfunktionen f r effektiv lockning av h ret Vi rekommenderar ven att du i...

Страница 20: ...Ceramic 39 mm x 100 mm Dampfunksjon Knapp for dampfunksjon 1 LED lys for dampfunksjonen 2 Temperaturvelger 3 5 niv er 150 C 170 C 190 C 210 C 230 C LED lys 4 som indikerer det valgte temperaturniv et...

Страница 21: ...trekk st pslet ut av stikkontakten La apparatet avkj les f r det legges p plass For kr lle h ret det er viktig deaktivere dampfunksjonen for kr lle h ret effektivt Vi anbefaler ogs ikke rette h ret f...

Страница 22: ...mm x 100 mm H yrytoiminto H yrytoimintopainike 1 H yrytoiminnon LED merkkivalo 2 L mp tilan valitsin 3 5 tasoa 150 C 170 C 190 C 210 C 230 C LED merkkivalot 4 ilmaisevat valitun l mp tilatason Ionic...

Страница 23: ...a ja kytke laite irti verkkolaitteesta k yt n j lkeen Anna laitteen j hty ennen s ilytt mist Hiusten kiharrus on t rke poistaa h yrytoiminto k yt st hiusten kihartamisen ajaksi Suosittelemme my s ette...

Страница 24: ...t ysin j htynyt Tyhjenn vesis ili jokaisen k ytt kerran j lkeen Puhdista levyt pehme n ja kostean liinan avulla ilman pesuainetta jotta levyt s ilyisiv t optimaalisen laatuisina l raaputa levyj T yt...

Страница 25: ...48 49 150 170 C LED LED 170 210 C LED LED 210 230 C LED 1 LED 2 5 2 Fig 2 2 4 2 180 360 Fig 3 Fig 4 5 Fig 6 4 cm 180 180 3 cm 360 360 2 cm 360 360...

Страница 26: ...rt ly kiemel s hez 7 A kivehet bont f s k 8 egyenletesen oszlatj k el a hajtincset a f t lap fel let n n velve gy a sim t s hat konys g t Levehet v d kupak 9 a hajsim t shoz s a g nd r tincsek prec z...

Страница 27: ...ztassa v gig a hajtincs teljes hossz n a hajt t l a hajv gekig 2 bra Sz ks g eset n ism telje meg t bbsz r a m veletet s az el bbiekben ismertetett mozdulattal haladjon v gig a haj teljes eg sz n Hagy...

Страница 28: ...otacza w kna w os w wyg adza je i zwi ksza ochron Dodaje im blasku elastyczno ci i sprawia e s mi kkie Loki utrzymuj si d u ej dzi ki stalowemu wyko czeniu prostownicy zapewnia w ten spos b niepowtar...

Страница 29: ...o grzebieniem Po u yciu wy czy urz dzenie Przed schowaniem zostawi urz dzenie do ostygni cia W przypadku kr cenia w os w nale y pami ta aby przed przyst pieniem do pracy wy czy funkcj pary Zalecamy te...

Страница 30: ...mm Funkce napa ov n Tla tko pro ovl d n p ry 1 Sv teln kontrolka LED ozna uj c funkci p ry 2 Tla tko pro volbu teploty 3 5 mo nost 150 C 170 C 190 C 210 C 230 C Sv teln kontrolka LED 4 ozna uj c v i z...

Страница 31: ...te h ebenem Po pou it p stroj vypn te a odpojte ze s t Ne p stroj uklid te nechte jej nejd ve vychladnout Kulmov n pro efektivn kulmov n je d le it vypnout funkci p ry Rovn doporu ujeme vlasy p edem n...

Страница 32: ...Pozor p stroj mus zcela vychladnout Po ka d m pou it z sobn k na vodu vypr zdn te O ist te desti ky pomoc jemn ho vlhk ho had ku bez sapon tu aby byla zachov na jejich optim ln kvalita Desti ky neo kr...

Страница 33: ...64 65 2 150 170 C LED LED 170 210 C LED LED 210 230 C LED 1 LED 2 5 2 2 2 4 2 180 360 3 4 5 6 4 180 180 3 360 360 2 360 360...

Страница 34: ...kapatma d mesi 5 Otomatik kapatma Su haznesi 6 Su haznesini karma d mesi 7 Sa tutam n s nan plakalar zerine d zenli ekilde da tarak d zle tirmenin verimlili ini art rmak i in kar labilir z c taraklar...

Страница 35: ...rak i lemi sonland r n Kullan m n ard ndan cihaz kapat n ve fi ini ekin Cihaz toplamadan nce so umas n bekleyin Sa lar bukle yapmak i in Sa lar n z etkili ekilde bukle yapmak i in buhar zelli ini devr...

Страница 36: ...r s k n Dikkat cihaz tamamen so umu olmal d r Her kullan m n ard ndan su haznesini bo altmay unutmay n Plakalar n ideal kalitesini korumak i in deterjan kullanmadan nemli ve yumu ak bir bezle plakalar...

Страница 37: ......

Отзывы: