background image

17

User Instruc

tions:

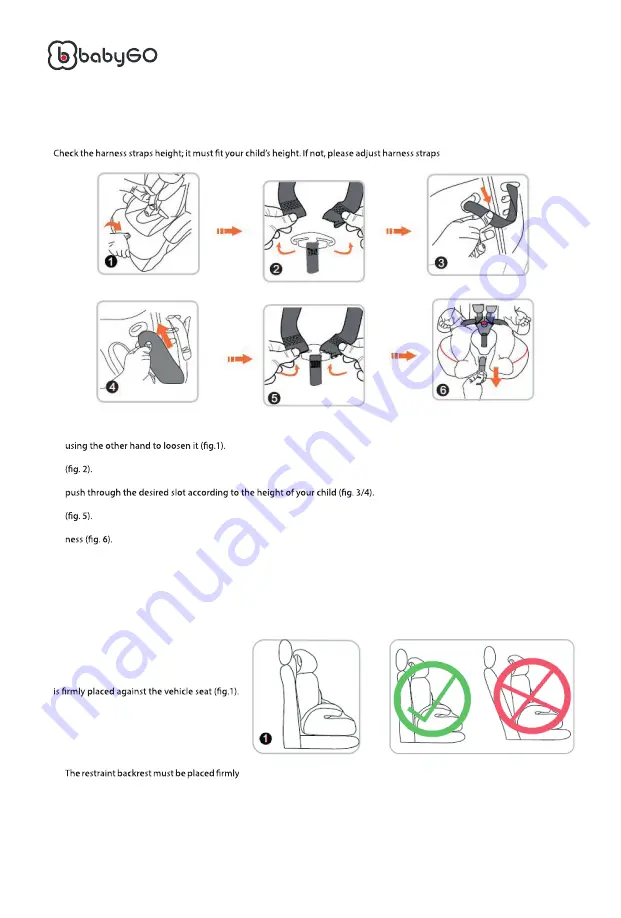
Adjustment of harness straps

height.

1.   Press the harness adjuster lever with one hand, then pull the shoulder belt harness forward 

2.   Remove the shoulder belt harness from the metal yoke on the back of the restrain system  

3.   From the back of the restraint, pull the shoulder belt harness out of the harness slot, then 

4.   At the back of the restraint, re-attach the shoulder belt harness onto the metal harness yoke 

5.   Pulling the end of the harness adjust the strap towards you to tighten the shoulder belt har-

Group I (for children 9 – 18 kg)

Place the child car seat on a vehicle seat wit-

hout any inclination, ensuring that its backrest 

HINWEISE:

a.   Before  placing  the  restraint,  please  make 

sure that the vehicle seat back is fully up-

right.

b.   The harness strap cannot be twisted.

c.   

against the vehicle seat, without any gap.

Use differnt installing modes for different g

r

oups

17

Car Seat 


Содержание FreeMove

Страница 1: ... enfants Instructions de Montage WICHTIG FÜR SPÄTEREN GEBRAUCH AUFBEWAHREN SORGFÄLTIG LESEN IMPORTANT RETAIN FOR FUTURE REFERENCE READ CAREFULLY IMPORTANT GARDER POUR UTILISATION ULTÉRIEURE LIRE ATTENTIVEMENT Car Seat BabyGO Baby Products GmbH Am Bahndamm 1 3 33378 Rheda Wiedenbrück Germany ...

Страница 2: ...eža NAVODILA ZA MONTAŽO Kindersitz Bedienungsanleitung Child car seat ASSEMBLY INSTRUCTION Siège pour enfant INSTRUCTIONS DE MONTAGE Seggiolino per bambini ISTRUZIONI DI MONTAGGIO Asiento infan l INSTRUCCIONES DE MONTAJE Autokinderstoel MONTAGE INSTRUCTIES FR IT ES NL PL SE GR RO SLO D EN HU Scaun auto pentru copii INSTRUCȚIUNE DE MONTARE 2 Car Seat ...

Страница 3: ...3 Bedienungsanleitung D Kindersitz Bedienungsanleitung Auto Kindersitz 3 Car Seat ...

Страница 4: ...iemals auf einem Autositz mit ZweipunktSicherheitsgurt an 6 Achten Sie bitte darauf dass alle Personen im Auto den Gurt angelegt haben Gegenstände müssen ebenso sicher befestigt werden Ansonsten könnten die Personen oder Gegenstän de das Kind im Falle eines Unfalls verletzten 7 Der Kindersatz kann und darf nach einer Beschädigung durch einen Unfall nicht wiederver wendet werden 8 Setzen Sie den Ki...

Страница 5: ...n 9kg 18kg Gruppen 11 111 Nach vorne gerichtete Anbrin gung geeignet für Kinder von 22kg 36kg 5 Hinweise für die Anwendung im Fahrzeug Nur geeignet wenn die zugelassenen Fahrzeuge mit Dreipunkt Sicherheitsgurten gemäß der UN ECE Norm Nr 16 oder anderen gleichwertigen Vorschriften ausgestattet sind Wichtig Der Kindersitz ist nur geeignet für Fahrzeuge die mit DreipunktSicherheitsgurten ausgestattet...

Страница 6: ...kt Sicherheitsgurt Falsch Anbringung auf einem Quersitz Anbringung auf einem nachgestellten Sitz Falsch Die Hauptbestandteile des Kindersitzes Inneres Kissen Schnalle Basis Kopfstütze Kopfkissen Sitzbezug Schulterpolster Schultergurte Schnalle und roter Knopf Gurtschild Einstellungsriemen des Gurtzugs Einstellungs riemen Kopfstütze roter Knopf Kopfstütze Gurt Schultergurt Schlitz Schultergurt Gurt...

Страница 7: ...es Kindes Abb 3 4 4 Befestigen Sie die Schultergurte wieder am Metallbügel auf der Rückseite des Sitzes Abb 5 5 Ziehen Sie das Ende des Einstell Gurtes heraus um das Schulter Gurtzeug festzuziehen Abb 6 Gruppe I Für Kinder von 9 18 KG HINWEISE 1 Der Kindersitz muss auf dem Autositz ange bracht werden Hierbei sollte der Autositz bzw die Rückenlehne gerade sein damit der Kindersitz optimal angebrach...

Страница 8: ...es damit sie nicht durchhängen Drücken Sie den Gurt dann solange in das Schloss bis Sie ein Klick hören Abb 2 3 Drücken Sie den Schnellverstellhebel mit einer Hand und ziehen Sie mit der anderen Hand das Schulter Gurtzeug nach vorne Dann können Sie den He bel wieder loslassen Abb 3 4 Schieben Sie dann die Gurte zur Seite Abb 4 8 Car Seat ...

Страница 9: ...hen Sie sachte den Gurt in Ihre Richtung um das Gurtzeug passend für Ihr Kind anzupassen Abb 7 8 Die Gurte müssen eng am Kind anliegen und dürfen nicht locker sitzen Sie müssen relativ gerade sein und sollten nicht durchhängen Außerdem dürfen die Gurte nicht drücken Über prüfen Sie alle Gurte und stellen Sie sie entsprechend ein Abb 8 len aus dem Schloss und nehmen Sie das Baby aus dem Sitz Gruppe...

Страница 10: ...Höhe Abb 17 8 Bringen Sie den Kindersitz nach vorne gerichtet auf dem Autositz an und stellen Sie die Kopf stütze passend ein Achten Sie bitte darauf dass der Sitz korrekt angebracht ist 9 Führen Sie den Dreipunkt Gurt Becken und Schultergurt durch den Schlitz für die Gurtfüh für den Schultergurt damit er nicht drückt Stecken Sie die beiden Steckschnallen zusammen und legen Sie die Gurte an sie si...

Страница 11: ...tz Nehmen Sie dann den Bezug vom Sitz Abb 24 25 Wichtig Der Bezug ist einer der Sicherheitsbestandteile des Sitzes Benutzen Sie den Kindersitz niemals ohne den Bezug Der Bezug ist austauschbar und kann bei 30 C gewaschen werden Nicht in den Trockner geben Sollten Sie an dere Bezüge verwenden könnte das im Falle eines Unfalls schlimme Folgen haben da Ihr Kind so möglicherweise nicht richtig geschüt...

Страница 12: ...12 Car Seat ...

Страница 13: ...13 Assembly Instruction Child car seat ASSEMBLY INSTRUCTION EN Child car seat 13 Car Seat ...

Страница 14: ...ith 2 point car safety belt 6 Please ensure all occupants of a vehicle use a safety belt Any items in the car must be securely on 7 Child car seat cannot be reused if damaged as a result of an accident 8 Keep the child car seat out of direct sunlight otherwise high temperature can hurt your child 9 Buckle cannot be in semi locked position Always make sure the restraint is locked before using In ca...

Страница 15: ...tem Group I forward facing installation suitable for a child weighing from 9 kg to 18 kg Group II III forward facing installation suitable for a child weighing from 22 kg to 36 kg 15 Notes to vehicle application Regulation No 16 or other equivalent standards Important The child car seat is only suitable for vehicles equipped with 3 point safety belts Please read the instructions carefully to learn...

Страница 16: ...des of the back seat Correct Back middle seat 2 point safety belts Incorrect Placed in the transverse seat Incorrect Placed in the postpositive seat Incorrect Features of the child car seat Inner cushion Buckle Base Headrest Head Cushion Seat cover Shoulder pad Shoulder straps Buckle red button Buckle pad Harness adjuster Adjuster strap Headrest red button Headrest belt Shoulder strap slot Shoulde...

Страница 17: ...ck of the restraint re attach the shoulder belt harness onto the metal harness yoke 5 Pulling the end of the harness adjust the strap towards you to tighten the shoulder belt har Group I for children 9 18 kg Place the child car seat on a vehicle seat wit hout any inclination ensuring that its backrest HINWEISE a Before placing the restraint please make sure that the vehicle seat back is fully up r...

Страница 18: ...icle seat while pulling the shoulder portion of the vehicle belt to remove slack and tighten the lap portion of the vehicle belt and then buckle it until you hear a noticeable click 3 Press the harness adjuster lever with one hand then pull the shoulder belt 4 To unfasten the harness release the buckle by sliding the red button towards 18 Car Seat ...

Страница 19: ...buckle tongues 7 Gently pull the harness adjust straps towards you to tighten the harness for a comfortable 8 The harness straps must be snug against the child A snug strap should not allow any slack push the child s body into an unnatural position Check the harness straps near the shoulders then take out the child Group II III for children 15 25 kg with a backrest 19 Car Seat ...

Страница 20: ...gh the belt guide slot at the car seat base body Put the two buckle clips together then fasten buckle and harness clips until you hear a Group II III for children 15 25 kg without a backrest 1 Halten Sie die Rückenlehne fest und drücken Sie sie nach hinten Abb 19 1 2 Press the base with your hand and pull the backrest out from base with your other hand 20 Car Seat ...

Страница 21: ... cover is a safety feature Never use the child seat without it Do not put your child s safety at risk by using any other replacement covers as they could prevent the child seat from protecting your child as well as the origi nal cover should Washing instructions The cover is removable and washable at 30 C line dry only The cradle safety belts and plastic components can be washed with soft scour an...

Страница 22: ...22 Car Seat ...

Страница 23: ...23 Siège pour enfant Instructions de Montage Siège pour enfant INSTRUCTIONS DE MONTAGE FR 23 Car Seat ...

Страница 24: ...nts du véhicule utilisent leur ceinture de sécurité Tout objet transporté dans la voiture doit être solidement attaché Dans le cas contraire des per sonnes ou des objets pourraient blesser un enfant lors d un éventuel freinage d urgence 7 Le siège enfant ne doit pas être réutilisé s il a été endommagé lors d un accident 8 N exposez pas le siège enfant directement au soleil la chaleur pourrait fair...

Страница 25: ...e convient à un enfant pesant de 9 à 18 kg Groupes II et III Installation face à la route convi ent à un enfant pesant de 22 à 36 kg 25 Notes concernant l utilisation dans le véhicule Ne convient qu aux véhicules équipés de ceintures de sécurité à 3 points homologuées selon la norme CEE ONU n 16 ou toute autre norme équivalente Important Le siège auto pour enfants ne convient qu aux véhicules équi...

Страница 26: ...einture à 2 points Non Sur un siège transversal Non Sur un siège supplémentaire Non Eléments du siège auto pour enfant Coussin d assise Fermoir Base Appuie tête Coussin de nuque Housse de diège Protection d épaule Sangles d épaule Bouton rouge du fermoir Coussinet de protection du fermoir Réglage du harnais Sangle de réglage du harnais Bouton rouge de l appuie tête Tendeur de l appuie tête Fente d...

Страница 27: ...nfants entre 9 et 18 kg 1 Placez le siège enfant sur le siège du vé hicule sans l incliner en vous assurant que son dossier soit fermement appuyé sur le NOTES a Avant d installer le dispositif de retenue assurez vous que le siège du véhicule soit totalement vertical b La sangle du harnais ne doit pas être vrillée c Le dossier du dispositif de retenue doit être fermement appuyé contre le siège du v...

Страница 28: ...sur le dossier du siège du véhicule tout en tirant la partie diagonale de la ceinture de sécurité du véhicule pour éviter tout jeu Reserrez la partie ventrale de la ceinture du véhicule puis engagez la boucle jusqu à entendre un perceptible 3 Appuyez sur la manette de réglage du harnais avec une main et tirez les san 4 Pour détacher le harnais déverrouillez le fermoir en coulissant le bouton rouge...

Страница 29: ...s sur l enfant Une sangle convenablement ajustée ne doit pas présenter de jeu Elle doit être pratiquement en ligne droite et sans jeu e l l e r u t a n n o n e r u t s o p e n u s n a d s a p e s s u o p e l e n t e t n a f n e l e d u a e p a l r u s s a p e i u p p a n e l l E Contrôlez les sangles du harnais près des épaules pour détecter un jeu éventuel et réglez l enfant Groupes II III pour e...

Страница 30: ...le guide de la base du siège auto et à sa partie postérieure Assurez vous que la ceinture de sécurité soit bien à plat et non vrillée A l arrière du siège auto choisissez au niveau de l épaule le guide de ceinture qui se trouve à la bonne hauteur par rapport à la taille de l enfant Positionnez l attache de ceinture Groupes II III pour enfants de 15 à 25 kg sans dossier 1 2 Appuyez sur la base avec...

Страница 31: ...ositif de sécurité N utilisez jamais le siège auto sans elle Ne mettez pas la sécurité de votre enfant en danger en utilisant d autres housses de remplacement elles pourraient empêcher le siège auto de pro téger votre enfant aussi bien que la housse originale Instructions de lavage La housse est amovible et lavable à 30 C sécher à plat uniquement Les san gles et les composants en plastique de la c...

Страница 32: ...112 Car Seat ...

Страница 33: ...3 RO Scaun auto pentru copii INSTRUCȚIUNE DE MONTARE Scaun auto pentru copii Instrucțiune de montare 113 Car Seat ...

Страница 34: ...igurați văîntotdeaunacădispozitivuldeblocare este blocat înainte de utilizare În caz de urgență copilul poate fi scos rapid 10 Țineți scaunul auto pentru copii departe de orice articole erozive 11 Nu folosiți niciodată scaunul auto pentru copii fără husă Nu utilizați niciodată o husă care nu este recomandată de producător pentru a înlocui husa veche deoarece husa face parte integ rantă din sistemu...

Страница 35: ...I III instalare cu fața la direcția de deplasare adecvată pentru un copil cu greutatea cuprinsă între 22 kg și 36 kg Este adecvat numai dacă vehiculele aprobate sunt echipate cu centuri de siguranță cu 3 puncte aprobate prin Reglementarea UN ECE nr 16 sau alte standarde echivalente Important Scaunul auto pentru copii este adecvat numai pentru vehiculele echipate cu centuri de siguranță cu 3 puncte...

Страница 36: ... fi utilizate pentru scaunul auto pentru copii Pernă interioară Husa scaunului Curea dispozitiv de ajustare Locaș de ghidare a curelei 116 Car Seat Plasat în direcția de deplasare Plasat contra direcției de deplasare Centuri de siguranță cu 2 puncte Centuri de siguranță cu 3 puncte Scaunul din față Ambele laturi ale banchetei din spate Scaun central din spate centuri de siguranță cu două puncte Pl...

Страница 37: ... de înălțimea copilului fig 3 4 În partea din spate a dispozitivului de reținere remontați centurile de umăr în clema metalică fig 5 Trăgând capătul centurii reglați cureaua spre dvs pentru a strânge centura de umăr fig 6 Folosiți diferite moduri de instalare pentru diferite grupe Grupa I pentru copii în intervalul 9 18 kg Așezați scaunul auto pentru copii pe scaunul autovehiculului fără nicio înc...

Страница 38: ...lui în timp ce trageți porțiunea centurii de umăr a autovehiculului spre a micșora partea liberă și strângeți porțiunea mediană a centurii autovehiculului iar apoi închideți catarama până când auziți un clic fig 2 Apăsați maneta de reglare cu o mână apoi trageți înainte centura de umăr cu mâna cealaltă pentru a o slăbi fig 3 Pentru a desface hamul eliberați catarama prin glisarea butonului roșu Ap...

Страница 39: ... asigura că lamelele Trageți ușor bretelele de reglare a hamului spre dvs pentru a strânge hamul pentru o poziționare sa permită niciun joc sau elasticitate îndepărtați catarama apoi scoateți copilul Grupele II III copii cu greutatea cuprinsă între 15 și 25 kg cu spătar 119 Car Seat ...

Страница 40: ...oateți clema de metal din cureaua de reglare fig 15 Scoateți cureaua de reglare din bază fig 16 Reglați tetiera la înălțimea corectă fig 17 Poziționați scaunul pe scaunul vehiculului orientat în față și reglați tetiera în poziția potrivită apoi așezați copilul în scaunul auto fig 17 Trageți centura cu trei puncte centura mediană și centura de umăr prin orificiul de ghidare a centurii de la baza sc...

Страница 41: ...Îndepărtați husa scaunului auto fig 24 25 Important Husa este un accesoriu de siguranță Nu folosiți niciodată scaunul auto pentru copii fără ea Nu puneți în pericol siguranța copilului prin utilizarea altor huse înlocuitoare deoarece acestea ar putea împiedica scaunul pentru copii să vă protejeze copilul în modul în care o face husa originală Instrucțiuni pentru spălare Husa este detașabilă și lav...

Страница 42: ...Impressum BabyGO Baby Products GmbH Am Bahndamm 1 3 D 33378 Rheda Wiedenbrück Germany Tel 0049 5242 418 86 81 Fax 0049 5242 418 86 80 e mail info babygo eu web www babygo eu ...

Отзывы: