Page 2 of 3
ASSEMBLY INSTRUCTIONS:
Thank you for choosing this quality product. Be sure to
check all packaging materials carefully for small parts
that may have become loose during shipment and place
all parts on a non-abrasive surface.
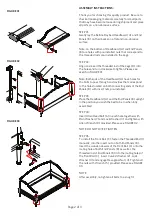
STEP #1:
Gently lay the Bellina Daybed Headboard (A) and End
Panels (B) on their backs on a flat and non-abrasive
surface.
Note: on the bottom of Headboard (A) and End Panels
(B) are holes with pre-installed nuts that correspond to
the threaded rods pre-installed in the Legs.
STEP #2:
Align and insert the threaded rod of the Legs (D) into
the holes and turn clockwise to tighten. Please see
sketch in FIGURE 01.
Note: Both ends of the Headboard (A) have holes for
the bolts to pass through and cavities that correspond
to the holes located on both connecting ends of the End
Panels (B) with insert nuts pre-installed.
STEP #3:
Place the Headboard (A) and the End Panels (B) upright
in the position you wish the bed to be in when fully
assembled.
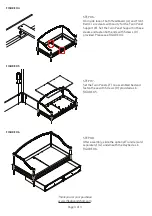
STEP #4:
Insert Allen Head Bolt (6) in each hole together with
Plain Washer (7) and Lock Washer (3) and tighten with
Allen Wrench (8) provided. Please see FIGURE 02.
NOTE: DO NOT OVER TIGHTEN
STEP #5:
To install the Front Rail (C), fasten the Threaded Rod (1)
manually into the insert nut on both End Panels (B).
Insert the wooden dowels of the Front Rail (C) onto the
mating hole of both End Panels (B) as well as the
threaded rod of End Panels (B) into the mating holes of
the Front Rail (C). Insert Curved Washer (2), Lock
Washer (3) and engage Hexagonal Nut (4). Tighten all
the nuts with Wrench (5) provided. Please see FIGURE
03.
NOTE:
After assembly, re-tighten all bolts to a snug fit.
FIGURE 01
FIGURE 02
FIGURE 03


