background image

3

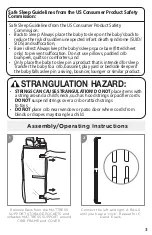
Assembly/Operating Instructions

2

1

Remove Rails from the MATTRESS 

SUPPORT STORAGE POCKETS and 

unfasten MATTRESS SUPPORT around 

CRIB FRAME and COVER.

Connect the left and right A RAILS 

until you hear a “click”. Repeat for C, 

D and E rails.

Safe Sleep Guidelines from the US Consumer Product Safety 

Commission:

•  Back to Sleep: Always place the baby to sleep on the baby’s back to 

reduce the risk of sudden unexpected infant death syndrome (SUID/

SIDS) and suffocation;

•  Bare is Best: Always keep the baby’s sleep space bare (fitted sheet 

only) to prevent suffocation. Do not use pillows, padded crib 

bumpers, quilts or comforters; and 

•  Only place the baby to sleep in a product that is intended for sleep. 

Transfer the baby to a crib, bassinet, play yard or bedside sleeper if 

the baby falls asleep in a swing, bouncer, lounger or similar product.

Safe Sleep Guidelines from the US Consumer Product Safety 

Commission:

  STRINGS CAN CAUSE STRANGULATION! DO NOT place items with 

a string around a child’s neck, such as hood strings or pacifier cords. 

DO NOT suspend strings over a crib or attach strings 

to toys.

•  DO NOT place crib near window or patio door where cords from 

blinds or drapes may strangle a child.

STRANGULATION HAZARD:

Содержание Horizon BD06210

Страница 1: ...com BD06210 BD06190 BD06240 MADE IN CHINA Storage Bag Crib Frame with Cover Mattress Support A Rails left and right B Rails left and right C Rails left and right D Rails left and right E Rails left a...

Страница 2: ...bly instructions could result in serious injury or death DO NOT use this crib if you cannot exactly follow the accompanying instructions To reduce the risk of SIDS pediatricians recommend healthy infa...

Страница 3: ...space bare fitted sheet only to prevent suffocation Do not use pillows padded crib bumpers quilts or comforters and Only place the baby to sleep in a product that is intended for sleep Transfer the b...

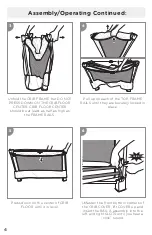
Страница 4: ...AILS Press down on the center of CRIB FLOOR until it is level Pull up on each of the TOP FRAME RAILS until they are securely locked in place Unfasten the front bottom corners of the CRIB COVER lift CO...

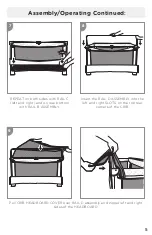
Страница 5: ...ottom with RAIL B ASSEMBLY Insert the RAIL D ASSEMBLY into the left and right SLOTS on the top rear corners of the CRIB 9 Pull CRIB HEADBOARD COVER over RAIL D assembly and zipper left and right sides...

Страница 6: ...the left and right SLOTS on the top front corners of the CRIB until you hear a click Fasten CRIB COVER HEADBOARD COVER with hook and loops on the left and right side Pull CRIB COVER over RAIL E assemb...

Страница 7: ...til tight Place MATTRESS SUPPORT inside the crib with INSTRUCTION POCKET facing up 16 Store this INTRUCTION BOOKLET in this pocket for future reference and place MATTRESS not included see the followin...

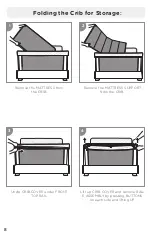
Страница 8: ...ib for Storage 1 3 2 4 Remove the MATTRESS from the CRIB Unzip CRIB COVER under FRONT TOP RAIL Remove the MATTRESS SUPPORT from the CRIB Lift up CRIB COVER and remove RAIL E ASSEMBLY by pressing BUTTO...

Страница 9: ...ght sides of the CRIB and B RAIL ASSEMBLY on the rear bottom of CRIB by pressing BUTTONS on each side and lifting up Unzip bottom of CRIB HEADBOARD COVER Un fasten CRIB HEADBOARD COVER on the left and...

Страница 10: ...NTER of the CRIB FLOOR raised squeeze the CENTER BUTTONS on the underside of each of the FRONT SIDES AND BACK RAILS and push down one at a time on each RAIL DO NOT FORCE THE RAILS DOWN IF THEY DO NOT...

Страница 11: ...to make sure it has been released WRAP the MATTRESS SUPPORT around the CRIB FRAME and secure with straps and pockets facing out Disconnect RAIL A B D and E RAIL ASSEMBLIES by pressing the button in t...

Страница 12: ...uct at no cost to you This limited warranty does not cover claims resulting from misuse failure to follow the instructions on installation maintenance and use abuse alteration involvement in an accide...

Отзывы: