background image

Installation 


Use the following steps to install your AX200 or AX300 Axle scale: 

  Select a site. 

  Check levelness and smoothness of site. 

  Unpack scales and ramps. 

  Anchor ramps to the scale and ground. 

  Connect interconnect cable to junction box and indicator. 

  Calibrate the scale base to the indicator. 


Protect vulnerable cables as needed.


Site Preparation


Avoid  overloading  the  scale  above  its  rated  capacity,  this  can  result  in  damage  to  the  scales 
electronics. Select a scale location that allows a straight path to the scale to avoid binding the 
scale.  Do  not  place  the  scale  in  an  area  that  may  receive  or  maintain  water.  If  the  scale  is 
submersed it can also result in electronic damage. 

Keep  the  interconnect  cable  between  the  scale  and  the  indicator  it  must  be  protected  against 
crushing, cutting, or moisture damage. Use conduit in areas that do not allow protection of the 
interconnect cable.  

For proper  placement the site surface should be within 

¼” from one end of the platform to the 

other. 

Unpacking


Remove all packing material and inspect scale for visible damage caused during shipment.  

Report any damages with the carrier before they leave. 

Positioning


Measure out and mark the area with chalk to ensure the scales are properly located when 
moved into position. 


Eye bolts must always be inserted into the top of the scale. Lifting should always occur with the 
top plate facing up and the eye bolts securely attached through the nuts welded to the bottom 
side of the top plate. Lifting from the bottom of the plate could cause nuts to break loose and the 
scale to fall. 


Lift the scale only with a properly designed 
spreader bar as shown below. Lifting force must 
be vertical to avoid bending the eye bolts. 

AX300 Eye bolt lifting holes 

AX200 Eye bolt lifting holes 

Содержание 911-5600

Страница 1: ...Instruction Manual AX200 AX300 Axle Scales 4 19 21 V2021 1 ...

Страница 2: ...Table of Contents 1 Table of Contents 2 2 Safety First 3 3 Introduction 4 4 Installation 5 5 Wiring Diagram 6 6 Load Cell Replacement 7 8 7 B TEK Contact Information 9 ...

Страница 3: ...Do not use this equipment for anything other than its intended use Ensure equipment is plugged into stable power sources Keep equipment away from high voltage vibration and high draft areas Keep equipment cords and cables secured and protected Perform periodic inspections to keep equipment in good working order Never apply a load over the capacity of your scale Keep the area around your scale free...

Страница 4: ... guide only and the actual installation should be performed by qualified personnel All sales of goods are subject to the standard warranty and the standard terms and conditions published by B TEK LLC Should you have any questions regarding the AX200 or AX300 Axle scales contact your local B TEK LLC scale representative Specifications ...

Страница 5: ...shing cutting or moisture damage Use conduit in areas that do not allow protection of the interconnect cable For proper placement the site surface should be within from one end of the platform to the other Unpacking Remove all packing material and inspect scale for visible damage caused during shipment Report any damages with the carrier before they leave Positioning Measure out and mark the area ...

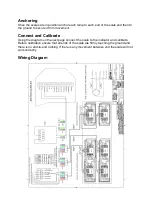
Страница 6: ...rom movement Connect and Calibrate Using the diagram on the next page connect the scale to the indicator and calibrate Before calibration ensure that all ends of the scale are firmly touching the ground and there is no end to end rocking If there is any movement between end the scale will not work correctly Wiring Diagram ...

Страница 7: ......

Страница 8: ...COTI Load Cell Wire Color Code ...

Страница 9: ...B TEK Scales LLC 1510 Metric Ave S W Canton OH 44706 Tel 330 471 8900 Fax 330 471 8909 www B TEK com ...

Отзывы: