


AirborneM2M™ User Guide
56
CONFIGURING A STATIC IP ADDRESS ON ETHERNET INTERFACE
This is not the default configuration for the Ethernet interface. It is important to verify that the address being
entered is unique to the device when on the network.
The Airborne Device does not support the ability to enable DHCP on the WLAN and Ethernet interfaces
simultaneously (when in client mode). Only one may have DHCP enabled at a time. The other interface
must be configured to use a static IP address.
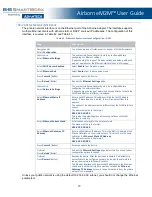
Table 30 - Configuring Static IP – Ethernet
Step
Description
Navigation Bar
Select
Configuration
You will see a group of fields under the banner
of WLAN Parameters.
Feature Link
Select
Ethernet Settings
The wireless interface and security must be
configured before configuring the Ethernet
settings.
A page showing the range of Ethernet options
and fields, setting the mode of operation for
the Ethernet interface is done in this page.
Select
Ethernet Role
Select
Client
from the drop down menu.
Press
Commit
[Button]
Saves changes to the device.
Press
Reload
[Button]
Reloads the
Ethernet Settings
page.
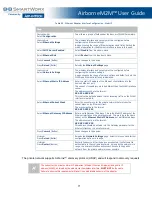
Feature Link
Select
Network Settings
The wireless interface and security must be
configured before configuring the network
settings.
A page showing the range of network options
and fields, for both the WLAN and Ethernet
interfaces, is displayed.
Select
Ethernet DHCP
Select
Disable
from the drop down menu.
Select
Ethernet Static IP Address
Enter the assigned static IP address.
The address must be in the format:
XXX.XXX.XXX.XXX
Select
Ethernet
Subnet Mask
Enter the subnet mask for the network.
The mask must be in the format:
XXX.XXX.XXX.XXX
Select
Ethernet
Gateway IP Address
Enter the assigned Gateway IP address.
The address must be in the format:
XXX.XXX.XXX.XXX
Press
Commit
[Button]
Saves changes to the device.
Optional
Press
Reload
[Button]
Reloads the
Network Settings
page. Select
this if you have further configuration options to
change.
Optional
Press
Restart
[Button]
Restarts the device. After the device is
rebooted, it will attempt to authenticate to the
configured network. As long as the network is
in range, the wireless interface will connect.
Once authenticated, the network will use the
assigned static IP address on the Ethernet
interface making IP connectivity possible over
the Ethernet network.